Friday, June 26, 2009
Raspberry Patch Crumb Bars
The temperatue outside is on the rise, so it must be raspberry picking time. I "pick" my raspberries at Sam's Club. Ha, ha, ha. No bugs, no snakes, just a polite swipe of my credit card at the check-out counter and away I go.
Today's offering is from a recipe I found on the Taste of Home web site: Raspberry Patch Crumb Bars. The crust in this recipe was a little different from what I'm used to: you cut shortening into the flour instead of butter. What?! No butter?! I don't know if I'm gonna like this....
Here are the eggs going in. Don't those yolks look bright? I've been using Egg Land's Best lately, and I really notice a difference in taste.
Here is the crust batter going into the pan. I found that the shortening produced a sticky dough, it wasn't "crumbly" in the least. I even added more flour trying to dry it out some, but I never achieved a good texture.
Aren't the raspberries beautiful? The recipe says to toss them with sugar and starch and spread over the crust. Word of WARNING: TASTE your raspberry/sugar mixture to see if it is sweet enough!!! The berries I used were so tart (lip puckering tart) they almost ruined the whole batch of cookies. I had to coat the finished bars with a thick layer of confectioner's sugar to counter the tartness.
Here is the pan right before it goes into the oven. See how lumpy the crumble looks. It's more like cookie dough than crumble. I know, I know, I'm obsessed with the crumble, but it just doesn't look right.
The finished product. The raspberries look bright and refreshing, and oh so summery.
And the crumble?
It looks okay, doesn't it?
It doesn't look lumpy, does it?
Please lie to me and tell me my crumble doesn't look lumpy.
Chocolate Cake with Bittersweet Chocolate Ganache
Today I tried a chocolate cake that was featured on Epicurious: Giant Chocolate Cake with Bittersweet Chocolate Ganache. The cake turned out just a tad dry, but the ganache was to-die-for. I made extra ganache so I could dip strawberries, blueberries, blackberries and raspberries. I had a berry dipping fest!
Here is the cake batter…
And that beautiful ganache coming together…
The final cake…
And don't forget those chocolate dipped berries. Heaven.
Oops. I ate them before I could get a picture. Sorry.
Wednesday, June 24, 2009
What's Blooming - Morning Glory
Tuesday, June 23, 2009
Peanut - One spoiled Chihuahua
Monday, June 22, 2009
Oreo Cookie n' Cream Cupcakes
This weekend I was able to kill two proverbial baking birds with one stone. I tested my fifth Yellow Cake recipe from the Cake Central June "Scratch-Off", and I tried to recreate a wonderful looking Cookies n' Cream cupcake I had seen on a blog a few months back.
Here is the end product…
So what do you think?
They look pretty good, but honestly I was a little disappointed in the overall experience. Both the cookies baked inside the cupcakes and the pieces arranged on top of the icing got very mushy and soggy. I know, I know, with all the moisture from the cake batter and icing the cookies were bound to get soft, but I naively expected the cookies to stay crisp. I wanted to bite into that cupcake and hear a satisfying cookie crunch, but instead all I got was a silent squish.
Sigh, some people are never satisfied.
Well, here's how it looks on the inside. Just remember squishy not crunchy.
White on White Buttermilk Cake
This weekend I was able to kill the two provable birds with one stone. I tested my fifth Yellow Cake recipe from the Cake Central June "Scratch-Off" and I tried to recreate a wonderful looking Cookies n' Cream cupcake I had seen on a blog a few months back.
So this time I tried the White on White Buttermilk Cake recipe.
The recipe called for your standard mixing steps. 1) sift the dry ingredients together. I didn't have any fresh buttermilk in the fridge, so I used the powdered stuff. 2) Cream the butter and sugar. 3) Add the eggs and vanilla. 4) Mix in the dry ingredients in three stages alternating with the buttermilk. I mixed the last stage of dry ingredients by hand. 5) Add in the crushed Oreo cookies. I was lazy and didn't feel like getting out the food processor to crush the cookies. I chopped them up by hand, so the pieces ended up being a little large.
Here are the cupcakes all baked up.
Here are the insides. See how big the cookie chucks are. Don't they look good?
One without any Oreos.
The final product.
Overall the White on White Buttermilk Cake recipe was good, but not the best. I found it had a strong buttermilk tang that didn't appeal to all of my tasters (the kids especially). Maybe if I had used fresh buttermilk the flavor wouldn't have been as strong, but either way the buttermilk cake was not a good complement to the Oreo cookies.
I think this will be the last yellow cake recipe that I test from the June "Scratch-Off" challenge. It was a fun experiment, but I'm getting a little burned out on yellow cake. July's challenge will be cheesecake.
Come on July.....
Cheesecake Napoleon
If you ever stumble upon a Copeland's of New Orleans restaurant stop in and have a piece of their signature cheesecake. It is light and fluffy and smooth as rich cream. The cheesecake can be decked out with a variety of toppings (praline is my favorite), but it also comes "Napoleon" style, where a layer of cheesecake is sandwiched between two layers of yellow pudding cake. Delicious.
For years I've been hunting for a copycat version of Copeland's Cheesecake Napoleon and in all that time I've only been able to find one recipe. One. In the whole world wide web. And according to that one recipe, Copeland's cheesecake is no-bake. Hummm. Like Jell-O cheesecake?
Intrigued, I decided to kludge together random pieces-parts or different recipes and come up with my own version of Cheesecake Napoleon. Here it is…
First I made the no-bake cheesecake layer:
2 (8oz) packages cream cheese, softened
3/4 cup granulated sugar
2 teaspoons vanilla extract
1-8oz tub of Cool Whip topping
* Beat together the cream cheese, sugar and vanilla until smooth.
* Gently fold in the Cool Whip topping.
* Drape one 8" cake pan with two 30" pieces of plastic wrap. Center the first piece of the plastic wrap in the center of the pan. Fit the plastic wrap to the contours of the pan drape the excess over the side. Do the same with the other piece, positioning it perpendicular to the first piece.
* Dump the cheesecake mixture into the prepared pan and smooth until flat.
*Cover the flattened top of the cheesecake with the plastic wrap that was draped over the sides of the pan. Gently press the plastic wrap into the cheesecake, flattening the cheesecake even more and making sure it conforms to the shape of the pan.
* Freeze the cheesecake (and the pan) for at least 8 hours or overnight.
Next bake a yellow cake. Any yellow cake will do, but it needs to be moist. Over the last month I baked five different yellow cakes for Cake Central's June Scratch-Off, and from that experience I decided to try a modified Downy Yellow Cake recipe. I liked the Downy cake's texture and ease of mixing, but I really loved the taste of Sylvia Weinstock's Classic yellow cake. Maybe a combination of the two would give me that elusive "perfect" yellow cake. I used all the ingredients called for in the Downy recipe but added 1/2 cup of sour cream, 4 additional tablespoons of butter, an extra teaspoon of vanilla.
Mixing the cake was a snap:
After the yellow cakes are cooled and the cheesecake is frozen solid, start the assembly. 1) Remove the crown from the top of the cake with a serrated knife. 2) Stack the layers: yellow cake at the bottom (cut side toward cheesecake), cheesecake in the middle, yellow cake on top (cut side toward cheesecake). 3) Let the cheesecake soften up a bit and using a spatula work smooth the cheesecake into the gaps between the layers until it looks like one continuous tower of goodness.
Slice a piece of Cheesecake Napoleon and smother in your favorite topping. I used raspberry preserves and whipped cream on mine, but let your imagination run free!
But does it taste good?
Well yes, kinda. It taste okay, but it's not "Copeland's". Both recipes need some tweaking. The cheesecake needs a lot more flavor, and the yellow cake ended up denser than I wanted. Next time I'm gonna use Crème Fraiche instead of Cool Whip, and adjust a few ingredients in the cake to try and lighten it up.
I'll also get a few slices of the real stuff so I can compare the two side-by-side.
See how willing I am to suffer for my craft?
No really, I am…
For years I've been hunting for a copycat version of Copeland's Cheesecake Napoleon and in all that time I've only been able to find one recipe. One. In the whole world wide web. And according to that one recipe, Copeland's cheesecake is no-bake. Hummm. Like Jell-O cheesecake?
Intrigued, I decided to kludge together random pieces-parts or different recipes and come up with my own version of Cheesecake Napoleon. Here it is…
First I made the no-bake cheesecake layer:
2 (8oz) packages cream cheese, softened
3/4 cup granulated sugar
2 teaspoons vanilla extract
1-8oz tub of Cool Whip topping
* Beat together the cream cheese, sugar and vanilla until smooth.
* Gently fold in the Cool Whip topping.
* Drape one 8" cake pan with two 30" pieces of plastic wrap. Center the first piece of the plastic wrap in the center of the pan. Fit the plastic wrap to the contours of the pan drape the excess over the side. Do the same with the other piece, positioning it perpendicular to the first piece.
* Dump the cheesecake mixture into the prepared pan and smooth until flat.
*Cover the flattened top of the cheesecake with the plastic wrap that was draped over the sides of the pan. Gently press the plastic wrap into the cheesecake, flattening the cheesecake even more and making sure it conforms to the shape of the pan.
* Freeze the cheesecake (and the pan) for at least 8 hours or overnight.
Next bake a yellow cake. Any yellow cake will do, but it needs to be moist. Over the last month I baked five different yellow cakes for Cake Central's June Scratch-Off, and from that experience I decided to try a modified Downy Yellow Cake recipe. I liked the Downy cake's texture and ease of mixing, but I really loved the taste of Sylvia Weinstock's Classic yellow cake. Maybe a combination of the two would give me that elusive "perfect" yellow cake. I used all the ingredients called for in the Downy recipe but added 1/2 cup of sour cream, 4 additional tablespoons of butter, an extra teaspoon of vanilla.
Mixing the cake was a snap:
After the yellow cakes are cooled and the cheesecake is frozen solid, start the assembly. 1) Remove the crown from the top of the cake with a serrated knife. 2) Stack the layers: yellow cake at the bottom (cut side toward cheesecake), cheesecake in the middle, yellow cake on top (cut side toward cheesecake). 3) Let the cheesecake soften up a bit and using a spatula work smooth the cheesecake into the gaps between the layers until it looks like one continuous tower of goodness.
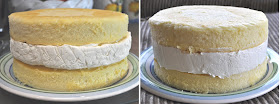
Slice a piece of Cheesecake Napoleon and smother in your favorite topping. I used raspberry preserves and whipped cream on mine, but let your imagination run free!
But does it taste good?
Well yes, kinda. It taste okay, but it's not "Copeland's". Both recipes need some tweaking. The cheesecake needs a lot more flavor, and the yellow cake ended up denser than I wanted. Next time I'm gonna use Crème Fraiche instead of Cool Whip, and adjust a few ingredients in the cake to try and lighten it up.
I'll also get a few slices of the real stuff so I can compare the two side-by-side.
See how willing I am to suffer for my craft?
No really, I am…
Thursday, June 18, 2009
Meet my New Camera: Nikon D5000
After months of indecision and waffling I finally bought a new camera!I stayed home from work today just so I could be here when it arrived (someone had to sign for it, so it wasn't a completely frivolous waste of a vacation day).
At around 11:00 am the dog started barking and I rushed outside. It's the UPS man. My camera is here.
See it in its Amazon box. Ohhhh…..
But I can't open the box just yet. I have cupcakes in the oven, more cookies to decorate, and I also have to run to Best Buy to buy a memory card. Can you believe that the camera doesn't come with a freakin' memory card? Not even a measly little 64K one!
Here is everything unboxed.
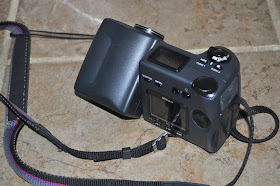
I'm so excited about my new toy. My old camera, a Nikon Coolpix 990, is ten years old and on its last leg. Here is my old camera.
Rest in peace little Nikon 990, I will remember you fondly.
Monday, June 15, 2009
Neiman-Marcus Chocolate Chip Cookies
Is there anything better than a warm, gooey chocolate chip cookie and a cold glass of milk? The melted chocolate oozes when you take a bite and coats your tongue and lips in smooth bliss...
My Go-to chocolate chip recipe goes by many names "Neiman-Marcus, Macy's, Mock Mrs. Fields..." I don't know where the recipe originated, but every time I bake-up a batch I thank that unknown, unheralded baker.
Pictured below is the cast of characters. The key to this cookie's moistness is grated chocolate and finely ground oats. Don't omit either one, and add more grated chocolate if you dare.
Here are the stages of cookie construction. 1) creaming butter and sugars; 2) mixing in the dry ingredients; 3) Adding the grated chocolate and chocolate chips; 4) scoops of cookies dough waiting for their turn in the oven.
I use a tablespoon size ice cream scoop and scoop the dough to overflowing. Bake for just 8 minutes until just the edges start to brown. The cookies will continue after you remove them from the oven, so you want to take them out before they look finished.
COOKIES... Next to brownies, chocolate chip cookies are my favorite. Want some?
Saturday, June 13, 2009
Sylvia Weinstock's "NEW" Classic Yellow Cake
Disclosure:
We are a participant in the Amazon Services LLC Associates Program, an
affiliate advertising program designed to provide a means for us to
earn fees by linking to Amazon.com and affiliated sites.
The Scratch-Off / June 2009 / Yellow Cakes - Trial #3
A group of scratch bakers on Cake Central have gotten together to test, rate and critique different cake recipes from a predetermined list. This week I decided to try Sylvia Weinstock's NEW Classic Yellow Cake. (Ms. Weinstock has some great books like Sensational Cakes.)
click here for Sylvia's "new" yellow cake recipe (oops - now this recipe is gone too. So much for data hanging around forever on the internet. The new recipe was like the old with an additional 1 cup of milk added - yes, one full cup.)
click here for her "original" recipe - (oops, broken link - see comment section for recipe)
Here is my finished product. "Look Glinda, I'm defying gravity."
The ingredients....
The mixing got a little involved. First the butter and sugar are creamed. Eggs are added one at a time. Milk added to creamed ingredients. Note: I got a little concerned at this point because after the milk was added the creamed mixture looked curdled (sorry I didn't get a picture). But I mixed on.
Next came the sour cream and flour which was added in five stages, beginning and ending with flour. In the final step beaten eggs whites were folded into the mix. I had just seen an episode of Alton Brown called "A Cake on Every Plate", and I decided to follow his suggestion and weigh my pans to make sure I had equal amounts of batter in each pan.
Kinda cool, huh. But I do need one of those new fangled digital scale. Next the equally weighted pans went into the oven.
Whew, it was a lot of work. This had better be worth it!
Just out of the oven and everything looks good.
After 3 minutes I remove the cakes for their pan and set on a cooling rack. The bottom of the cake looked a little "wet", so I place it on a paper towel to absorb the excess moisture.
A few minutes I removed the paper towel and, YIKES, I found this !!!!!! A huge pile of yucky, sticky, gooey mess. What is going on ????
This is the bottom of the cake after the paper towel was pulled away. Notice the big oval patch in the middle where the cake looks REALLY wet. This is not looking good.
But I couldn't worry about the wetness; I had a wedding to attend. So after the cake had cooled to room temperature, I wrapped the layers up in plastic wrap and went off to the wedding.
The wedding was held at The Peristyle in City Park, New Orleans LA
When I got home that afternoon I unwrapped the cake and took a slice. Yuck!! It was gooey and sticky and looked like someone a dipped the bottom third into melted butter.
I took a taste...
Hummmm... not bad. In fact it was delicious. But I couldn't get past the texture. It was wet and gooey and somewhat slimy. It was like eating squishy worms. I threw it in the trash and frantically baked another cake (more on that later).
But the next morning I found the second layer sitting on the counter just waiting to be unceremoniously pitched into the trash. I felt sorry for the poor guy (any guilty about being a wasteful American), so I decided to bring the goopy thing to a family gathering that day and see what other people thought of it.
Well do you know what???? THEY LOVED IT. You could have knocked me over with a feather. They actually LOVED it. Not everyone mind you, about half the taste testers thought it was too moist, but the other half thought it was the BEST CAKE EVER.
Go figure. Teach me to assume that everyone likes dry hunks of sawdust like me.
If you would like to see the final results of the Yellow Cake Scratch-Off, click here. I could just tell you who the winner was, but that would spoil the surprise.
Downy Yellow Cake
The Scratch-Off / June 2009 / Yellow Cakes - Trial #4
Scared of baking a cake from scratch? Well then, this is the cake for you!!!
No whipping of egg whites.
No creaming of butter and sugar.
Everything goes into one big bowl and you mix. Nothing could be easier. And it taste pretty good too.
Doesn't the batter look lovely? So thick, so creamy. Why bake, just eat it raw!
So like I mentioned in a few other posts, some scratch bakers from Cake Central have gotten together to test/rate/critique 14 popular yellow cake recipes. The Downy Yellow Cake is the fourth recipe from the list that I have tried.
Here is the original recipe that was a part of the Cake Central challenge:
All-Occasion Downy Yellow Cake
6 large egg yolks
1 cup milk, divided (1/4 cup and 3/4 cup)
2-1/2 teaspoon vanilla
---
3 cups sifted cake flour
1-1/2 cups sugar
4 teaspoons Baking Powder
1/2 teaspoon Salt
--
12 Tablespoons Unsalted Butter, cubed, room temperature (Note: cube the butter while it is still cold)
Directions
1. Preheat oven to 350F. Prepare two 8" round pans.
2. In a bowl combine egg yolks, 1/4 cup milk, vanilla. Whisk until combined.
3. In a large mixing bowl, combine all the dry ingredients (flour, sugar, baking powder, salt). Blend with a whisk (or low speed of your mixer).
4. Add butter and remaining 3/4 cup milk to the dry ingredients. Mix on low speed until the dry ingredients are moistened. Increase to medium speed and mix for 2 minutes. This will aerate and develop the gluten in the flour. Scrape down the sides with a rubber spatula.
5. Gradually add the egg mixture in 3 batches, scraping down the sides and beating 20 seconds after each addition. Make sure each egg mixture batch is fully incorporate before adding the next batch.
6. Divide the batter between prepared pans and smooth the surface with spatula.
7. Bake 25-30 minutes or until just a few crumbs cling to a wooden toothpick tester. DO NO OVERBAKE or the cake will dry out. Remove from oven just as the cake starts to pull away from the side of the pan.
In the final analysis the Downy cake was a little on the dry side (I may have baked it too long), but man was it easy to mix. Almost as easy as a box mix. I think I will play with the recipe (maybe add some sour cream, and more extract) to punch up the flavor and moisture content. Wish me luck.
Thursday, June 11, 2009
Magnolia's Vanilla Birthday Cake
The Scratch-Off / June 2009 / Yellow Cakes - Trial #2
I just baked up my second test for Cake Central’s June “Scratch-Off” which features 14 different scratch “Yellow Cake” recipes. This time I selected the Not So Lemon Magnolia Cake. I have an aversion to all things lemon flavored so I subbed the lemon juice with milk and the lemon zest with vanilla extract. This subbed out version of the Magnolia Lemon Cake is also Magnolia’s Vanilla Cake.
The creaming…
The final 1/3 of flour being mixed in by hand…
The scoop. Man was this batter thick, and sweet, and oh so yummy…
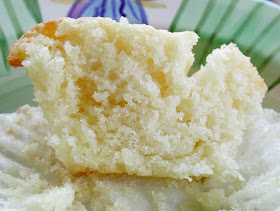
Here is a dissected cupcake, showing all of it beautiful crumb...
Just so you know, it tasted as good as it looks. Definitely a 9 out of 10 on the score board.