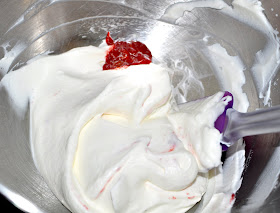
This week's Tuesday with Dorie assignment, Coconut Tea Cake, was selected by Carmen of Carmen Cooks. Let me say that I love coconut and I adore cake so I was in heaven. Yummm. I also had some leftover Strawberry Marmalade and some flavored whipped cream from the March 2010 Daring Bakers' assignment so I slathered it on my Coconut Tea Cake as well.
Triple Yummmm.
Here is the batter being prepared. The recipe called for Coconut Milk, which I had a hard time finding. Wally-World had sweetened coconut water and sweetened coconut cream, but no unsweetened coconut milk. I almost had to make my own (go figure, I was able to find instruction/recipe on the web), but my next-door-neighbor just happened to have a can. What luck. I traded her half a Coconut Tea Cake for a can of coconut milk.
Here is the cake about to go into the oven. The batter looked a little thin and watery, but I have faith in Dorie's recipes so I didn't worry.
I did fret about the length of cooking time. Dorie suggested 60-65 minutes, but I have a oven possessed by temperature demons so I started checking the cake at 45 minutes. At 50 minutes my cake tester came out clean so out of the oven came the cake. It was nicely brown and smelled like a coconut dream. Dorie didn't suggest a glaze for her tea cake, but in my book everything taste better with glaze/frosting/icing so I found a glaze recipe that used up the extra coconut milk. Not content with just a glaze, I encrusted the coconut cake and more shredded coconut.
Ahhh, life is good thanks to Tuesday with Dorie.
Tuesday, March 30, 2010
Saturday, March 27, 2010
DB: Orange (Strawberry) Tian
The 2010 March Daring Baker’s challenge was hosted by Jennifer of Chocolate Shavings. She chose Orange Tian as the challenge for this month, a dessert based on a recipe from Alain Ducasse’s Cooking School in Paris.
To me The Daring Bakers' Challenges are always a struggle not so much in the technical aspect (I love learning new things), but in the flavor arena. I'm a wuss when it comes to trying new foods, and I have some very strange likes and dislikes. Citrus is one of the things I'm not overly fond of. Orange juice hurts my stomach, and the white pithy stuff that surrounds the orange segments is very unappetizing to me. I know, I know, I'm weird.
So this month's Orange Tian posed a dilemma. To Orange or not To Orange? I chose Not to Orange. I swapped out the Orange Marmalade for Strawberry Marmalade and used strawberry slices as my topping instead of orange.
The recipe I used for Strawberry Marmalade did include tangerines, so I saved some of the tangerine segments and made one token "Orange" Tian.
Below are the many steps that went into making the Tian.
The Pate Sablee were quick and easy to whip up.
Jennifer of Chocolate Shavings suggested a baking time of 20 minutes, but my Sablees were toasty brown after just 13 minutes.
Next came the Strawberry Marmalade which was made from strawberries, tangerines, sugar, vanilla, strawberry extract and cinnamon. The marmalade took a long time to cook (about 30 minutes), and at first taste was a little bitter. I added more sugar, more vanilla and a little bit of mint. It tasted better after the adjustments.
The whipped cream was a snap to whip up.
Then the assembly. I lined the pan with parchment paper and arranged the fruit. I made one orange and the rest strawberry.
Added a layer of whipped cream.
And topped with a Pate Sablee that had been slathered in marmalade.
I froze the pans for 3 hours and then popped the frozen concoction out with just a twist of the pan.
Everyone who sampled the Tian said they were superb. And what really made my day was that the people who sampled both the Orange and Strawberry Tian said the strawberry was better. Thanks Jennifer from Chocolate Shavings, I really enjoyed your challenge.
Tuesday, March 23, 2010
Sprinkles Cupcake Mix - Review
I attended a friend's baby shower recently, and came home with a tube/box of Sprinkles' Dark Chocolate Cupcake Mix (I won one of the silly shower games). Now I had heard of Sprinkles before but had never tried one of their cupcakes. And honestly after sampling the cupcakes produced from their mix I don't think I would be in a hurry to buy the original. The cupcakes (from the mix) were moist enough, but I found them very bland and unexciting. There was no explosion of flavor or pop of taste, and if I'm paying $14 for a box of cupcake mix I expect an end product that makes my taste buds stand up and sing.
I made the Sprinkles cupcakes for my Mom's 76th birthday party. I always buy her birthday cake from Swiss Confectionery (the BEST tasting cake in New Orleans), but some last minute additions to the party list made me fear that I wouldn't have enough cake (a serious crime in my family). So I pulled the Sprinkles mix from the pantry and whipped up some cupcakes in less than an hour.
I did make one change to the Sprinkles cupcake: I added a cookie crumb crust. I grind up Lorna Doone shortbread cookies, mixed them with sugar and butter, press the crumb mixture into the bottom of the cupcake liner, and bake the crust for five minutes until it sets. My Mom LOVES cupcakes with cookie crust.
Next came the mixing of the Sprinkles cupcake batter. The sequence of mixing was a little different than normal. 1) Cream the butter then added the dry mix to the butter, 2) add the eggs, 3) and finally the milk. The batter was thick and luscious looking, but even at this point it was a little lacking in flavor.
I spooned the batter on top of my pre-baked cookie crust, and then baked the cupcakes for 20 minutes. My oven runs a little hot so I always remove my baked goods at the lower end of the baking range.
I didn't think the trademark Sprinkles "dot" looked festive enough for a birthday party, so I skipped the blue and black dot and used my own sprinkles.
Looks cute, but taste-wise the cupcake was unremarkable. Even the cookie crust and luscious frosting wasn't enough to perk up flavor of the Sprinkles cupcake.
Tuesday, March 9, 2010
Triple Chocolate Chip - Chocolate Almond Cookies
Every morning I run on the treadmill and while I'm sweating and panting and cursing my fat thighs I watch cooking shows. Go figure. The other day I watched an Ina Garten - Barefoot Contessa episode entitled Baking Basics. She baked some soda bread and some savory palmiers, but then Kathleen King, of Tate's Bake Shop, came on and together they baked Double Chocolate Almond Cookies. Oh-la-la. As soon as the treadmill timer hit 30 minutes I hopped off that torture device and started yanking ingredients out of the pantry. (No wonder I can't lose any weight, I get off the treadmill and bake cookies!)
But before I actually started to bake I pulled up the recipe on the Food Network web site and read all the reviews. Yes, all of them. Most people LOVED the cookies, but a few complained that the dough was dry and the finished cookies were crumbly. One reviewer suggested adding another egg to the recipe, and another suggested reducing the amount of flour.
I took all the comments to heart and adjusted Kathleen King's recipe slightly. My final cookies were wonderful. Everyone agreed that they were the best chocolate-chocolate chip cookies ever. Thank you Kathleen and Ina, this has become my new Go-To chocolate-chocolate chip cookie recipe.
Triple Chocolate-Chocolate Chip Almond Cookies
Adapted from Kathleen King's Double Chocolate Almond Cookies
Ingredients
• 2 -1/3 cups all-purpose flour
( IMPORTANT, sift the flour and then measure, if you don't sift you will use too much flour and the cookies will be dry)
• 3/4 cup Dutch-processed cocoa powder
(I used Hershey's Special Dark Cocoa, it give the cookie dough a pitch black color)
• 1 teaspoon baking soda
• 1 teaspoon salt
(Kathleen's recipe called for 3/4 tsp, but I used unsalted butter so I upped this a little)
• 1 -1/4 cups (2 -1/2 sticks) UNSALTED butter, softened to room temperature
(Kathleen used salted butter, but I only had unsalted butter in the house. I upped the amount of salt accordingly.)
• 1 cup sugar
• 1 cup firmly packed dark or light brown sugar
• 2 large eggs
( I added another egg to combat cookie dough dryness)
• 1 teaspoon vanilla
• 1 cup white chocolate chips
• 1 cup semisweet chocolate chips
• 1 cup milk chocolate chips
(I decreased the volume of semisweet chips and added some milk chocolate. I think the lighter color of the milk chocolate really stands out against the dark cookie dough)
• 1 cup almonds, toasted and chopped
Directions
Preheat the oven to 350 degrees F.
In a medium bowl, whisk together the flour, cocoa powder, baking soda, and salt.
In the bowl of an electric mixer cream the butter and sugars. Add the eggs one at a time mixing until the yolk disappear. Add the vanilla and mix until incorporated.
Add the flour mixture and continue mixing on low just until combined.
Add the chocolates and almonds and using a spatula mix until combined.
Using a small ice cream scoop (2 Tablespoon size), drop the dough two inches apart on sheet pans lined with parchment. Note: the cookies don't flatten or spread very much so if you like flatter cookies press the ball of cookie dough down with moist finger tips.
Bake for 12-15 minutes. (My convection oven runs hot, so I only baked my cookies for 12 minutes. The outsides were crispy and the insides were soft and chewy.)
Cool the cookies on the cookie sheets. The cookies should be very soft when they are removed from the oven. They will firm up as they cool.
TWD: Thumbprints for Us Big Guys
This week's Tuesday With Dorie assignment was "Thumbprints for Us Big Guys".
Sigh, I must have done something wrong, because here are my cookies before baking...
and after...
Before, After. Before, After. Please scroll back and forth and as you view my latest baking misadventure make soothing sounds of pity and comfort. On days like this I need all the pity and comfort I can get.
Honestly I don't know what went wrong. The dough went together with out any mishaps, and (as instructed by Dorie) I rotated my two cookie trays half way through the suggested baking time. When my timer went off at 14 minutes (suggested baking time was 15-18 minutes), I checked my cookies and found confusing mix of results. Some of the cookies were round and puffy with a nice little depression in the middle, while others were as flat and crispy as tuiles. Even on the same cookie tray some were showpieces and others were flops. Huh????
Was the butter the culprit? If I didn't mix the butter and flour well enough would random chucks of butter cause some cookies flatten during baking? I guess that is a question for Dorie and other baking gods and goddesses out there. Hellooooo anyone out there?
But from my two trays I did find a few cookies that were presentable. Here they are sprinkled with powder sugar and waiting for the jam to be poured into the thumbprint depression.
One great trick I did learn from this recipe was to fill the cookie depression with boiled jam. The heat liquefies the jam so that it pours like water.
And once the liquefied jam cools, it jells into a smooth, mirror like surface. Amazing. Astounding. Jam-marvelous. Isn't astounding the things you can learn from cooking blogs?
Wednesday, March 3, 2010
Charlene's 40th Birthday Cake
My sister-in-law's sister, Charlene, turned 40 on Saturday, February 20 and her husband threw her a blow-out, over-the-hill surprise birthday party. But to keep Charlene from suspecting that she was getting a BIG party, we had a combination birthday party/Mardi Gras crawfish boil on the Tuesday before her "real" party.
And you know what? I was asked to bake the birthday cake for the Mardi Gras party!
Wahoo!
I'm very new to cake decorating, so I consider it an honor when someone wants me to make the cake.
But because I'm new to cake decorating problems seem to crop up at every turn. My biggest issue involved the large "40" gum paste topper that I made for the cake. The "40" looked perfect as it dried atop my counter, but as soon as I lifted it and tried to insert it into the cake it began to crumble. To compound the crumbling issue I realized (too late) that I had cut the support wires too short. I wanted the "40" to stick up above the flowers, but no matter what I did the heavy topper kept sinking into the cake. Grrrr…
Once I delivered the cake to the party house, I did some quick repairs and managed to elevate the "40" using some of the pink curly things and a lot of butter cream icing. The topper looked pretty unstable so I quickly picked up my camera to snap a picture, and, and, and…. The stupid battery in my camera was dead.
Stupid camera.
Stupid me.
I knew the battery was low, but I didn't think it would just give out on me like that. Oh well live and learn. You'll just have to take my word for it, the cake looked much better with the "40" not crouching shamefully behind the flowers.
But even with all my problems the birthday girl seemed happy with her cake, and she was completely surprised when she walked into her real over-the-hill birthday party.
As for the crawfish boil, it was a success too. Yummy, yummy crawfish soaking in their spicy bath water. Corn, potatoes, sausage and other veggies too.
Lets EAT!
Tuesday, March 2, 2010
MS: Brown Butter Toffee Blondie
TOO SWEET!
That was my first impression of Martha Stewart's Brown Butter Toffee Blondies. Ultra sweet, tooth achingly sweet, hyperactive kids bouncing off the walls sweet.
The mixing process for the Brown Butter Blondies started with, surprise, surprise, browning butter. I had never browned butter before, and instead of being prudent and watching a how-to video on YouTube I just kinda winged it. In hindsight I think I browned it a little too much (okay I burned it), but the scorched butter didn't seem to negatively affect the taste.
See all the black flecks floating around? That's the butter :(
But I didn't let crispy butter stop me.
And the batter ended up looking luscious, black specks and all.
I didn't have the walnuts that the recipe recommended so I substituted macadamia nuts. And because white chocolate and macadamias go hand-in-hand, I subbed 1/2 cup of toffee chips with 1/2 cup of white chocolate chips. Look at that mound of chunky batter. I would give you the spatula to lick if I could.
So this Martha recipes gets a thumbs up (from both me and the party goers), but be aware that it is very, very sweet. If you like cakier blondies, you might want to try a different recipe.