Saturday, December 23, 2017

Melting Ice Cream Cone Cake

Another family birthday cake request.  This time it was for one of those upside-down, melting ice cream cone cakes.

Fun, Fun, Fun... And easy to boot.  I love it when someone wants a cake that takes NO prep before the decorating begins.  No detailed gum paste figures, no intricate flowers.  Just an ice cream cone melting on top of the cake, and lots of candy stuck to the sides.  How easy is that??!!!


<< Disclosure: We are a participant in the Amazon Services LLC Associates Program, an affiliate advertising program designed to provide a means for us to ear fees by linking to Amazon.com and affiliated sites.>>

I started with the "mock" truffles in their "paper" cups.  I wanted everything on the cake to be edible, so I made the paper cups out of pink candy melts.  I just melted the chocolate and spread it inside a mini cupcake liner.  I had to use a bunch of cupcake liners to hold the chocolate in place.


After the chocolate hardened, I carefully pulled away the paper and I was left with a realistic looking chocolate cup.


For the "truffle" inside the cup I just used a piece of fondant rolled in melted dark chocolate and then sprinkled with jimmies.  I was going to use some real truffles, but the ones I had in the house were a little too small for my cups.


Next came the border around the base of the tiers.  I wanted the base trimmed in candy sixlets, but  placing all those individual balls would have been too time consuming.  So instead I used a mold.  Quick and easy.  I just pressed some fondant into the mold, popped it out, and placed it on the cake.  The mold I used is actually sold as a pie crust impression mat, but it works great for fondant too.


I had both tiers trimmed in just a few minutes.


Next I placed some jumbo gumballs around the base, and then I made some lollipops out of fondant and stuck them to the side of the cake.


I made lots and lots of lollipops in all different colors.  


I also added store bought candies: M&Ms, Skittles, Hershey Drops, and Hershey Miniature Bars.  And my Mock Truffles in their pink chocolate cups.


Next came the topper - the melting ice cream cone.  I started with glob of melted pink candy melts.


Then I placed the scoop of "ice cream".  It is actually Rice Crispy Treats that I formed into a half ball and covered in melted pink candy melts.  I also hollowed out the center of the ball because I didn't want to waste my Rice Crispy Treats.


I used a real cone for the "cone" of my topper, and threw on some jimmies.  Here is...


But I wasn't happy with the look of the melting ice cream.   You couldn't really see the bend where the pink chocolate changed from the round scoop of ice cream to the melting pool.  So I used some powder food color in dark pink to accentuate the boundary.  It may just be me, but I think it looks better.


So here is the final cake.  Everyone screams for ice cream.


Happy Decorating,

Carol

Wednesday, December 20, 2017

Slutty Brownie Threesome - Twix, Mounds Bar, and Milky Way Simply Caramel

Slutty Brownies have been the rage for months now, and I have made them a few times to rave reviews.  But the last time I tried to whip up a batch of "Slutty B's" someone cruel, vengeful person had eaten all of my Oreos.  Oh No, what is  Slutty Brownie Baker supposed to do?  Well I had to improvise...

Instead of Oreo Cookies, I added mini versions of Twix, Mounds Bars, and Milky Way Simply Caramel bars that I had leftover from Halloween.  I also threw in some caramel bits too.  I ended up with what I call a

Slutty Brownie Threesome!    
 

And can I say WOW!  The original Slutty Brownies were good, but the version with the Twix bar is just amazing.  The Twix cookie stays very crunchy and it is surrounded by a layer of melted chocolate and caramel that makes the the brownie and chocolate chip layer extra moist and gooey.  It was so, so good.


The Mounds Bar version was good too.  When you sink your teeth into a piece of the "Mounds Slutty B" you get a mouthful of soft, luscious coconut.


And if caramel is your thing, the Milky Way version is the bomb.


<< Disclosure: We are a participant in the Amazon Services LLC Associates Program, an affiliate advertising program designed to provide a means for us to ear fees by linking to Amazon.com and affiliated sites.>>

So from now on when I make my Slutty Brownies I'm going to make it a Threesome!  I'm going to skip the Oreo Cookies and use Twix, Mounds, and Milky Way bars instead.

To make them I start with the 10.25 oz size Betty Crocker Fudge Brownie Mix,  mix according to directions and pour into 8x8 pan.  Next I layer the mini candy bars on top of the brownie mix, and sprinkle on some Kraft Caramel Bits and chocolate chips.


Mix up some Betty Crocker Chocolate Chip Cookie Mix and spoon on top of the candy bars.  As a final step sprinkle with more Caramel Bits and Chocolate Chips.


Bake for about 25 minutes until the cookie layer is golden brownie.


And don't worry if it is not completely cooked.  The gooey the better in my book.

Yummm......


Happy Baking,

Carol


Saturday, December 2, 2017

Volleyball Court Cake

2017 was my niece's last year on her high school volleyball team.  Go Lady Panthers!  She was the Libero all four years, and was awarded Defensive Player of the Year in her final year!  Go, Amanda!!

For her last Volleyball Banquet I decided to make her a special cake.
 

<< Disclosure: We are a participant in the Amazon Services LLC Associates Program, an affiliate advertising program designed to provide a means for us to ear fees by linking to Amazon.com and affiliated sites.>>

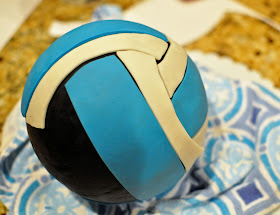
The most involved part of the cake was the volleyball itself.  I used the Wilton 3D Cake Pan and the included pattern to make the volleyball markings.  I first covered the cake with black Fondarific fondant. (The Fondarific is very pliable and it stays soft for a long time so it worked well on this 3D shape).  Then I cut out the blue sections and placed them on the round cake.
 

Then I placed the white strips.  The flat pattern didn't exactly fit the 3D shape, so I had to do some trimming of the white pieces.  I also wanted gaps between the white and blue pieces so the black fondant underneath would show.


Next came the main cake.  I used the Wilton 1/2 sheet cake pan, and made one side yellow and the other side chocolate.


Turning a slab of cake into a volleyball court was the fun (and easy) part.  I started with yellow Mona Lisa fondant, added some dabs of brown, and then twisted it in one direction to give the fondant a streaked look.


Here is the streaked fondant all rolled out.  At this point it is really starting to look like wood.  I guess I could have used it just like this, but I wanted to try out my new wood grain impression mat.


Just press the silicone mat into the fondant...


And lift off the mat to get that wood grain pattern.  Pretty cool, huh?!


Next I cut the fondant into strips.  I decided to use strips instead of one big piece of fondant because it was easier.  I didn't want to struggle with a huge 22 x 28" piece of fondant so I just made small 1-1/2 x 9" strips.  Easy, easy, easy.


The strips of fondant were just positioned on the cake.  I was finished in just 30 minutes, and no stress, panic, or hair pulling from trying to place and smooth a monster piece of fondant.


I made markings to represent the lines of the volleyball court...


And then came the net.  This was the most frustrating part of the cake.  My fondant extruder broke, so I had to roll all the string by hand.  What a PITB.


For the lettering on the volleyball I used some FMM Funky Cutters in Uppercase and Lowercase.   I wanted to put the word "volleyball" on the ball itself, but it won't fit, so I put it on the top of the net.

For the final assembly I simply placed the volleyball on the main cake (secured with some wooden skewers), added two Lineman Flags for a pop of color, and Ta-Da, I was finished.


All-in-all it was a pretty easy cake to make. 

Happy Decorating,

Carol