Sunday, February 28, 2021

Baby Dinosaur Cake

My first request for a baby dinosaur cake.  How does it look?  I'm not a very good 3D sculptor, but I hope the topper doesn't look too weird. 

And here is the smash cake...


I made the orange dinosaur topper ahead of time.  I didn't want to use too much fondant so I started with an aluminum foil armature.  On the face I built up the nose and cheek section with fondant, and then I covered the entire head with one flat piece of fondant.  (Note: I mixed the fondant with some Tylose powder to make the fondant stiffer.)


I tried several ways of covering the body, but finally I made a hollow funnel shape and slipped the aluminum foil body inside.  The pointy end becoming the tail.

The body ended up looking like a big orange tadpole, but I hoped/prayed it would look more like a body when I attached the head and legs.

And it did look much better once I attached the other parts.

And here it is with the eyes and spines along his back.  Not too bad but I wish I made his jaw and chin a little bigger.


<< Disclosure: We are a participant in the Amazon Services LLC Associates Program, an affiliate advertising program designed to provide a means for us to ear fees by linking to Amazon.com and affiliated sites.>>

I also made the palm trees ahead of time to give them time to dry.  I made the cutters myself using my trusty Creality Ender 3 Version 3 3D printer.  I have an blog post about using a 3D printer HERE.

And here are the palms after I dusted them with brown and green powder food color.  The shading of color gives them a little more life.


In addition to the palm tree cutter I also made a bunch of others cutters for this cake: the dinosaurs, the letters, the sun, the big number "1" with the spines along the side.  The 3D Printer has become my favorite cake decorating tool. 


Another handy tool is this set of tiny circle cutters.  They make perfect little circles for eyes, eyebrows, mouths, etc.  I use them on almost every cake.


The cake itself is frosted in American Buttercream, and I did an Ombre effect from green to dark sky blue to light sky blue.   I use acrylic disks to get the straight sides, flat top, and sharp edges.  The disks make the task so much easier, and they are really worth the investment.  I got mine from Cake Safe, and I have a blog post about how to use them HERE.  FYI:  On most cakes I use the size that is 1/4" larger than my cake.  For the 8" cake I used the 8-1/4" acrylic disks, and for the 6" cake I used the 6-1/4" disk.


While the cake was chilling, I decorated the 12" white foil cake drum.  I had some burgundy Satin Ice fondant left over from another cake, so I added some brown food color to it and made a nice reddish-brown color.  While the fondant was still fresh, I pressed a piece of Styrofoam into to give it a nice texture. 


Next I stacked my cakes and started to add the details.   The palm tree, and a mountain went on first.  For the mountain I use a Soft Stone food coloring gel.   I don't know why, but the Soft Stone color works so much better then adding black food gel to white fondant.


And after that it was just a matter of cutting out the dinosaur shapes using my cutters and slapping them on the cake.  For the clouds I used these cutters.  I bought them before I got my 3D printer.  Now I would just make my own. LOL.  Here are the sides of the cake showing the other dinosaurs I made.


For the green Pterodactyl hovering above the cake, I glued an 8" long 3mm wide transparent acrylic rod to the back of the body and stuck the rod into the cake.  You can see the rod, but it is not too obvious.


So another finished cake, and a few more lessons learned.  Cake decorating is certainly an adventure.

Happy Decorating,

Carol

Monday, February 15, 2021

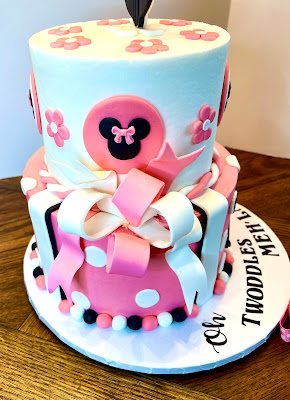
Minnie Mouse Cake

My family has always been big Disney fans, and the newest generation is no different.  Here is a cake I made for my grand-niece.

And here is a side view of the gum paste bows. Those things were a pain in the butt to make.


<< Disclosure: We are a participant in the Amazon Services LLC Associates Program, an affiliate advertising program designed to provide a means for us to ear fees by linking to Amazon.com and affiliated sites.>>

I started by make the gum paste topper.  Instead of using a paper templet and cutting the shape by hand, I made a plastic cutter using my nifty Creality Ender Pro v2 - 3D Printer.   That thing has come in so handy; it is now my favorite cake decorating tool!  I wrote a blog post about 3D printers for cake decorating.  The post can be found HERE.


I made cutters for each feature.


And here is the finished topper.  I drew in the eyelashes with an edible black marker, and dusted the creases in the bow with Roxy & Rich Princess Pink petal dust.  To make the little dots I use tiny little circle cutters.  The cutters are advertised as a clay tool, but they work great for fondant and gum paste too.


I also made the gum paste bows and streamers ahead of time which gave them plenty of time to dry and harden.  I used foam cake dummies (in the size of my cake) so I would get the size and proportions of bows correct.  Nothing worse then making stuff ahead of time and having it too big or too small for the cake.

Construction of the cake began with an 8" tier frosted with American Buttercream.  I used a 12" white foil cake drum and a chop stick for the center dowel.   I like using chop sticks because I find them the perfect thickness and height for a two tier cake.  I don't show it in this picture, but I used 4 Extra Wide Fat Boba Straws to support the top tier.  For the fondant accents I just used Wilton's Black and White fondant.  If I'm covering a cake in fondant, I use a better tasting brand, but for accent work the Wilton (or the Sunny Side Up brand from Hobby Lobby) works fine.  I used the Wilton Strip cutter to make the fondant strips all the same width.  


The second tier is 6", and here I am removing the top acrylic disk.  I use acrylic disks to get the straight sides, flat top, and sharp edges.  The disks make the task so easy, and they are really worth the investment.  I got mine from Cake Safe.   I have a blog post about how to use them HERE.


Next I rolled a bunch of balls in black, white, and pink fondant.  I cut out white fondant circles and made another cutter (using my 3D printer) to make the number 2.


I also make the tiny mouse silhouettes using circle cutters. The pink gum paste bows were made using a silicone mold, and I used edible glue to stick the bow to the silhouettes.

Once I had all the accents made it was just a matter of putting everything on the cake.


Easy, peasy.  NOT!  It only took me about 10 hours to make the cake.  LOL.  Good thing I like my family.  


Happy Decorating,

Carol


Sunday, February 7, 2021

Jo Jo Siwa Cake - Lots of Bows

I made this cake for the five year old daughter of a girl I used to baby site.  Man I'm getting old. 


 << Disclosure: We are a participant in the Amazon Services LLC Associates Program, an affiliate advertising program designed to provide a means for us to ear fees by linking to Amazon.com and affiliated sites.>>

It was a simple cake to make: gum paste bows and gum paste rainbow and clouds.  I used a cutter for the clouds, and I used a silicone mold for the tiny bows on the cake topper.  I used plunger cutters for the hearts and stars, and outline the fondant cutouts using a black edible marker.  The letters were made using FMM's Magical Alphabet set.

For the gum paste "5" topper I used my trusty Creality Ender Pro v2 - 3D Printer.  I wrote a whole blog post about 3D Printers for Cookie Cutters.  You can find it HERE.  The 3D Printer has become my favorite cake decorating tool. 


Happy Decorating,

Carol

Gold Drip Cake

I hate gold drip cakes.  All the tedious painting of every single drip only to discover at the end that you don't like the color.  Brassy, much, much too brassy.  I tried painting over it was a softer color, but the brass still glowed through.  Oh well.  Nothing to do but say, "Yes, that is the color I wanted!"  

I wasn't too happy about the color of the sprinkles not matching the color of the flowers either.  The customer wanted Rose Gold for both, but I just couldn't get the colors to match.  The flowers weren't rose gold enough and the sprinkles where too dark of a rose gold.  I tried mixing some pink sprinkles with the rose gold, but that didn't look good.  I tried putting more rose gold luster dust on the flower but that didn't help either.  Ugh...  Cake decorating is so hard...   

But the gum paste flowers came out nice.  Roses and hydrangeas. 


The macarons came out nice too.  I use the Swiss method where you heat the sugar and eggs whites in a ban-marie till the sugar is dissolved and then beat the egg white/sugar mixture.  I find this method easier and more foolproof than the French or Italian method.  The recipe is just equal parts egg white, granulated sugar, almond flour, and powdered sugar.  Look at those feet!

On this cake I also made some custom embossers for the name "Brooklyn" and gum paste cutters for the "16" using my trusty Ender Pro 3D Printer.  I wrote a whole blog post about 3D Printers for Cookie Cutters.  You can find it HERE.  The 3D Printer has become my favorite cake decorating tool. 


And don't. don't look at that smear of gold paint between the bottom of the K and L.  I tried everything to get rid of it, but I kept making it worse.  Hopefully the birthday girl won't notice.

So another learning experience.  


Happy Decorating,

Carol