
So you want to try the newest trend in cake & cookie decorating and make your own cookie cutters? Well so do I! How about we learn all this stuff together....
Here is the first set of 3D cookies cutters I made. Can you guess who they are??? The Sanderson Sisters - I smell children.

It was really, really easy making these cutters. After setting up my 3D printer it took about 10 minutes to go from a sketch...

to the cutters forming on the bed of my 3D printer...

It took FOREVER for the things to actually print, but after about 7 hours of waiting, I finally had my first set of cookie cutters. It was like magic.

Update: 2/19/2021 - I've also been making fancy letter embossers using my 3D printer. How cool is that!


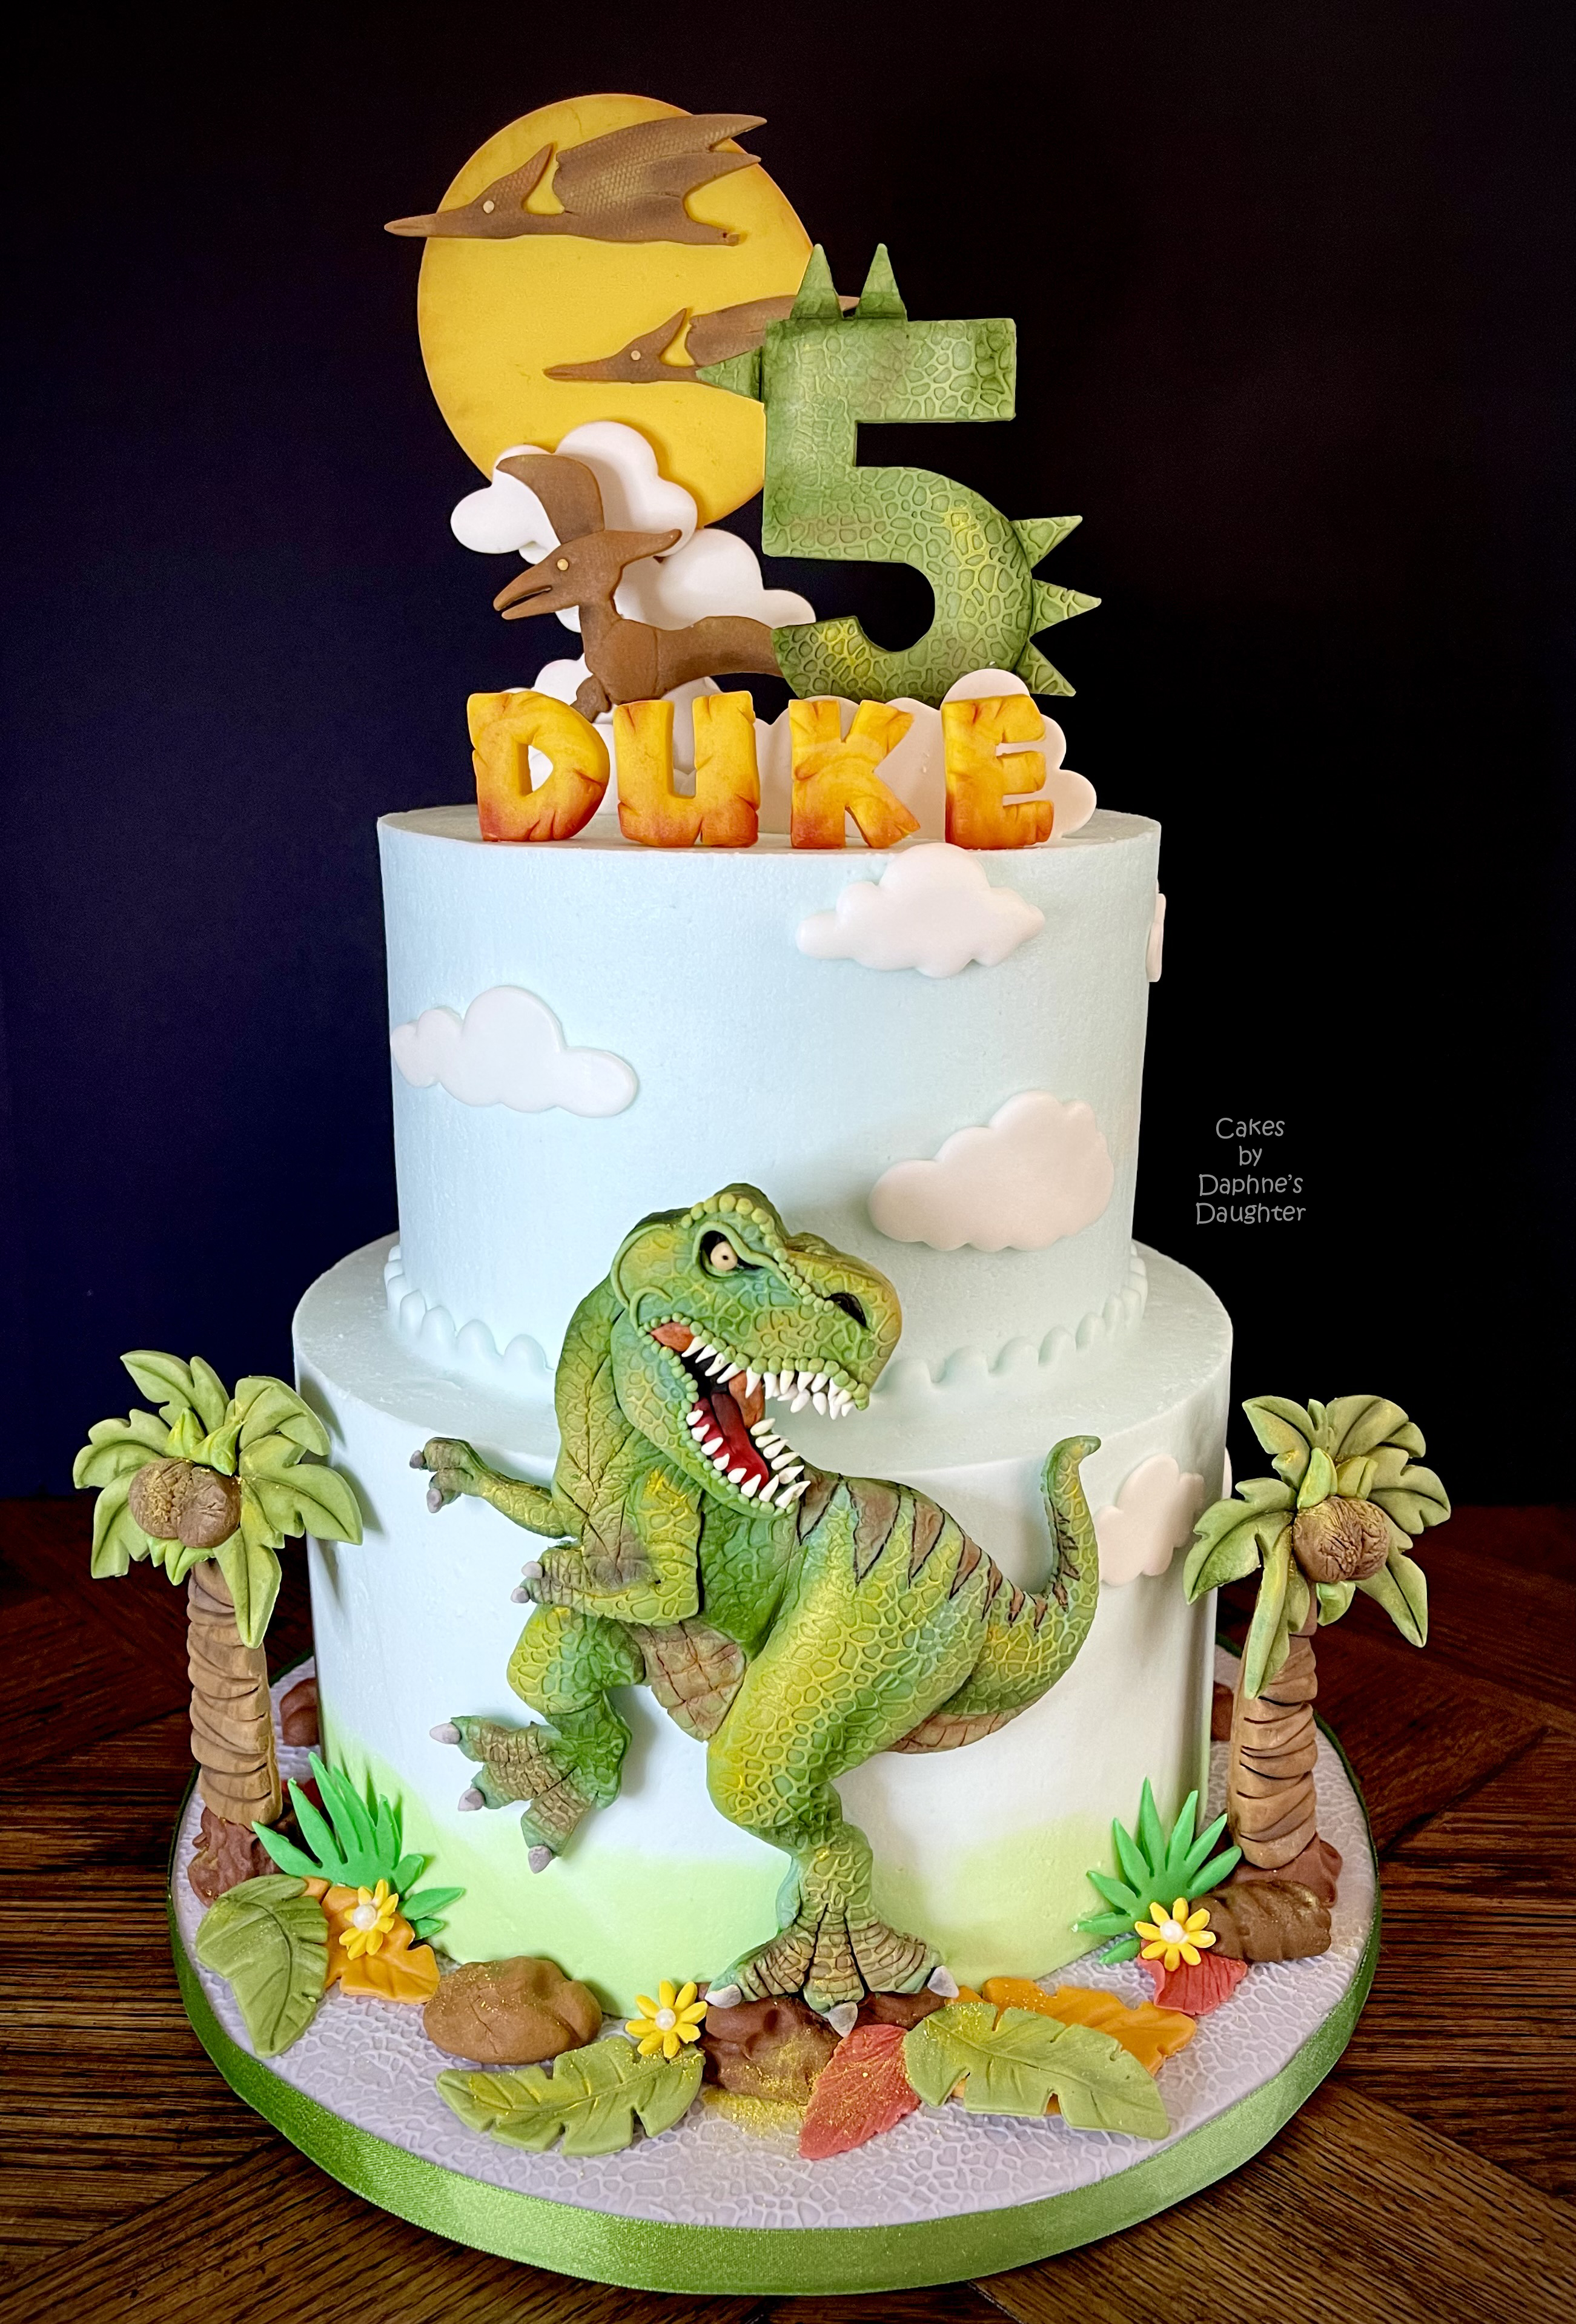
Update: 2/28/2021 - This printer has become my most useful cake decorating tool. In just a few hours I made all the fondant/gum paste cutter used on this cake. I even made the letters for the name on the side of the cake and a tiny dinosaur foot embosser to make tiny foot prints in the fondant covering the cake drum.


So how is all of this accomplished?? In a nutshell there were 3 steps to the process:
- CLIP-ART was sent to 3D MODELING SOFTWARE (Cookiecad.com in this case). I just told the app how large I wanted the cutter to be, and Cookiecad generated a .STL file which I then downloaded to my computer. (An STL file describes the 3D geometry of your cookie cutter.)
- The .STL file was loaded into SLICER SOFTWARE which generated a .GCODE file. (GCODE tells the 3D printer what to do.)
- The .GCODE file was transferred to the 3D PRINTER (via a micro SD card) and the printing of the cookie cutter began.
Simple right? Well maybe not.
Lets look at the process in a little more depth. I'm a list type of person so lets make a list of all the things you will need to go from a simple sketch to a fully formed plastic cookie cutter.
You will need:
- 3D printer - The most popular FDM 3D printers for hobbyist include Creality and Prusa. (A larger list of common brands can be found below.) The most important thing to consider when buying a printer is SIZE: size of the nozzle, the size of the bed, the size of the Z-axis. SIZE really does matter!
- Filament - Filament is a thin string of plastic that is melted and extruded from the nozzle of the FDM 3D printer to form the cookie cutter. Filament comes is different types, sizes, colors, brands, and food safety. PLA 1.75mm is the most common filament used to make cutters. See detailed filament descriptions below.
- Design Software - This software is used to digitally design your cutter. When you're first learning you can skip this step and just use clip art you find on the web.
- 3D Modeling Software - This software will convert your line drawing/clip art into a 3D model. The model is saved to a file in the "STL" format. The biggest names in 3D modeling software are Fusion 360 and TinkerCad.
- Slicer Software - The Slicer software reads the STL file and slices your 3D model into thousands of thin horizontal planes. The "slices" are then packaged with other printer specific information and saved to a .GCODE file. A GCODE file is specific to a brand/model of printer and is not interchangeable between printers. The most popular Slicer software is Cura. More info on Slicer software is below.
- Slicer Profile - There are literately hundreds of parameters that can be adjusted in the Slicer software. These parameters will need to be tweaked based on your 3D printer, your brand of filament, and the weather (not joking). There are a bunch of really tech savvy gurus on YouTube that have taken pity on us newbies and put together profiles for every printer and slicer combination. Just search YouTube for you printer brand and the slicer you are using to get a fool-proof profile. Thank you CHEP!
- Alta by Silhouette - The Alta is designed for beginners. It comes preassembled and calibrated so you just take it out of the box, plug it in, and you can start printing. All the design, modeling, and slicer steps are combined into one Silhouette software package. It is easy peasy. BUT - the largest cutter you can print is just under 4". I actually considered getting this printer till I noticed the bed size limitation.
- ANYCUBE Photon is another 3D printer that comes fully assembled, but this brand uses the SLA technology and liquid resin.
- Creality - The Creality printers are widely used by both beginner 3D enthusiast and large scale printer farms. The Ender 3 series is at the lower end of the price spectrum but still reliable. There are tons of different models and versions starting with the Ender 3, Ender 3 Pro and the Ender 3 Version 2 (which is the one I ended up buying). The Enders have a bed size of 220 mm square, which is an impressive 8.66 inches. At this size you can print several cookie cutters at once. The only gotcha with this printer is that it has to be assembled, and I mean REALLY assembled: bolts, screws, pulleys, wiring, power supply - EVERYTHING. If this scares you - don't get an Ender 3. (Update: Creality has released the Ender 3 Max, which is the Ender 3 V2 with a few upgrades and an larger 300mm /11.8" bed.) *** Creality also sells the CR series which has a 300 mm bed and lots of upgrades over the Ender series. The latest version the CR-10S Pro V2 also boasts Auto Bed Leveling. The CR-10S Pro V2 is almost twice as much as the Ender series, but knowing what I know now, I should have ponied up the extra $300 and gotten the CR-10S. Manually leveling the bed involves placing a piece of paper between the nozzle and and bed and tightening the corner leveling knobs until the two just kiss. You have to do this at each corner and when you finish all four corners you need to got around again, and then again to make sure everything is level. It is a royal PITB. So if you can afford it, get a 3D printer with auto leveling.
- Dremel - Dremel has the 3D20 printer that comes preassembled with a 9 x 5.5 inch bed size. The printer is fully enclosed so there are less issues with noise and dust. BUT the Dremel uses a .G3DREM file instead of the typical .GCODE file. This is not a big deal except you can't use the more popular Slicer software programs like Cura and Prusa (more about that later). Dremel has its own slicer software that you would use to convert the .STL file (which describes the geometry of your cutter) to .G3DREM (which tells the 3D printer what to do). The Dremel is also limited to PLA filament (more on that later); the nozzle doesn't get hot enough to melt PETG and ABS filament.
- FlashForge has an extensive line of 3D printers. I don't know anything about them, but they get mentioned a lot.
- Makerbot is another widely used brand but is a higher end (ie expensive) printer.
- Monoprice Mini Delta is similar in size and shape to the Silhouette Alta. The Mini Delta comes fully assembled, it is all enclosed, it has auto-leveling, a 4.3" bed plate, and it reaches temperatures high enough to melt ABS filament. It also has a Wi-Fi connection. The specs and low price (~ $180) makes this look like a viable option for making small cookie cutters, but it has gotten mixed reviews.
- Prusa - The Prusa 3D printer is another brand used widely by cookie cutter enthusiast. It is a little more expensive than the Enders, but it is a lot more glitzy and feature packed. It also has that holy grail: Auto Bed Leveling. When I first considered buying a 3D printer Prusa had just released the Prusa Mini. (The mini has a bed size of 180 mm or 7 inches.) I seriously considered buying this machine but there was a n 8 week wait for delivery. I said no to the wait and bought the Creality Ender instead. FYI: Here is a video that gives an interesting look inside the Prusa factory.
- Ultimaker is another high end production 3D printer, but the Ultimaker 2 will set you back almost 3K. Ultimaker also distributes the wildly popular (and free) Cura Slicer program which can be used with most 3D printers.
- Nozzle
- Size - The 0.4mm nozzle is the most common size. It is the best of both worlds in that it gives good details but also prints at acceptable speeds. With the .4mm nozzle you can print down to layer heights of just 0.1mm or up to 0.3mm. The thinner the layer height, the better the detail (on the Z axis), and the thicker the layer height the fast you will print. Other common nozzle sizes are .25mm and .2mm, but if you need/want a smaller nozzle check to make sure your 3D machine can handle it.
- Food Safety - If you plan on making cookie cutter for sale to the public, you might want to invest in a stainless steel plated nozzle. Most 3D printers come with a brass nozzle which isn't considered food safe because it might contain lead. But be aware if you change to stainless steel you may have to increase the temperature of your nozzle to compensate.
- Bed Plate Size
- Bed plate size is one of the biggest consideration when selecting your printer. The bigger the bed, the more cookie cutters you can print at one time. Also be aware that you won't be able to print right to the edge of the bed. Some printers have clips that hold the bed in place so that will reduce some of the usable bed space. A "skirt" and "brim" is also commonly extruded around the area where the cutter will be printed, and this will also reduce your usable bed space. The skirt primes the nozzle and gets a good flow going before the actual cutter is started. The "brim" is like a levee/dam around your cutter that will stop cold drafts of air from hitting the nozzle and cooling the melted filament prematurely. So watch out for printers that have a really small bed. A 4" bed might sound okay when you are shopping, but it might actually be limited to a 3.5" cutter.
- What material is the bed plate made from? Printers can come with rubber, metal, magnetic, or glass beds. You want a bed that is perfectly flat: no dips, waves or divots on the surface. You also want it made from material that won't warp or deform over time because a warped bed plate will generate a deformed cookie cutter. The build plate also needs to have adhesive properties so the extruded plastic has something to stick too. If the plastic doesn't stick to the bed plate your cookie cutter will end up being a big clump of spaghetti instead of a blade and handle. My ender came with a glass bed, but glass beds sometime need extra adhesive such as a glue stick, painter's tape, or Aqua Net hairspray. (Note: if using hair spray remove the plate and spray it away from the printer, you don't want the sticky hairspray getting onto the components of your printer.)
- Maximum Extruder Temperature - Some printers have a maximum extruder temperature that will limit the type of filament you can use. If the printer can only reach 230 degrees C than it can only use PLA filament. You won't be able to use PETG or ABS filament (if you wanted too). See section below on filament types.
- Z-axis height - The maximum Z-axis height is important if you also want to print tall figures with your 3D printer, but because cookie cutter are so short (around 19mm tall) is not really a consideration.
- Heated Bed - A heated bed helps the filament stick to the printing bed. A heated bed it required for some types of filament (ABS) and just optional for other types of filament (PLA). But it is HUGE problem getting filament to stick to the bed, so opt for the heated bed if you can afford it.
- Auto Leveling - Auto leveling is nice but not required. Manually leveling the bed involves placing a piece of paper between the nozzle and and bed and tightening the corner leveling knobs until the two just kiss. You have to do this at each corner and when you finish all four corners you need to got around again, and then again to make sure everything is level. So it would be nice if the printer did this leveling for you, but it is not a requirement.
- Noise / Safety - Some printers are noisy, very very noisy. There are motors and fans and belts constantly whizzing back and forth. If noise is an issue you may want to look for a printer that comes with an enclosure. Printers also generate micro shards of plastic as the filament is heated and cooled so place the printer in a well ventilated area. And DON'T put food or eat around the running printer - you don't want the micro plastics getting onto your food and ending up in your digestive system or your lungs. You can buy an enclosure for your Ender 3 printer, but on warm days all the moving parts can cause the air inside the enclosure to heat up rapidly. If using ABS filament you will need a ventilation system because of the toxic fumes the ABS releases as it is heated.
- Ethernet connection - Most 3D Printers read the .GCODE data files from a micro SD card, and it is a pain to constantly move the SD card from your computer (where you are generating the .GCODE file) to the printer (which reads the file on the SD card and prints the object). Some printers allow you to hook the printer to the computer via a micro USB cable but this can be problematic. If you intend on printing cookie cutters for sale, you might want to find a printer that will work via an Ethernet connection.
- FDM printers typically use PLA, PLA Plus/PRO, PETT, PETG, or ABS filament. Some FDM printers can handle nylon, PVA, TPU, and blends mixed with wood, ceramics, and metal fibers. FYI: Virgin filament uses no recycled plastics.
- PLA (polylactic acid) is the most commonly use filament for printing cookie cutters. PLA is a bio-degradable type of plastic that is made from corn starch or sugar came (it also contains additives and pigments). It is called "the green plastic", and it is considered food safe. PLA comes in a rainbow of colors including translucent, and Silky. It melts at a temperature range of 195-210 degrees Centigrade, and a heat bed is useful but not required. A heated bed helps the first layers of the cookie cutter stick to the bed. If the cutter doesn't stick, a mess of filament is created and the cutter is ruined.
- PLA Plus also called PLA + or PLA Pro is essentially PLA was some additional additives that make it silkier, stronger, less brittle, or more colorful. The extra additives mixed with the PLA is typically trade/company secrets.
- PETT - PETT is halfway between PLA and PETG as far as strength and flexibility. It has a temperature range of 212 and 224 degrees C. Some articles tout it as being FDA approved, but others articles it is made up of FDA materials (just like PLA). PETT easily sticks to a heated bed plate. PETT is also about twice as much as PLA.
- PETG - PETG stands for "Polyethylene terphthalate glycol-modified". It has a lot of the same properties as PLA (considered food safe and easy to work with) but it is more expensive. PETG requires a higher temperature to melt (235-265 degrees C), but it is also stronger and more impact resistant (less brittle). But check the specs on the 3D printer - some printers can't achieve a temperature high enough to use the PETG filament.
- ABS - ABS which stands for Acrylonitrile butadiene styrene is an oil-based thermoplasic. ABS has superiors properties of strength and flexibility to PLA but ABS requires a heated bed because it tends to warp when printing. ABS also needs ventilation when printing because of the noxious fumes it emits. PLA on the other hand has a pleasing cotton candy scent (maybe because it is made from sugar cane?)
- Whichever type of filament you use, it comes in tightly wound roll typically weighing 1 kg (2.2 lbs). The rolls come in vacuum sealed bags to protect it from humidity. Humidity is the enemy of filament. Humidity can cause the filament to become sticky when it is heated which clogs the nozzle. Damp filament can also cause bubble, bumps, and pimples to form on your finished cookie cutters. When not in use the filament should be protected from humidity. You can also use a filament dryer box which is like a mini dehydrator for your filament. FYI: From a 1 kg roll I can get about 200 cookie cutters! That works out to about 10 to 15 cents each in filament costs for each cutter (depending on how much you pay for a roll of filament of course). FYI2: The Slicer software will tell you how much filament a cookie cutter will use and from that you can calculate an exact cost.
- There are two standard filament sizes: 1.75 and 2.85 mm. 1.75 mm is the most commonly used size for printing cookie cutters.
- You should also look for the labeled Dimensional Accuracy when purchasing filament. This number indicates how much the filament varies from the expected size. Common accuracy measurements are +/-.05 to +/- .02. The larger the variance in the filament size the greater the chance that it will clog the nozzle. Look for accuracy in the .02 to .03 range.
- The most recognized names in filament are:
- Hatchbox PLA
- Prusament PLA
- Soultech PLA
- OVERTURE PLA
- eSun
- ERYONE
- Axis 3d - They have vibrant colors and translucents too.
- KODAK PLA
- T-GLASS PETT
- To name just a few.


- CookieCad.com -The easiest way to turn your clip art into a 3D model is with the free CookieCad App. You upload your drawing to the web site, enter a few parameters (or use their defaults), and in 5 seconds flat the app generates your 3D model that you can then download to your computer as a .STL file. If you are new to 3D modeling, this is THE WAY TO GO. The app is not perfect, but it will give you a 3D modeled cookie cutter 90% of the time. If you want the other 10% you will need to learn some 3D modeling software. And if you don't have a 3D printer but need a custom cutter they can do that to. Just upload your clip art and they will 3D print and mail the cutter directly to you. PS: Cookiecad is nice enough to FLIP your image automatically so you don't have to remember to do it.
- TinkerCad - I haven't had time to play around with TinkerCad, but a lot of people use it.
- Fusion 360 - AutoDesk's Fusion 360 dominates the 3D modeling world. The software has a hefty price tag, but if your are a hobbyist you can use the software free for a year. Fusion is also the most frustrating and non-intuitive software I have every used. Nothing works like you think it should and it takes 10 steps to do what should take one. For example say your want to shrink /enlarge your sketch to be 4". Simple right?? Forget about it! You need to do this cryptic scaling of the sketch. Fusion 360 has an add-on, named Bella, that you can buy to make the cookie cutter building process much simpler. But I like to punish myself, so I do it all manually. And I have to admit that once you learn the cryptic Fusion 360 process, you can outline your sketch and generate your .STL files in about 5 minutes.
- Cura - Ultimaker puts out the Cura Slicer and it will work with most 3D printers It is free to download and use.
- Prusa - Prusa puts out the Prusa Slicer. There are default profiles for Prusa and Creality 3D printers, but you can build your own profile for other 3D printers. Like Cura, Prusa Slicer is free to download and use.
- Creality - Creality offers a bare-bones slicer named Creality Slicer. It is a striped down version of Cura. Free download.
- Simplify3D - One of the only slicer programs that you have to buy. I haven't tried it because I'm cheap.
- Dremel DigLab 3D slicer - Slicer for Dremel printers only, based on the Cura slicer.

- Not Sticking to the Bed - I have a heated glass bed on my Ender and in the beginning my KODAK filament wouldn't stick to the bed. The entire cookie cutter would slide around with the nozzle as it moved. I finally started using an Elmer's Purple Glue Stick. Before printing I will apply a thin film to the glass bed. After a few prints I start getting a buildup of old glue, so I remove the glass bed and wash it with warm water. But according to Simplify3D's troubleshooting guide there are 6 or 7 other things you can check if your print is not sticking to the bed including a non-level bed, the nozzle being too far away from the print bed, temperature settings, fan setting, etc. They also say that different brands of filament stick better or certain bed material. The sample of Creality filament that came with my Ender stuck fine to the glass bed, but the KODAK green filament had problems from day one (hence the need for the glue stick). So maybe it is true that some brands of filament just stick better than others.
- Warping - I was getting warped edges on the sharp corners of my cookies cutters. The edge would lift off the printing bed and interfere with the movement of the nozzle. Putting extra glue in the trouble areas seemed to reduce the problem, but the problem went away completely when I switched to the Prusa slicer and CHEP's profile. (CHEP is one of the YouTube 3D printing gurus.) The CHEP profile keeps the cooling fan turned off for the first few slices of the print. Turning off the fan keeps the filament from cooling too quickly on the critical first layers.
- Under Extrusion - When I switched to the Prusa slicer I was getting under extrusion on my base layer (which is the handle of the cookie cutter). No matter how I fiddled with the parameters I couldn't fix it, but then I found the CHEP profile which gave me the perfect setting and now my handles look beautiful.
- Stringing - In the beginning I was getting a lot of stringing. Things that can cause this are retraction speed, temperature too high, long movements over open spaces, movement speed. Bumping up the nozzle temperature up by 5 degrees seemed to fix this problem.
- Layer Separation and Splitting - In the beginning a few of my cookie cutters just split apart. Apparently this is caused by the Layer Height being too large or the temperature being too low. The problem went away when I increased the temperature.


- First question is: is the PLA filament itself food safe? The filament is made from corn starch or sugar came (which is food safe), but it also contains additives and pigments that are potentially not food safe. There are PLA manufactures that actually label their productions as Food Safe including German RepRap's PP Plastic and FormFutura's HDglass.
- Are the printer's components food safe? Is the nozzle made from stainless steel? What about the adhesive you are using to get the cutter to stick to the bed plate?
- PLA cutters will warp when exposed to heat so they can't be placed in hot water or in the dishwasher. Remember that PLA melts at 195 degrees C/ 383 degrees F, so even very hot water will soften and warp the cutter. Because of this low tolerance to heat, you can't use the typical sterilization method of dunking the cutter in hot water. Instead you need to use a lukewarm bath or an anti-bacterial solution to wash the cutter after it is made and before it is used.
- Another concern is that while the cutter looks solid, it is not. There are small crevices and tiny gaps in the surface of the cutter that is very hard to thoroughly clean (especially since you can't use hot water). The small crevices allow bacteria to quickly build up.
- Some "people" says that 3D printed cookie cutters are only safe for Single Use. After using them to cut out a batch of cookie dough, the cutter should be thrown away. This is because after coming in contact with dough (which usually contain raw eggs) the porous surface of the cookie cutter becomes a petri dish of multiplying bacteria.
- Other "people" say that using a 3D printed cookie cutter is safe because the cutter is not in contact with the cookie dough for very long, and the cookie itself is baked which will kill off any bacteria transferred to the cookie dough via the cutter. The heat of the oven might solve the bacteria problem with cookies, but what about fondant? I cut fondant and gum paste with my cookie cutters too. That also brings up the subject of Stencils used on cookies. Like the PLA the stencil plastic itself is food safe, but what other bacteria are lurking on the plastic stencil? And paper! I use paper templets as a guide when cutting cakes - is paper food safe?
Carol

thank you! so helpful. I am actually considering buying a 3D printer for my cookie cutters. Will probably go with the Ender 3Pro for beginners and if I like it, will move up. Very good information. Thankyou.
ReplyDeleteThanks for your comment. I'm so glad you found the information helpful. Let me know if you have any questions and I will try to answer them. -- Carol
DeleteWow. Talk about timing. I just chatted with the lady who made my cookies about this. I will be printing some cutters for her! This info helps! Thank you!
ReplyDeleteGlad it helped!
DeleteHow do you print embossers vs cookie cutters?
ReplyDeleteHi CakeMeAway, The printing part is the same regardless of whether it is a cutter or an embosser: you bring your STL file into the slicer software and create the .GCODE to send to the printer. The difference is in the modeling software which creates the STL file. If you are using CookieCad, then there is an option button to change from "Cutter" to "Stamp". (A stamp is another name for an embosser.) If you are using Fusion 360 then instead of creating thin Offsets (.6mm) around your item and then extruding the .6mm offsets to create a cutting blade, you simply extrude the item itself. I will add a section in the post on the difference between a cutter and an embosser/stamp to help clear things up.
DeleteHI! Your post has been extremely helpful. I do have a question.... so I own a Flash Forage 3d printer. I've been using Cookiecad but I've been having issues with my cookie handle and not being able to adjust their size through my printer program. I decided to try Fushion 360 and I am getting the hang of it but I was wondering if I need a slicer program or not? I've been just downloading the STL file to my desktop and then opening it in the flashprint app that is what my printer uses.
ReplyDeleteHi Victoria, You need slicer software to convert the STL file into the gcode that is specific to your program, but it sounds like your FlashForge printer has its own slicer software built into the app. This is not unusual. Creality has its own slicer software and so does Prusa. But the Creality and Prusa slicer software can be used with other 3D printers. For example I use the Prusa Slicer to generate a .gcode file that my Creality 3D Ender understands. Regarding the handle size, what happens when you increase the handle size in CookieCad?
DeleteHi! Your page has been extremely helpful! Quick question: Do you NEED slicer software? I'm just learning how to use Fushion 360 and Ive just been downloading the STL files to my desktop than sending them to my FlashForage printer.
ReplyDeleteHi Victoria, Yes, you do need some type of slice software to convert the generic STL files into code and commands that your specific printer understands. But it sounds like the FlashForge printer may have its own slicer software built into the printer so it does the conversion from slt to gcode automatically.
DeleteHope this helps.
hi! my boyfriend has just the same printer and he made some imprint and high detailed cookie cutters for me but i couldnt find the perfect recipe, some of them hold the shape perfectly but too sticky to work with. do you have a recipe for imprint cookie cutters ?
ReplyDeleteHi, I use a recipe called No Fail Sugar Cookies from the Cake Central site. Here is the recipe...
ReplyDeleteNo Fail Sugar Cookie – NFSC
Ingredients
6 cups flour
2 cups unsalted butter
2 cups sugar (white granulated)
2 large eggs
2 tsp. vanilla extract or desired flavoring
1 tsp. salt
Instructions
Cream butter and sugar until light and fluffy. Add eggs and vanilla. Mix well. Mix dry ingredients and add a little at a time to butter mixture. Mix until flour is completely incorporated and the dough comes together.
Chill for 1 to 2 hours (or see Hint below)
Roll to desired thickness and cut into desired shapes.
Refrigerate the cut dough for 30 minutes or 10 minutes in the freezer.
Preheat the oven to 350 degrees. Heat a cookie sheet lined with parchment paper in the oven.
Transfer the cold cookie dough onto the hot cookie sheet and bake for 8 to 10 minutes or until just beginning to turn brown around the edges.
HINT: Rolling Out Dough Without the Mess
Take the freshly made dough and place a glob between two sheets of parchment paper.
Roll it out to the desired thickness then place the dough and paper on a cookie sheet and pop it into the refrigerator.
Continue rolling out your dough between sheets of paper until you have used it all. By the time you are finished, the first batch will be completely chilled and ready to cut.
Reroll leftover dough and repeat the process! An added bonus is that you are not adding any additional flour to your
Hello do you happen to have a thingiverse collection for stl files you've already made? My wife wants me to print your spiderman cutters for our sons bday cake. It would save me and others time if you already had the files.
ReplyDeleteSorry, no thingiverse collection. But I use Cookiecad.com to create the STL file. It is very easy. Just load the black and white image into their app, give it a size and a few parameters and it generates and STL file. It only takes a few minutes.
DeleteHi, do you ever find on cookiecad that some dimensions work better with different size cookie cutters. For example I always choose 0.4mm for my blade thickness because my nozzle is 0.4, but when it come to entering the size, the thickness come out thicker than 0.4mm, just wondering what your default dimensions are for blade thickness and handle height/width for big cutters and what it is for small cutters. I use my printer mainly for printing polymer clay cutters so they are normally less than 3cm big
ReplyDeleteHi Amber,
ReplyDeleteSadly, the dimensions you end up using involves a lot of trial and error. If your blade thickness is printing thicker than 0.4 mm it might be a function of your slicer program. I use Prusa Slicer and there is a "thin wall" option that sets a minimum wall thickness. A setting like that might be forcing your blade to print thicker than what you selected in CookieCad.
For blade thickness I use 0.6mm for fondant cutter (which is similar to the polymer clay). I use a blade height to 7-9 mm depending on the thickness of the object I am cutting. The handle thickness and height also depends on the size of the cutter. If I am cutting little 1/2" cutters I will use a handle size of 2mm thick and 2mm high, but as I increase the cutter size I increase the handle size just to give stability to the cutter. But I never go above the cookiecad default of 4mm handle thickness because it uses too much filament and takes too much time to print.
I also never had much luck printing a blade thickness of 0.4mm (even with a 0.4mm nozzle). The blade comes out very fragile and often splits away from the handle. If you really need a blade that thin you could try a .2mm nozzle.
Let me know if you have any other questions, and I will try to help.
Carol
Hi there, thank you for this extremely helpful post! Do you have any additional guidance for specifics on using CookieCad and printing a rounded handle? Thanks again!
ReplyDeleteHello, Carol, thank you so much for this information! This is very helpful for me. Thanks a lot! Have a nice day🌈
ReplyDeleteHola como tengo que hacer para tener el diseño del dinosaurio 3d
ReplyDeleteThis was so awesome.. I'm very new to all of this and this was beyond helpful! Thanks so much.. I have a question.. probably a stupid one.. Why do some cutters have the two layers as depicted in one of your pictures (cutting blade and secondary blade) and some cutters just have one? Is there an advantage to having two?
ReplyDeleteHi that is not a stupid question! The cutting blade can be any thickness from about 0.20mm to 1mm. The thinner the blade the sharper and more precise the cut, but a thinner blade (.2mm) is also a weaker blade. A thicker blade (1mm) is sturdy and won't break or collapse, but it doesn't give as nice a cut. So using two blades sandwiched together gives you the best of both world. The tip of the cutting blade is thin and gives a nice cut, and the secondary blade stacked against cutting blade makes the composite blade stronger. But I usually don't make my cutters with two blades. If I'm making a cookie dough cutters I use a .8mm cutting blade and a 12.5mm depth. If I'm making a fondant cutter I use .6mm (or sometimes .4mm) cutting blade and a 8mm depth. Because the cutters are just for me I don't worry if they break - I just make another one. Hope this helps.
DeleteLove all of the information given , it’s so helpful. I specifically want to make embossers and debossers for myself. I use silhouette studio at the moment as I don’t know how to use adobe yet and have had a play in tinkercad for the layering but I just can’t seem to find any tutorials or guides on how to’s. Do you have any tips or guidance at all. Thanks so much for the info already given. You can buy every cake tutorial going , bakers are quick to make money on their recipes and methods yet no one really wants to fully share or teach the digital side of making your own tools - I know a lot of the learning is self taught and I’ve got myself so far but it would be nice to have a fellow creative brain offer some guidance lol 😂 Rachael x
ReplyDeleteHi Rachael,
DeleteSorry I don't know much about Tinkercad other then the sales blurbs. I take the simple route with my cookie cutters and just load my image into app.CookieCad.com/design and let it do all the work. I just fill in all the parameters (size, blade height/thickness, etc) and it spits out a STL file.
But if you are looking for more in-depth instruction try out SamsCookieCompany.com She has an Academy that teaches everything about cookie cutter designing and manufacture. I just make cutters for myself so I don't worry about how they look - just that they get the job done. LOL
Hope this helps.
Carol