Monday, December 30, 2019

New Orleans Saints Cake

Every fall I get a bunch of family requests for New Orleans Saints themed cakes.  Here is one for Evan.


<< Disclosure: We are a participant in the Amazon Services LLC Associates Program, an affiliate advertising program designed to provide a means for us to ear fees by linking to Amazon.com and affiliated sites.>>

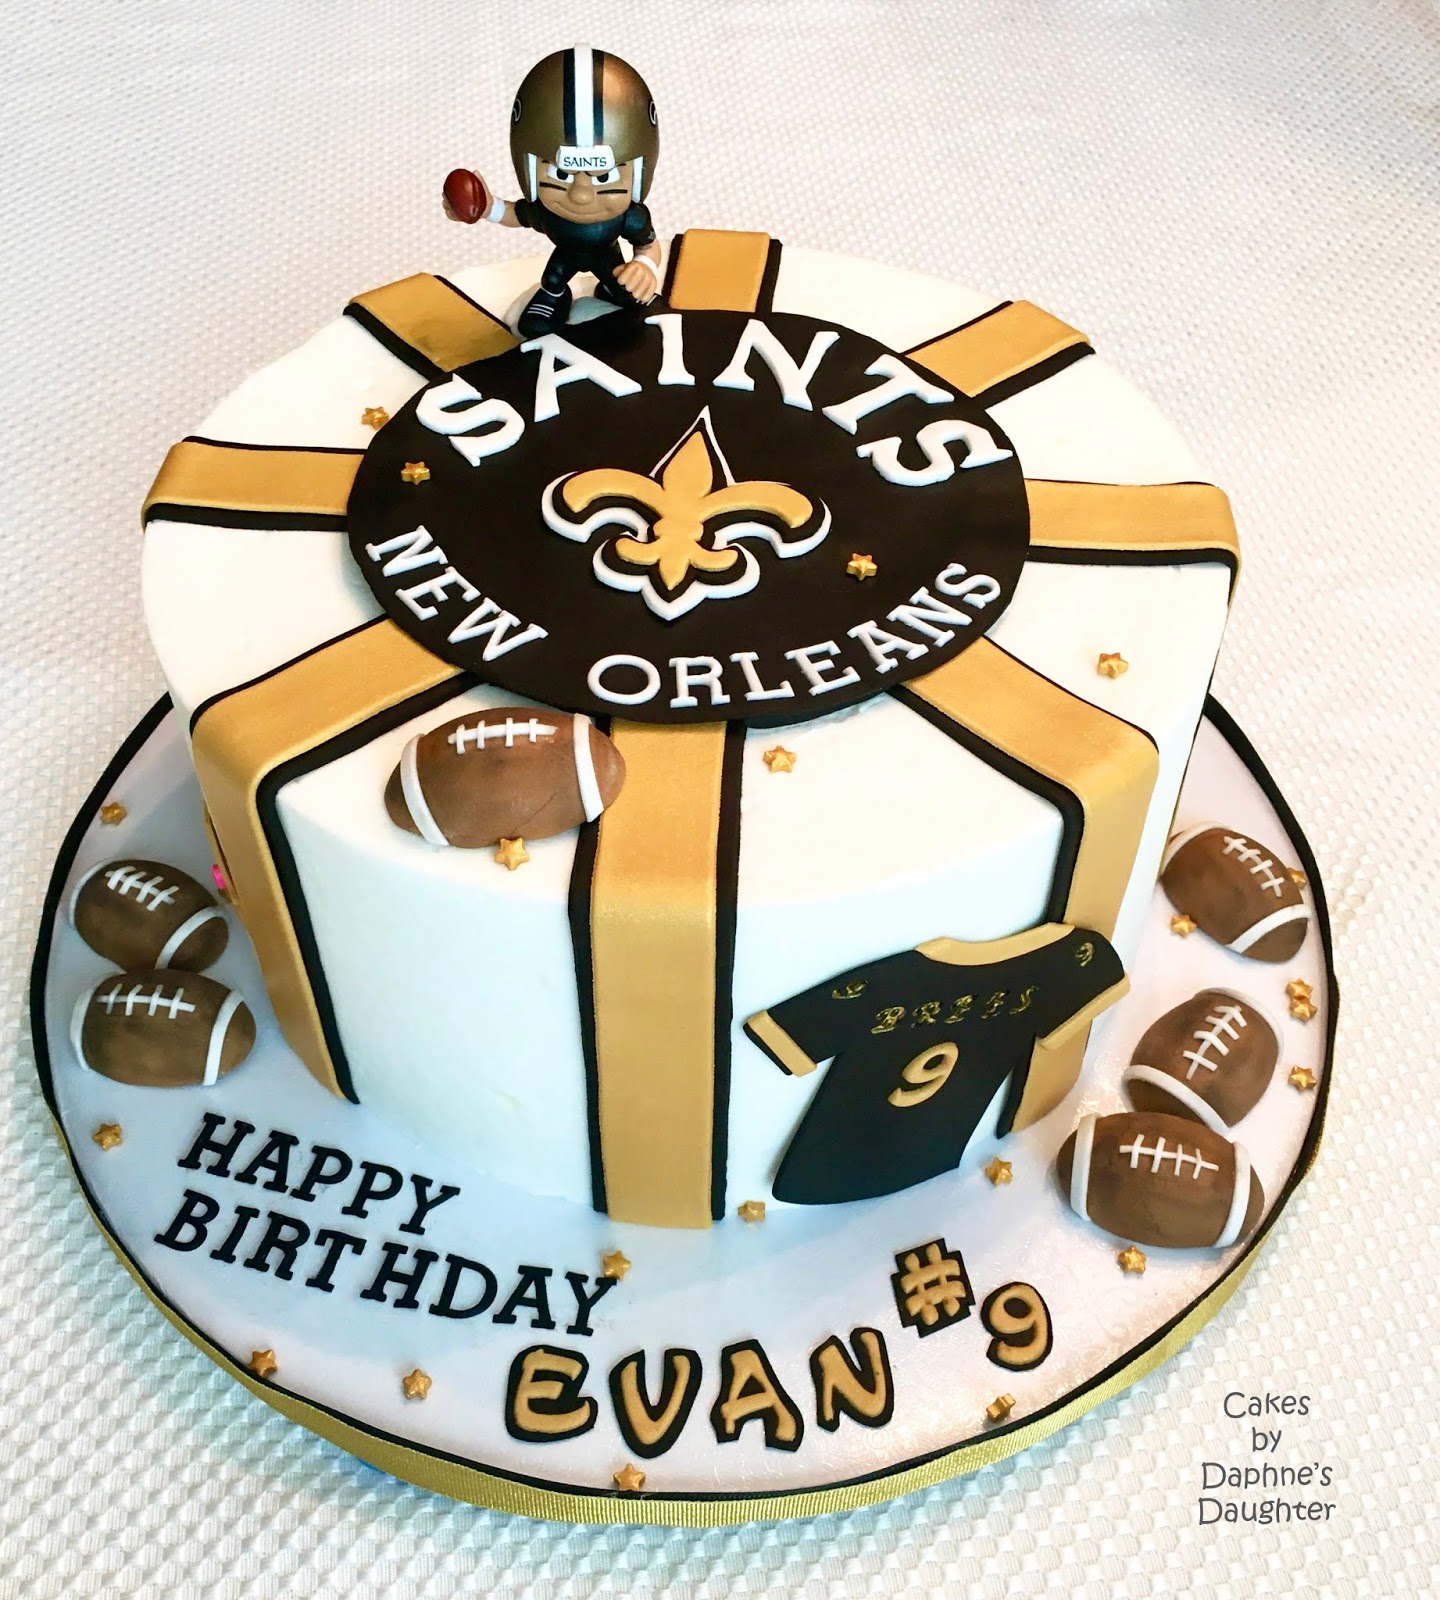
First thing I made for this cake was the fleur-de-lis for the Saints's logo.  I cut the gold section using Satin Ice Gold Shimmer fondant.  The shimmer fondant is not as sparkly as fondant painted with gold luster dust mixed with alcohol, but the shimmer fondant looked fine on this cake.


For the black section of the Fleur-de-lis logo I used black Fondarific fondant, and for the white sections I used Renshaw fondant.  (I have been testing white fondants again since my goto fondant - Mona Lisa - was discontinued.  That was a sad, sad, day.)


Here is the Fleur-de-lis all cut out and the three colors of fondant stacked.  It is not perfect, but hey, it is just cake!


For the distinctive "Saints" lettering I used a paper template cut from an actual logo, and for the "New Orleans" portion I used FMM Block Alphabet Tappits.


For the strips on the cake I cut out strips of black and shimmer gold and placed them on my buttercream frosted cake.  The toothpicks mark where the circular logo will be placed.


I put a black circle of fondant in the center so my logo would be at the same height as the stripes.


I purchased a little plastic Saint's quarterback player for the top of the cake, and used a bit of white fondant for a base.  The base kept the guy from flipping over and also kept the non-food safe plastic from touching the edible parts of the cake.


For the jersey I used a cookie cutter to cut out the shape.  For the "BREES" lettering I used mini push letters I found at Hobby Lobby, and painted the depression with gold lust dust mixed with vodka.  The large "9" on the jersey is the FMM Magical Alphabet Tappits


For the footballs I used a sports ball mold, and added the white strips after I removed the fondant ball from the mold.  So here is the finished cake - I hope Evan likes it.


Happy Decorating,

Carol


Supply List: 

Satin Ice Gold Shimmer fondant
Roxy & Rich Gold luster dust
Black Fondarific fondant
Renshaw white fondant
FMM Block Alphabet Tappits
FMM Magical Alphabet Tappits
Plastic Saint's quarterback player
Anne Clark jersey cookie cutter
Sports ball mold

Saturday, December 28, 2019

LOL Surprise Bon Bon - in Cakesicle form

I'm not sure who or what LOL Surprise Bon Bon is, but when a co-worker asked for an edible version this is what I came up with.

LOL Bon Bon in Cakesicle form


Here they are all ready to go to the party - 36 of those little buggers.


I hate the mushy combination of cake and icing that most cake pops are made of, so instead I use a combination of brownie and chocolate chip cookies.  The brownies are a little under baked so there is no need to mix them with frosting, and they stay moist and delicious for days.

<< Disclosure: We are a participant in the Amazon Services LLC Associates Program, an affiliate advertising program designed to provide a means for us to ear fees by linking to Amazon.com and affiliated sites.>>

I coat my cakesicle mold with Ghiradelli white melting wafers, and once that is set I pack the brownie mix into the cavity.  More white chocolate goes on the top, and then I just let it firm up overnight before I start decorating.


For the Bon Bon cakesicle decorations, I made a paper template from an image of Bon Bon.  I had one template from the blue hair in the front and one template each for the yellow and pink portions of hair.  For the decorations I used Choco-Pan's White Covering Chocolate instead of fondant.  I think the covering chocolate just tastes better.  I cut out the blue portion of hair and stuck it on the front of the cakesicle.


The yellow and pink pieces were cut next....


I stuck the two together before I curled it around the top, back and sides of the cakesicle.


Next I rolled out some rope from the yellow and pink chocolate, cut them into 3" lengths, and curled them into little Bon Bon's hair buns.  I stuck them to the cakesicle with a little dab of melted white chocolate.  I tried using water as a glue, but they kept falling off.


The eyes came next.  I cut out thin circles of white, blue, and black and stacked them together.  I stretched them a little to make them more oval shaped.


I rolled a thin rope of black fondant, tapered it at both ends and positioned it over the top of the stacked eye to form a sort of eyelid.


I put the eye on the cakesicles and added pink eyebrows, a mouth, and a little ball for a nose.  Notice that the color of the nose doesn't match the color of the skin?  To make the white chocolate match the skin tone of the actual Bon Bon doll, I added a touch of Fleshtone/Copper food gel to the white chocolate before I coated the cakesicle mold.  I forgot to tint the white covering chocolate but once I put the nose on the cakesicle I realized my mistake and made the nose color match the skin color.  I also couldn't get the nose to stick to the face.  I tried pushing some nostrils in the nose hoping it would make it stick to the face, but the nostrils made the nose too pig-like.  In the end I just stuck the round ball to the face using a touch of melted white chocolate.


Making Bon Bon's eye glasses were a PITA.  I rolled out the covering chocolate (stiffened with a bit of Tylose powder) and cut it into strips.  I used a wider strip for the top part of the glasses, and two narrower strips to form the loops.  I pushed the looped section into the top section and used a bit of water as glue.


After allowing the glasses dry overnight, I stuck the eye glass to the face using - you guessed it - white chocolate.  So what do you think?  Do they look like Bon Bon?


Happy Decorating,

Carol


Supply List: 

Cakesicle mold
Ghiradelli white melting wafers
Choco-Pan's White Covering Chocolate
Mini Circle Cutter
Fleshtone/Copper food gel
Sky Blue food gel
Pink food gel
Buttercup Yellow food gel
Tylose powder

Saturday, December 21, 2019

Patron Drip Cake


It is the season for liquor inspired cakes!!

This one is a Silver Patron Drip Cake with Salted Patron Margarita Macarons, Slutty Rum Brownie Balls, and Tequila Key Lime Cookies.

Cheers!


<< Disclosure: We are a participant in the Amazon Services LLC Associates Program, an affiliate advertising program designed to provide a means for us to ear fees by linking to Amazon.com and affiliated sites.>>

The drip on this cake was made from a ganache recipe using Nestle White Morsels, heavy whipping cream, and Vivid Green food gel by GSA.  I usually use real white chocolate to make the drip, but I had some Nestle morsels in the pantry so I decided to use them.  The drip recipe is just 175 grams of morsels and 1/3 cup of heavy cream (70 grams) warmed in the microwave at 30 second intervals till melted.  The ganache came out a little oily looking and a little thin, but it looked okay once it was set.  The green color came out a very vivid shade and exactly matched the ribbons on the little bottles of Patron.  The ganache did look a little translucent, and in hindsight I should have added some Bright White Food Gel to make the color more opaque.  But, hey,  live and learn.

To decorate the cake I used some little bottles of Silver Patron, some green Macarons filled with buttercream laced with lime juice, tequila and Margarita salt,  and some cake balls made from my Slutty Rum Brownie recipe.  I used this cake pop press to form the balls, and coated them in Ghirardelli White Melting Wafers

All-in-all this was a really boozy cake - good thing there were no kids at the party.


Happy Decorating,

Carol


Supply List: 

Wilton Gum Paste
Nestle White Morsels
Vivid Green food gel
Bright White Food Gel
Cake Pop Press
Ghirardelli White Melting Wafers
Almond Flour