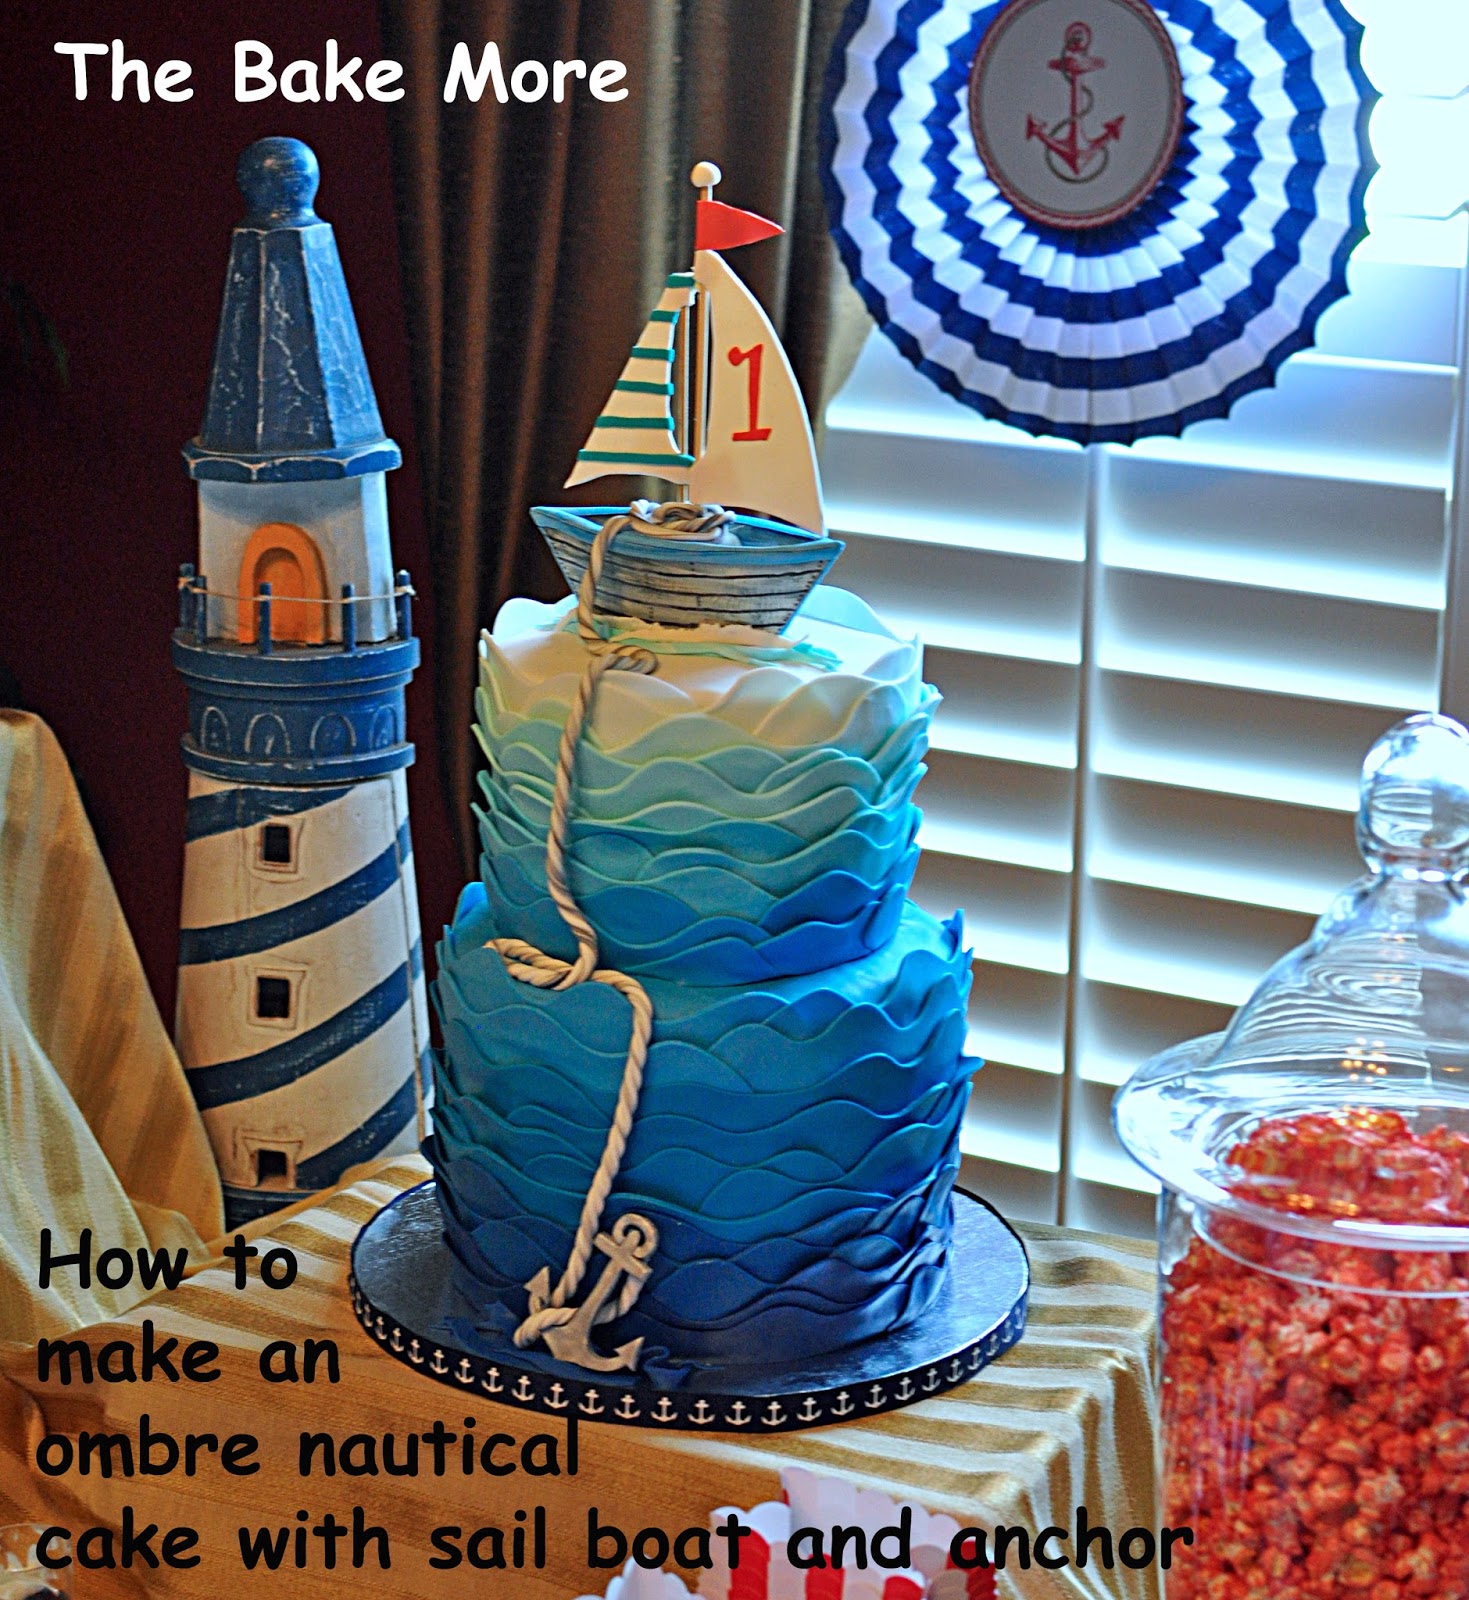
My latest adventure in cake decorating was a nautical themed cake for my sister-in-law's sister's step-grandson. Does that make sense? The birthday boy's name is Duke and he was turning 1. Happy Birthday Duke!!
Duke's mom gave me a picture from Pinterest and asked, "Can you make this for me."
I happily said, "I'll try..."
Duke's mom seemed happy with the finished cake, and I was really impressed with her decorating abilities. She went all out with the nautical theme, and everything looked amazing.

Now onto the construction of the cake - the fun part!!!
I baked the cakes a week prior and froze them. The day before the party I made the icing and started stacking my frozen cakes. On my last big party cake (a gold engagement cake) I had a problem with icing bulging from between the layer and pushing the fondant out like an inter-tube. It was not an pretty sight!! During the party I kept trying to smooch the fondant and push the bulge back into the cake, but sadly all my efforts were in vain. But happily the party was dark, so no one noticed my bulges.
After some research I figured that the reason for the bulge was that my "icing dam" was too skimpy. The weight of the cake layers above squeezed the filling past the dam which in turn caused the bulge in the fondant. Lesson Learned!
So on this cake I used some extra firm icing for the dam, and piped a barrier that was really wide and high. I also followed the directions from the Krazy Kool Cakes videos on YouTube and placed the dam a good 1/2 inch away from the edge of the cake. At the time I didn't have a big enough piping tip so I just used a standard coupler (without a tip attached). My hack worked fine, but I have since gotten a round Wilton Tip #2A to make the dam.

For this cake I also tried a different buttercream recipe - one from Edna De La Cruze via Krazy Cool Cakes. Edna has one recipe for a firm/crusting buttercream that is all shortening. The firm buttercream is used for dams and to ice the outside of the cake. The second icing is a softer, creamier version made with butter and shortening that is used as filling and for crumb coating. I'm not a big fan of American buttercream (too sweet and greasy feeling), but I have to say I really liked Edna's version. It is lighter, fluffier, and noticeably less sweet then others I have tried. The recipe uses High Ratio Shortening, and I now realize it is important not to substitute this ingredient with regular vegetable shortening because the High Ratio Shortening makes a real difference in the taste and texture of American Buttercream.

After stacking comes the crumb coat: ice the top, fill in the 1/2 inch gap between the icing dam and the edge of the cake. and then a final crumb coat on the sides. I made the final crumb coat with a light blue buttercream just in case any of the crumb coat peaked through the blue fondant waves that would cover the sides.

Next comes the fondant. I used Renshaw white fondant on this cake, and it took about 3 lbs of fondant to cover a double barrel 9" round cake that was about 8" tall, and a 7" round cake that was about 6" tall.
The original cake design called for the top of the top tier to be white. I'm a little cheap and I didn't want to waste fondant on the sides, so I just covered the top and let the white fondant hang down the side about 1/2 inch. Notice that I didn't spend any time smoothing the top and the sides. The sides would be covered in fondant waves, and the top was supposed to be choppy water! So no worries about the rough spots.

The first row of waves at the top of the cake are white. I cut the waves free hand. Using an X-acto knife I cut the bottom edge straight, and then just cut a wave pattern in the upper part. I also kept the length of the waves short: about 4-5 inches each. At first I cut longer lengths, but this didn't work well. The longer pieces were hard to position and they kept stretching and pulling out of shape. And with the longer pieces I couldn't get the crests and troughs of the waves to line up correctly. I kept getting crests on top of crests, which didn't look very good. So in the end I just cut short pieces with 2-3 peaks on each length. I also tapered each end so they came to a point.

After the first white row of waves, I mixed a little Wilton Teal food color gel into the white, and gradually made each successive row darker. Towards the bottom of the top tier I started adding Wilton's Royal Blue. Also notice the little balls of paper towels I used to prop up the tips of the waves sticking up over the top of the cake. The "waves" kept flopping over so I did this just till the tips firmed up and could stand up without drooping.

Here is the top layer all finished. I went a little overboard with the number of rows. Some of the waves are just a little too close and cramped. I probably could have used half as many rows and it still would have looked fine.

Next comes the second tier. When I colored the fondant for the bottom row of waves on the top tier, I made enough to cover the top of the second tier in the same color. Again I only covered the top and about 1/2 inch down the side. I also used the Wilton Cake Marking Tool to put guide lines around the cake. These lines made sure that my waves stayed level and didn't start to angle down the cake.

Getting close to the bottom.

Toward the bottom of the cake I started to run out of Royal Blue food color, so I added Wilton's Violet to the mix. The mix of Violet and Royal Blue really gave the bottom waves a rich, dark color. In hindsight I should have started adding a touch of the Violet color midway down the bottom tier.
Then I stacked the cakes. There are a few gaps between the top and bottom tier. :-(

Originally I planned on putting a ribbon around the base of both tiers, but the ribbon just didn't look right. The colors didn't match because the ribbon was a navy blue and the fondant was more teal and violet. And stupid me, I didn't save any of the tinted fondant I used to make the last row of waves on each tier. No way could I reproduce the color, so I just pushed and stretched the fondant to fill in the gaps. I also think the top tier kind of sank into the bottom tier which also got rid of the gaps. Oops.
Next I assembled my sailboat. The boat, sails, and flag are made out of gum paste, and the "masts" are wooden BBQ skewers. For the teal stripes on the smaller sail I first tried to paint them on. It didn't look very good, so I used my extruder and created thin, flat strips of teal fondant that I wrapped around the sail. The "1" on the cake came from a Funky Alphabet Cutter Set.
Then I put a lump of gum paste inside the boat, trimmed the skewers masts to the correct length, and stuck them into the gum paste lump to create the holes. I then removed the sails and let the gum paste harden before I reinserted the sails. I also "glued" the skewers to the lump with a little melted white chocolate, and I also glued the two sails together using the same melted chocolate.

Then I placed my boat on top of the cake. I cut out thin strips of teal and white fondant and surrounded the base of the boat. I thought it kind of looked like splashing water. Next I placed the anchor and draped a fondant "rope" from the anchor to the boat. I used my extruder to make the rope, but the extruder couldn't make one piece of rope long enough to go from top to bottom so I just joined the two pieces and hid the join behind a "wave".


And strangely I think my favorite part of the cake is the rope. I really like how it came out. It is just white fondant that I dabbed with a little black food color and then pushed it thorough a clay extruder fitted with a 3 ringed, clover leaf looking blank. After the rope came out of the extruder, I twisted and stretched it to make it look like rope.


I have read that a decorated cake drum really makes a cake stand out. I was going to do something fancy with the silver cake drum under the cake (maybe add sand to look like the ocean bottom), but like always I ran out of time. So instead I just wrapped a piece of ribbon around the drum. I also put some strips of fondant under the anchor to help hold it in place. The anchor is gum paste cut out that I sprayed with Wilton's Silver Color Mist. I was going to put a fondant "rock" beside the anchor and make it look like the anchor was caught on the sea floor, but my rock look more like dog poo so I tossed it.
So in the end I was happy with the cake, and Duke's mom and step-grandmother looked pleased.

And the cake itself was a hit too. Yummy White Chocolate Almond Cake. And notice that there is no fondant on the sides of the cake. When I disassembled the cake I just cut the entire length of waves fondant and peeled it from around the cake in one big piece. It is so much easier to slice the cake without the fondant!!

Happy Decorating,
Carol