Showing posts with label Fondant. Show all posts

Friday, June 22, 2018

Rustic/Weathered Basket of Tulips - Cake

I love it when a disaster waiting to happen turns out pretty well.  I made this cake for my mom's birthday back in March.


I had planned on filling the basket with gumpaste roses I had made a few weeks earlier, but once inside the basket the flowers just looked too wimpy.  Not enough color and not nearly large enough.  As a last minute fix I used some fresh tulips I had bought for my mom's birthday.

Besides the panic over the flower, this rustic, weathered looking basket was pretty easy to make.  It starts of course with a cake that I sliced in an oblong shape.


<< Disclosure: We are a participant in the Amazon Services LLC Associates Program, an affiliate advertising program designed to provide a means for us to ear fees by linking to Amazon.com and affiliated sites.>>

After frosting the cake I started on the "wooden slats" that make up the basked.  To get the weathered look, I used a wafer paper technique that is super quick and easy.  First you need some funky colored fondant.  I wanted the basket to be gray so I tinted some fondant gray and then added some left over brown and yellow fondant I have from other cakes.


Next I cut the fondant to match the 8x11" wafer paper.  Wafer paper is made from potato starch, water and vegetable oil.  It is considered edible, but I wouldn't eat it.  I actually peeled off the wafer paper covered fondant and discard it before serving the cake. 


After cutting the fondant to match the shape of the wafer paper, you start to dampen the paper with water.  Add the water slowly till the wafer paper starts to buckle and warp.


When the paper is wet enough, take a small rolling pin and roll it over the paper. The rolling action will stretch the fondant underneath and cause the wet wafer paper to rip and tear.  The more you rip the paper, the more weathered the final wood with look.  Note that over a few hours the water in the wafer paper will evaporate and the wafer paper will dry and crinkle even more.


When the wafer paper looks ripped enough, just cut the fondant into strips to fit the height of your cake


Next start sticking the strips to the side of the cake.  See those tulips in the background?  They are going to be sacrificed for this cake!


I added horizontal pieces at the top and bottom of the basket.


For the handle I just cut a long strip of the weathered fondant and let it dry overnight on top of a cake pan.  Sadly the handle wasn't stiff enough to stand up on its own, so I added some thick wire and secured the wire to the handle using more weathered fondant.


As a last step in making the weathered fondant look more realistic I made what looked like nail heads at the top of  each board and where the handle connected to the basket.  I just pushed a sharp tool into the fondant, and added a little black and brown powdered food coloring to give it that extra ump.


At this point I tried placing the gumpaste flowers I had pre-made made for this cake, but they looked horrible.  They were way too small, and I only had about 1/3 as many as I needed.  In desperation I decided to sacrifice my mom's bouquet of tulips for her cake.  I wasn't sure if tulips were poisonous, or if they had any chemicals on them, so I put some parchment paper on top of the cake to protect it from any nasty stuff.  I also added another piece of weathered fondant to hide the cut ends of the tulips.


So here is the finished cake.  Can you tell that it is cake?  Surprisingly none of the guest at the party realized what it was.   A lot of people gave my mom flowers for her birthday, so everyone thought the cake was another bouquet of flower.  How cool is that!


Happy Decorating Folks,

Carol


Supply List: 

Mona Lisa Fondant
Wafer Paper
Wilton Ribbon Cutter
Tylose powder
Wood Grain Texture Mat
Edible Black Luster Dust


Wednesday, May 2, 2018

Cutout Flower Cake

I've wanted to tryout this Cutout Flower style cake for a while now, and I finally got the chance when my niece requested a cake "with flowers".  I guess she was expecting pipped buttercream roses because she looked a little surprised when she got this.   LOL, my family show know by now that if they don't ask for something specific, they get a design that I want to try out.


<< Disclosure: We are a participant in the Amazon Services LLC Associates Program, an affiliate advertising program designed to provide a means for us to ear fees by linking to Amazon.com and affiliated sites.>>

The process of making the flower cutouts was actually really easy.  I just took all the flower cutters I had on-hand and mashed up the different styles. 


I made lots of flower not knowing how many I would need, and gave them a few days to dry so they were nice and stiff and would stand up straight without flopping over.  On the day of assembly I covered the cake with fondant, put a sugar pearl border around the base...


And then just started sticking the flower cutouts to the fondant with a little melted white chocolate.


I started panicking near the end because I  didn't have enough flowers, but I just made a few quick cutouts to fill up all the empty spaces.  I even threw on a few red flowers because the birthday girl's favorite color is red.


So I enjoyed trying out this new technique, and I think the design makes a bold statement.  It is not your everyday birthday cake.


Happy Decorating,

Carol


Supply List: 

Mona Lisa White Fondant
14" Cake Drum
Wilton Gum-Tex Tylose Powder
Wilton White Sugar Pearls
Various flower cutters

Saturday, February 3, 2018

Easy Minnie Mouse Cake – Just ears and bows

I’ve have been making so many cakes lately, I haven’t had any time to blog. Honestly I’ve been getting a little overwhelmed by cake request: baby showers, birthdays, engagement parties. Cakes are just a hobby of mine, so I have to be careful not to let it slip from being an enjoyable pastime to a chore.

Anyway, here is a little cake I made from my sister-in-law’s sister’s step-grandchild. Does that make sense? Happy Birthday, Molly.


The poor little girl’s birthday fell during the height of the 2018 Mardi Gras season so her mom couldn’t find a bakery willing to make a cake. FYI: During the Mardi Gras season, bakeries in New Orleans turn their shops into King Cake making assembly lines. Apparently King Cakes are more profitable than regular cakes and pastries. Strangely in the Cajun/Creole city of New Orleans the hottest selling King Cake is made by a Vietnamese bakery name Dong Phuong.   DP went from selling 80 King Cakes in the 2008 season, to selling 80,000 in 2017.  In 2018 they won the James Beard Award for American Cuisine, and demand for their cakes sky rocketed.  People have been lining up outside the bakery and waiting in line for 2 hours to get one of their King Cakes.  No telling how many Kings Cakes they will sell this season.  Congrats Dong Phuong.

So little Molly is crazy about Minnie Mouse, and her mom requested a simple cake with ears and a bow.  For the free standing ears I just cut out circles from black fondant mixed with a little Gum-Tex. I cover the fondant with plastic wrap so that the top edge would have a rounded look instead of sharp edge.


I attached a bamboo stick to the back and let it dry for a few days till it hardened.  The letters I made using a cute Funky Alphabet cutter from CK Products.


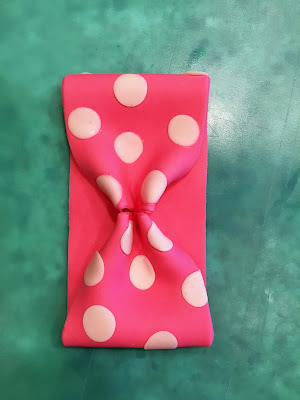
The bow was next. I wanted a polka dot bow so I pushed white dots into the pink fondant.


 I cut out a strip about 2” wide and 11” long. Folded the ends over toward the center.


Crimped the top edges, and then stuck the crimped side to the flat bottom piece.


Instead of crimping the bottom section to make it match the top, I just trimmed the bottom section to a size that was slightly smaller than the top.


I wrapped a 1/2" piece around the center to form the “knot”, and then stuffed plastic wrap inside the bow to hold the shape as it dried.


For the little bows I just made a paper template, and stuck the fondant cutouts together.


I used cotton swabs (wrapped in plastic wrap) to hold the bow open as it dried.


The cake assembly was really easy. I just cut out some mouse silhouettes out of black fondant and stuck them to the cake. The hardest part was making sure there was an equal distance between each silhouette.


I glued the little bow to the silhouette with a bit of melted white chocolate, and used the same white chocolate to make the dots on the little bows.  Next I put the ears and the big bow on top of the cake, and finally a border and a few pick flowers to completed the cake.

So cute, and actually one of the easier cakes I have done.  Happy Birthday, Molly!


Happy Decorating,

Carol


<< Disclosure: We are a participant in the Amazon Services LLC Associates Program, an affiliate advertising program designed to provide a means for us to ear fees by linking to Amazon.com and affiliated sites.>>


Supply List: 

Mona Lisa White Fondant
Fondarific Black Fondant
Wilton Strip Cutter
Wilton 12" Cake Drum
Wilton White Candy Melts
Circle Cookie Cutters
Wilton Pie Crust Impression Mold (for trim about base of cake)
Wilton Pink Food Gel
Funky Upper Case Letter Cutters
Wilton Gum-Tex Tylose Powder


Saturday, December 2, 2017

Volleyball Court Cake

2017 was my niece's last year on her high school volleyball team.  Go Lady Panthers!  She was the Libero all four years, and was awarded Defensive Player of the Year in her final year!  Go, Amanda!!

For her last Volleyball Banquet I decided to make her a special cake.
 

<< Disclosure: We are a participant in the Amazon Services LLC Associates Program, an affiliate advertising program designed to provide a means for us to ear fees by linking to Amazon.com and affiliated sites.>>

The most involved part of the cake was the volleyball itself.  I used the Wilton 3D Cake Pan and the included pattern to make the volleyball markings.  I first covered the cake with black Fondarific fondant. (The Fondarific is very pliable and it stays soft for a long time so it worked well on this 3D shape).  Then I cut out the blue sections and placed them on the round cake.
 

Then I placed the white strips.  The flat pattern didn't exactly fit the 3D shape, so I had to do some trimming of the white pieces.  I also wanted gaps between the white and blue pieces so the black fondant underneath would show.


Next came the main cake.  I used the Wilton 1/2 sheet cake pan, and made one side yellow and the other side chocolate.


Turning a slab of cake into a volleyball court was the fun (and easy) part.  I started with yellow Mona Lisa fondant, added some dabs of brown, and then twisted it in one direction to give the fondant a streaked look.


Here is the streaked fondant all rolled out.  At this point it is really starting to look like wood.  I guess I could have used it just like this, but I wanted to try out my new wood grain impression mat.


Just press the silicone mat into the fondant...


And lift off the mat to get that wood grain pattern.  Pretty cool, huh?!


Next I cut the fondant into strips.  I decided to use strips instead of one big piece of fondant because it was easier.  I didn't want to struggle with a huge 22 x 28" piece of fondant so I just made small 1-1/2 x 9" strips.  Easy, easy, easy.


The strips of fondant were just positioned on the cake.  I was finished in just 30 minutes, and no stress, panic, or hair pulling from trying to place and smooth a monster piece of fondant.


I made markings to represent the lines of the volleyball court...


And then came the net.  This was the most frustrating part of the cake.  My fondant extruder broke, so I had to roll all the string by hand.  What a PITB.


For the lettering on the volleyball I used some FMM Funky Cutters in Uppercase and Lowercase.   I wanted to put the word "volleyball" on the ball itself, but it won't fit, so I put it on the top of the net.

For the final assembly I simply placed the volleyball on the main cake (secured with some wooden skewers), added two Lineman Flags for a pop of color, and Ta-Da, I was finished.


All-in-all it was a pretty easy cake to make. 

Happy Decorating,

Carol