Saturday, December 17, 2022

Glow In The Dark Cake

I was a little skeptical that "glow in the dark" food coloring would actually work - 

but it did.  

AMAZING!!  

Here is a cake under UV / black light. 


  And here it is under regular light.


What a difference!!


<< Disclosure: We are a participant in the Amazon Services LLC Associates Program, an affiliate advertising program designed to provide a means for us to earn fees by linking to Amazon.com and affiliated sites.>>

I used the ROLKEM brand of Lumo UV Fluorescent colors and I tried both the powder and liquid versions.  Both the powder and liquid worked equally well, but the liquid made the fondant a little sticky due to the added moister.  I will opt for the powder if I ever need to buy more.

Here are the colors mixed into Wilton white fondant. Not all of the colors glowed as brightly, but they all had some shimmer.  And I did notice that if you positioned the non-glowing colors closer to the UV light, then the color got more luminous.  The Astral Pink (1), the Lunar Yellow (2), and the ARC Chrome (7) glowed the most.  The Voila (3) and the Pinkilicious (6) glowed the least, and the Comet Blue (5), and Stellar Green (4) had an adequate glow.


Here is the glow in the dark fondant going onto the cake.  I had the UV light on as I decorated the cake to make sure I had high-intensity glow in all the right places.  I used a JEM PME strip cutter to cut the long strip and tiny circle cutters for the circles.  The lettering is FMM Tappits Funky Alphabet Cutter Upper and Lower Case.


So this was a very interesting cake to make.  Man I love that glow...


And here is another Glow cake I made recently.  These are so much fun!


Happy Decorating,

Carol

Sunday, December 11, 2022

Safari / Wild One Cake

This was a super easy Safari / Wild One Cake that is easy to make because I used plastic toys instead of spending hours and hours trying to make them out of fondant.  


The cake is a 9" chocolate on the bottom and a 6" almond on the top.  I also offset the top 6" cake to the back rather than centering it on top of the 9" so I would have lots of room to place the zebra.  The brownish/orange of the buttercream color wasn't the shade I was going for, but it is what I ended up with.  I started with pure white buttercream and added Wilton's Ivory, and Hobby Lobby's Warm Brown, and Chocolate brown to the buttercream and this is the shade I ended up with.  Originally I tried using just Wilton Brown, but that came out with a brownish-green tint that reminded me of baby poo. (Yuck!)  

<< Disclosure: We are a participant in the Amazon Services LLC Associates Program, an affiliate advertising program designed to provide a means for us to earn fees by linking to Amazon.com and affiliated sites.>>


Here is a link to the plastic animals I used.  The leaves where cut from fondant using tropical leaf cutters.  I used the green Wilton fondant as the base color, separated it into three balls, and then added Avocado to one ball, Moss Green to another, and Kelly Green gel food color to the final ball.  I made three distinct colors and because they all had the green Wilton fondant as the base, the shades blended nicely together.  I also added Tylose/Gum Tex powder to the fondant so it dried hard.   The cake sits on a 12" black grease-proof cake drum, and I use extra-wide bobba straws to support the top tier.   And for a final touch, I scattered little "rocks" which are actually Amber Sugar that you use in hot tea.  


See, nothing to it!


Happy Decorating,

Carol

Monday, April 11, 2022

Hedwig Cake - Cutest and Easiest Cake to Make

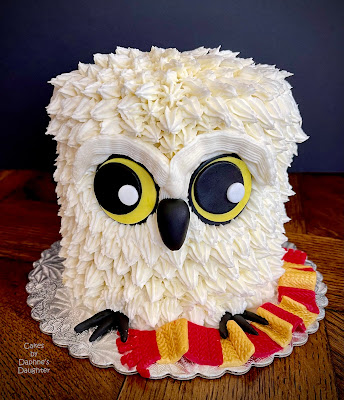
How cute is this little Hedwig Smash Cake???!!!!  And it was so easy to make.  Cut a few fondant circles, pipe on some "feathers" and you are done!


<< Disclosure: We are a participant in the Amazon Services LLC Associates Program, an affiliate advertising program designed to provide a means for us to earn fees by linking to Amazon.com and affiliated sites.>>

The cake itself is a three layer 5" cake.  (These 5" Fat Daddio pans are the perfect size for a smash cake.)  With the three layers the cake was about 6" tall.  At first I thought it would be too tall, but in the end I think the added height gave the cake a more majestic look

First step to this Hedwig was to stack and crumb coat the cake and then put it in the refrigerator to chill.  While chilling, I cut some circles out of black, yellow, and white fondant.  I have a bunch of different circle cutters and I just used the one that looked the best.  The biggest circle was the black at the bottom, then a slightly smaller circle in yellow, then a black circle, and finally I cut a small circle in white using tiny circle cutters.  (I love these tiny circle cutters - they come in so handy).  

Stack the circles to form the eyes...


...and then place the eyes on the cake.  But make sure the eyes are even and the white dots are pointing the the same direction - unless you want a cross-eyed Hedwig.


Then using a Wilton #21 Open Star piping tip, I started piping on the feathers.  In the photo below you can see what NOT to do.  I just piped regular stars and realized that they didn't look right.  They look like little flowers instead of elongated feathers.


To pipe a regular frosting star, you apply pressure to the bag and place a dot of frosting on the cake.  With the dot in place, you then release the pressure on the bag as you quickly pull the tip away.  This gives you a compact, pointed star.  In contrast, to pipe a feather you want to apply the dot of frosting but then slowly release the pressure on the bag as you pull the tip down and away from the dot.  This gives you an elongated tail attached to the dot of frosting.


Once you get the hang of the piping technique, pull up a chair, flex your wrist, and start piping around and around the cake.  Near the eyes I reduced the size of my dots and piped smaller feathers.


On top of the cake I piped more upright, spikey feathers.  For the eyebrows I used a Wilton #48 Basket Weave tip.  I put on one layer of eyebrows, but I didn't think the eyebrows stuck out far enough so I added another layer of frosting on top of the first.


The nose is just an elongated piece of black fondant that I pushed into the buttercream.


For a final touch I added some claws/toes for Hedwig and a red and gold scarf.  For the scarf I rolled out some red and shimmer gold fondant, and then I used a knit-like texture mat to make the fondant look like knitted yarn.  I cut the fondant into squares and then formed a long, continuous scarf by squishing two edges of two squares together.  The final step was to make fringe on the ends of the scarf by using a straight edge blade to cut 5 slices into the end squares.  


I wrapped the scarf around the base of Hedwig and stuck it under his claw.


See wasn't that easy!!  And best of all everyone fell in love with it.


Happy Decorating,

Carol

Saturday, April 9, 2022

The Simpsons Cake - Homer and His Donuts

Making this cake wasn't as difficult or time consuming as it looks because all of the Simpson figures are plastic toys.  I love it when cakes are easy.... although I did make the sofa, tv, and the donuts out of fondant.


Here are the plastic figures - aren't they cute!


<< Disclosure: We are a participant in the Amazon Services LLC Associates Program, an affiliate advertising program designed to provide a means for us to ear fees by linking to Amazon.com and affiliated sites.>>

To make the sofa, tv, and donuts I use my super cool Creality Ender 3 V2 3D printer to make cutter sets for each object.  My 3D printer is my favorite cake decorating tool.  If you want to read more about it, click HERE.

For the donuts, I uploaded the shapes below to the CookieCad design tool which in turn generated an STL file.  The STL file is then sent to a "slicer" program which generates a .GCODE file specific to your 3D printer.  Finally the .GCODE file is sent to the 3D printer and the cookies cutters printers.  Easy right???    FYI: I used 3.25" donuts for this cake.


For the donut I started by tinting white Wilton fondant with a little bit of Ivory gel food color to give a light tan color.  The "icing" of the donut was made with pink fondant.  I mixed white and pink fondant together to get a paler shade of pink.  First I used my donut frosting cutter to cut the pink frosting and then used the "mouth/teeth" cutter to cut the "bite" out of just the pink frosting layer.  Then I positioned the pink frosting on top of the tan donut.  

Next I matched up the mouth cutter with the cutout in the pink frosting, and then cut through the tan part of the donut.  I tried cutting the pink frosting and tan donut together, but the pink got smeared into the tan of the donut which didn't look very good.


The sprinkles on top of the donut are just pieces of thinly rolled fondant.

I made the TV from another cookie cutter set, but you could just cut the pieces from a paper temple.  I just get a kick out of making the cutters.  Below is the template I used to make my TV 4-1/2" wide.  

I used purple and black fondant mixed with Tylose power (which makes the fondant harden) to make the body of the TV.  For the TV screen I rolled out white gum paste and glued a printed "Happy Birthday Madison" image to the gum paste using a glue dot runner.  After the image was glued to the gum paste, I used the TV screen cutter to cut out the gum paste, and then I placed the TV screen on the main body of the TV.   And just to give the TV some pizzazz, I added some finishing touches to the knobs and the speaker.  I also dusted the speaker with some brown food power to give it some depth.  For the TV antenna, I used some thin wire, but I should have used something thicker because the wire didn't show up very well.  


For the sofa I used Wilton Brown fondant mixed with Tylose.  I again made a set of cutters, but you could just use a paper template.  I made the sofa about 5-1/2" long, but it was actually a little small when compared to the size of the toys, but the top tier of my cake was only 6" so I couldn't make the sofa any larger.  I made a cutter for the back of the sofa, the base of the sofa, a cutter for the arm rest, and a cutter to make the three cushions sitting on the base of the sofa.


Sorry I didn't take a better picture of the sofa.  Once each sofa piece was cut, it glued them together with a dab of water.


To tint the buttercream for the base tier, I use Electric Green and a touch of Leaf Green to tone the bright color down a bit.  For the top tier I used Electric Blue and a touch of Navy Blue.  The border abound the base of the cakes was made using a Wilton pie crust pearl mold.

Once the cakes were stacked and the border attached, it was just a matter of placing the plastic figures on the cake.  There is a bit of fondant under the figures to keep them from touching the buttercream and to help them stay in place.  

So here is the finished cake.  Don't you just love The Simpsons!


Happy Decorating,

Carol

Monday, January 17, 2022

Hellcat Cake - Charger or Challenger - I'm not sure

I'm not sure if this cake is a Hellcat Charger or a Hellcat Challenger.  LOL  Actually when I made the cake I didn't even know they were two different cars!  So all you car fanatics, please forgive me if I don't have the details correct.  My Hellcat Cake is probably a mashup of the Charger and the Challenger.  


<< Disclosure: We are a participant in the Amazon Services LLC Associates Program, an affiliate advertising program designed to provide a means for us to earn fees by linking to Amazon.com and affiliated sites.>>

The first thing I made for this cake were the wheels.  I made an embossing tool to resemble the rims, and simply pressed that into black fondant mixed with Tylose Powder (aka CMC and Gum Tex Powder).  After the wheel dried, I painted the "rim" area with edible silver luster dust mixed with Everclear grain alcohol.  (Note: I use my super cool Creality Ender 3 V2 3D printer to make the embosser and cutters that I used on this cake.  It is my favorite cake decorating tool.  If you want to read more about it, click HERE.)


Next I carved and crumb coated the cake. I printed out several paper templates of the car: side, top, front, rear, and then I used the templates to trim the cake into a car shape.  Once the shape looked reasonable, I crumb coated and chilled the cake.


After the cake was chilled, I used a cutter I made with my 3D printer to cutout sections for the wheel wells.  I could have used just a circle cutter, but on the car template I used, the wheel wells where more oval shaped.  And I use any excuse I find to use my 3D printer.


In hindsight I made a serious mistake on this cake.  Typically when I cover a cake in fondant, I crumb coat in ganache instead of buttercream.  The ganache dries as a hard shell and keeps the carved cake from drooping and sagging.  I decided not to use ganache on this cake because it was cold outside and I thought it would be okay.   Mistake!   Big Mistake!  

But anyway, after the wheel wells, I added some fondant detail that would actually go under the fondant used to cover the cake.  


Here is the fondant going on.  Just drape it over the cake and smooth into all the nooks and crannies.  It was actually easier to cover this odd shaped cake than it was to cover a round cake.


And here is the fondant all smoothed.  You can see how the fondant was pushed in around the front grill.  I could have added the grills later, but I thought it would look more seamless this way.   BUT just look at how the fondant is sweating.  This was the first hint of the problems I was going to have with this cake.  The fondant was absorbing the moisture from the buttercream below it.  This usually doesn't happen with ganache because the white chocolate ganache doesn't have much moisture in it.  


I also used the wheel well cutter to cut through the blue fondant and replace it with black.  And notice the car is looking lumpier the longer it sits out at room temperature.  Sigh.  I should have taken the fondant off and coated with ganache, but at this point I still thought it would be okay.


I also had some cutters that I used to cut out the windows and replace the area with black fondant.  I thought this would look better than just placing the black fondant on top of the blue.  The shape of the front windshield came out a little odd looking.  In the end I cut the top of the windshield out a little wider.


Here I started putting on the black accents.  I used Choco-Pan Black Modeling Chocolate for this.  The modeling chocolate has a firmer texture and doesn't pull out of shape like fondant does.  Modeling Chocolate is great for detail work.  And notice car is looking lumpier and lumpier.  At this point I put the cake in the refrigerator to chill and harden up some.


While the cake was chilling, I started working on the cake drum.  I marbled some brown fondant with bits of other colors (yellow, white, black- extra bits I had in my salvage bin).  Once the fondant was rolled flat, I used an impression mat to give it a wood-like texture, and then cut the fondant into 1" wide planks using a strip cutter.


The planks were placed on the cake drum. I used a little piping gel to help glue the fondant strips to the board.


And here is the finished cake drum.  I dusted the groves with black and white powder food color to make it the look more like wood. 


Sadly I was so stressed about my lumpy cake that I forgot to take any more pictures.  But at this point I was just putting one the finishing touches.  On the rear of the car I made a spoiler (which I don't think the car actually has), tail lights, exhaust pipes, and a license plate.  I was going to write the birthday boy's name on the license plate, but the fondant was so damp I thought the edible markers might run. 


On the front I added some windshield wipers, head lights, and a grill.  I dusted the lights and grill with some silver edible powder to give it that shiny look.  I also dusted some silver on the windshield to give it more of a glass-like appearance. 


So all-in-all this is not the worst cake I've made, but not the best.   Someone has requested a Mustang GT cake for mid April.  Rest assured, I will crumb coat with ganache.  I don't want another lumpy muscle car cake.


Happy Decorating,

Carol


Sunday, January 16, 2022

White Orchids on a Navy and White Cake

Technique-wise there is nothing elaborate or complicated about this cake, but nevertheless I love how it came out.  It looks elegant, and I normally suck at making elegant.  LOL.   The customer ordered a cake for his wife's 30th birthday, and he was very specific about what he wanted: navy and white marbled for the bottom tier, white for the top tier, and 2-3 white orchids.  That is it.  He wanted simple and elegant.  


<< Disclosure: We are a participant in the Amazon Services LLC Associates Program, an affiliate advertising program designed to provide a means for us to earn fees by linking to Amazon.com and affiliated sites.>>

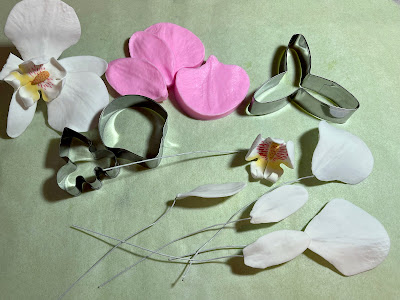
For the orchids I used a cutter and veiner set, and I used this veining board to help insert the wire into the petals.   I also cut the 3 pronged Sepal piece into three separate petals and wired each one individually.  Making the flowers was actually an easy process.


I used pink edible marker to draw the lines and dots on the Lip of the flower, and I dusted the edge of the Lip with some yellow petal dust. 


On construction day I stacked my cakes and iced them using white chocolate ganache.  I always use ganache under fondant because it gives a firmer base than buttercream.  I also use acrylic cake disks to get the razor sharp edges.  If you want to read more about the process, click HERE.  

For the marbled tier I used Carma Massa Ticcino fondant.  I refrigerate my cakes and live in a hot/humid environment so I need a fondant that won't sweat and sag when it hits 100 degree F temperatures, but sadly I've been told this fondant has been discontinued.    Anyway, I made three shades of navy using Wilton's Royal Blue and a touch of Black.  (The color came out a little too bright to be true Navy, so I might have to try Americolor's Navy Blue next time.)  For the 10" base tier I need 800 grams of fondant so I marbled 700 grams of white with my 3 premixed shades of  navy (100 g total of navy).  I didn't combine the colors too much because I wanted the marbling to be sharp.  I also put some gold accent lines where the darker navy lines met the white.  I mixed gold luster dust with Everclean and painted on the lines with a very thin brush. 

I stacked the tiers and added some white sugar pearls at the base of the top tier, and then I just added the branch of orchids to the cake.  See, easy as cake.   :-) 


Happy Decorating,


Carol