Sunday, December 30, 2018

Unicorn Cakes are still the Thing in 2018

At the end of 2018, Unicorn Cakes are still all the rage.  They were the "Thing" this year.  But try as might, my unicorn cakes never look quite right.  At first glance they look easy enough to make, but a lot of things can throw off the look. 

Here are a few of my latest attempts....


On this cake the horn wasn't big enough, and the mane looked a little flat.  But in my defense I ran out of icing and didn't have enough powdered sugar to make more.  On a positive note I did like how the little "Birthday Girl" cake turned out.  Nothing is more precious than a miniature unicorn cake.


Here is another unicorn cake; this one using a tri-colored rosettes.  On this cake the eyes were a little too close together, but I didn't want to pull them off and risk messing up the buttercream.  I also had a time making the tri-colored rosettes.  I tried using the Wilton Color Swirl decorating tip, but that was a flop.  That was a waste of $10.


I also "tried" making a unicorn out of polymer clay.  I'm not very good at sculpting, but my work is good enough to make a five year old happy.


So this closes out 2018, and guess what?  I have another request for a unicorn cake.  But this next one will be a DRUNK unicorn cake.  That one should be fun.

Happy Decorating,

Carol

Saturday, November 3, 2018

Halloween Mummy Cake

I needed a cake for our Halloween office party, but since I would only have a few hours to work on it so I chose a simple design.


I started out with two 8"x 8" cakes.  One was red velvet and one white.  I just laid then end to end, slapped on a little buttercream, and place an oval of black fondant where the eyes would go.


Then I just started draping 3/4" wide strips of fondant across the cake.  I dusted the edges of the strips with a little cocoa power to give it an aged look.


Next went on the eye balls looking in the direction of where the spider would be place.


The "BOO!!" when on last.  The letters are sugar cookies iced in Toba Garrett's glaze .  I baked and iced them a few days ahead of time and seriously miss judged the size of the cookies I would need.  When I tired to place them on the cake there were way, way TOO BIG.  But in the end I managed to squeeze them on with just a little bit hanging off the sides of the cake.


But hey it was a cake for work, so no one would criticize my Bo-Bo.


Happy Decorating,

Carol

Sunday, October 28, 2018

Lucille the Zombie Unicorn

Lucille the Zombie Unicorn took her cue from Negan and wrapped her horn in barbed-wire.  Her once pearly complexion is now green and decaying, and blood drips from a bite on her ear.  A bite that turned her from a golden unicorn into a Zombie Unicorn.  Poor, poor, Lucille.


I made the horn from black gum paste, and then curled some wire to fit around the horn.


I twisted short, thinner pieces of wire around the curled wire and glued them in place.  These short pieces are supposed to be the barbed part of the barbed wire.


For the green and black molted look of the cakes I dotted the white frosted cake with gray and green frosting.


Then I used a bench scraper to smear all the colors together.  For the first swipe I went clock-wise.


Then to keep it from looking like an ombre cake I used the bench scraper again, but the second time I went in a counter clock-wise direction to break up the uniform streaks.  (Got this tip from Cupcake Gemma.)


Next the cake was adorned with its black horn, bitten ear, and a mane of yellow, green and purple rosettes.  I tinged the colors with a bit of black to give them a decaying look.


My niece, who dressed like a unicorn for Halloween, loved her Zombie Unicorn Cake.


Happy Halloween from Lucille the Zombie Unicorn 


Monday, October 8, 2018

Elephant Themed Baby Shower Cake

My latest endeavor was a baby shower cake for a friend of my niece.  There was no real theme for the party, but I was told that the mom-to-be loved baby elephants and the baby was a girl.  I found a precious cake on Pinterest that included baby elephants holding up a cloths line, and I decided to use that as my inspiration.


And surprise, surprise, when I arrived at the party I found that all the plates, napkins, and cups were decorated with cloths lines and baby cloths.  And even better, the walls and cake table were decorated with swags of baby cloths hanging from lines.  How cool is that!  Just by coincidence the cake exactly matched the decorations.  Except for the elephants.  Only the cake had the elephants that the mom-to-be was so in love with.

<< Disclosure: We are a participant in the Amazon Services LLC Associates Program, an affiliate advertising program designed to provide a means for us to ear fees by linking to Amazon.com and affiliated sites.>>

This was a pretty easy cake to put together because I was able to make a lot of it ahead of time.  I started with the elephants.  I wanted them to be a keepsake so I made them out of polymer clay instead of gumpaste.  I have a bunch of different polymer clays hanging around my craft room, but I picked the Sculpey III because it is so soft and easy to use.  It actually looks and feels a lot like fondant.

Anyway I rolled out some sparkly gray clay and used a pattern to cut out the body of the elephant.


I cut out the ears and attached them to the body.  Then I cut out the legs from clay that was about 3 times as thick as the body.  I wanted the legs to be extra plump looking so the elephant would appear more three dimensional.


I added some very thin pink to the ear and cheek, and added tiny balls of pink clay for the toes.  I used a slightly darker pink for the bow.  I also propped the big ear on some parchment paper for baking.  I wanted the ear to look like it was flopping around.


After baking the elephant for 30 minutes the clay was nice and hard.  I pushed the base of the elephant into some green clay to make a stand.  I added some flowers to the stand so it wouldn't look so plain.


I also made some hearts out of red clay and glued them to the elephant using a clear toothpick.  I wanted the heart to "float" above the elephant's trunk so that is why I didn't just stick the heart directly onto the trunk.


After baking the green stand, I glued the finished elephant to the finished base.


And here are the completed elephants.  When I placed them on the cake I put a blob of white fondant between the non-food safe polymer clay and the cake.  In addition to forming a barrier, the fondant also held the elephants in place.


So onto the cake...  I used a 10" x 5" cake for the bottom tier, and a 7" x 4-1/2" cake for the top.  I stacked the cakes and put a pink ribbon of fondant around the base of each tier.  I used my Wilton Strip Cutter to cut the ribbons.  I also used a Wilton Fabric Embosser to try and make the fondant ribbon look more fabric-like, but the pattern didn't show up very well on the pale pink fondant. I also used the same embosser on the fondant covering the cake board.  Again, the pattern wasn't very noticeable, but it was enough to camouflaged the imperfection in the fondant.

Next I used my ACE Food Safe Extruder to make the cloths line.  I twisted one end of the cloths line around the trunk of the elephant and then attached the other end of the line to the cake using some vodka.  I use the vodka instead of water because the vodka evaporates quickly and doesn't make the fondant gummy.


Next I started placing the fondant "clothing" on the cloths line.  The cloths were super easy to make using a silicone mold.  Just dust the mold with cornstarch, press the fondant into the mold, and then peel the mold away.  Worked great.


Here are some of the fondant "cloths" waiting to be placed on the cake.  I made them ahead of time and covered them with plastic wrap to keep them from drying out.


After I was finished with the cake I though it look a little plain, so I stuck a pink fondant ribbon on each tier.  I used the same width fondant for the bow and the ribbon, but I think the bow looks a little small.  In hindsight I should have used a wider piece of fondant for the bow.


For the heart topper I used my Cricut Cutter to cut a heart from pink glitter poster board.  I cut the letters from a gray card stock, and then I glued them together using a glue dot runner.  Easy Peasy.   I glued a bamboo skewer to the back of the heart, stuck the heart in the cake, and called it done.  I hope the mom-to-be likes it.


Happy Decorating,

Carol


Supply List: 
Sculpey III Clay
Sculpey Super Slicer Razor Blade
Mona Lisa Fondant
ACE Food Safe Extruder
Wilton Strip Cutter
Wilton Fabric Embosser
14" Cake Drum
Cricut Cutter
Glue dot runner

Sunday, September 23, 2018

M.A.C. Makeup Cake

M.A.C. Makeup cake for my niece-in-law.  I forgot to take pictures during the construction (I think I'm getting senile), but at least I remembered to take a picture of the finished cake.


Happy Decorating,

Carol

Wednesday, August 29, 2018

Painter's Palette Cake with Drip Tier

I have a cousin that always request the most interesting cake designs.  Because of her I get to experiment and learn challenging new techniques.  (And she doesn't get upset when I mess up and have to improvise.)

This month's new technique was the "Drip Cake".


<< Disclosure: We are a participant in the Amazon Services LLC Associates Program, an affiliate advertising program designed to provide a means for us to ear fees by linking to Amazon.com and affiliated sites.>>

But before I could try out the drip technique I had to make the other do-dads for the cake.  First I made the painter's palette.  I cut out the shape from brown tinted fondant mixed with tylose powder.


I wanted the palette to have a marbled wood grained look, but I couldn't get enough colored veins into the fondant so I just brushed the different colors onto the palette using powder food color.  I used brown, black and yellow to get the effect I wanted.


Then I cut out circles of fondant tinted in red, blue, green, orange, and yellow.  To give the circles rounded edges and a domed shape, I placed plastic wrap over the fondant before cutting out the circles.


The top tier of the cake is supposed to look like a paint can, so I decided to make it a double barrel cake.  I planned on it being 6 inches round and 8 inches high, but when I started to assemble the tier it looked a little top heavy.  I didn't want the cake tipping over during transport, so I decided to make the top 4" out of a Styrofoam cake dummy.  (I used Styrofoam so often I should buy stock in it.)


I also didn't want to try and smooth a round piece of fondant over a 6" x 8" cake , so I took the easy way out and cut a long 8" x 20" piece of fondant and just wrapped it around the side of the double barrel cake.


Using this method results in seam at the back of the cake, but this process is so much easier than trying to drape and smooth fondant over a pencil shaped cake!  And who cares about a little seam at the back of the cake??  Not me.


To trim any excess fondant from the top of the cake I used a long razor blade.  For tasks like this, these long blades work so much better than X-Acto knives.


Then the real assembly started.  First I used my ACE Food Safe Extruder and made the turquoise fondant ribbon and bow for the bottom tier, and then I made the same size ribbon out of gray for the top tier.  I cut a 6-1/4 inch circle out of gray fondant and placed it on the top.  Next I cut out the pink circles and carefully measured and positioned then on the cake.  For the name I used some letter cutters, and for the handle of the paint can I used the extruder and a half-circle shaped disk.


Now for the hard part - the DRIP.  I did some research and found that I could use either white chocolate ganache tinted with oil based color, or I could use pre-colored Candy Melts and make ganache out of them.  I chose the Candy Melt route.  For a practice test I made Candy Melts ganache using a 2:1 ratio (60 grans if candy and 30 grabs of heavy whipping cream) but this made the ganache much, much too thin.  Next I tried a 5:1 ratio (60 grams of candy and 12 grams of heavy cream) but this was too thick.  I finally settled on a 3-1/2:1 ratio.  Next I had to decide on the delivery method: spoon or squeeze bottle.  I tried them both and while the spoon method had less mess, the squeeze bottle method gave more control over the exact placement of the drip.

I'm a precise kind of person so I decided on the squeeze bottle method.  I mixed up batches of  yellow, pink, orange, turquoise, and purple candy melts ganache.  I also had blue and green candy melts, but the blue and green look too similar to the turquoise so I didn't use them.  I also only had 5 squeeze bottles.


So time to start dripping...


Not too bad, but could have been better.  Here are some lessons I learned:
  1. My ganache was too thick.  Next time I will go with a 3:1 ratio.  
  2. You have to keep the ganache warm to keep it flowing smoothly.  I microwaved the squeeze bottle before every use, but it still got a little clumpy.  
  3. You need to keep a little gap between each drip.  If you put the drips too close together they just merge into a big lump.  Drip one line and while still gently squeezing the bottle move the tip over about 1/4 inch.  Once you have a large enough gap, start squeeze out the next drip.
  4. Next time I will keep the bottles in a pot of warm water instead of repeatedly microwaving the bottles.  I'm not sure if the glass door of my microwave was flawed or if it was the 50 odd microwaving sessions, but the next morning when I used the microwave to boil some water for  my tea this is what happened.   


The glass just shattered when the microwave finished the cycle.  There was a big boom and I heard all this crackling.  I didn't know what had happened.  I thought the cup had exploded but instead it was the glass in the door.

Oh well, such is life, but at least the cake came out cute.


Happy Decorating,

Carol


Supply List: 

Mona Lisa Fondant
ACE Food Safe Extruder
Tylose powder
Pastry Mat with Grid Lines
Sculpey Super Slicer Razor Blade
Cake Boss Circle Cutters
Cake Boss Letter Cutters
14" Cake Drum
Alligator Impression Mat (used on the fondant covering the cake drums)
Wilton Candy Melts
Wilton Squeeze Bottles


Tuesday, August 14, 2018

Easy Vampirina Cake with Spiderweb Drum

When a friend asked me to make a Vampirina Cake for her daughter's 4th birthday I said, "Vamp-a-who???"  Apparently I haven't been keeping up with the latest TV cartoon characters because I had no clue who Little Miss Vampirina was.


Anyway the cake my friend select was pretty easy to make, but the one thing that gave me pause was the request for NO FONDANT.   Wait WHAT???   Sure I've made buttercream covered cakes before, but they all had a rustic look.  I never tried making a buttercream cake with a smooth surface and sharp edges.

<< Disclosure: We are a participant in the Amazon Services LLC Associates Program, an affiliate advertising program designed to provide a means for us to ear fees by linking to Amazon.com and affiliated sites.>>

But before I had to deal with icing the cake I concentrated on making Vampirina's  bat shaped pigtails.  I used black Dream fondant mixed with Tylose power to form black gumpaste, and embedded a wooden skewer into the pigtail cutouts so I could attach them to the cake.  I made the pigtails a few days ahead of time so they would be nice and stiff by the time I needed them.

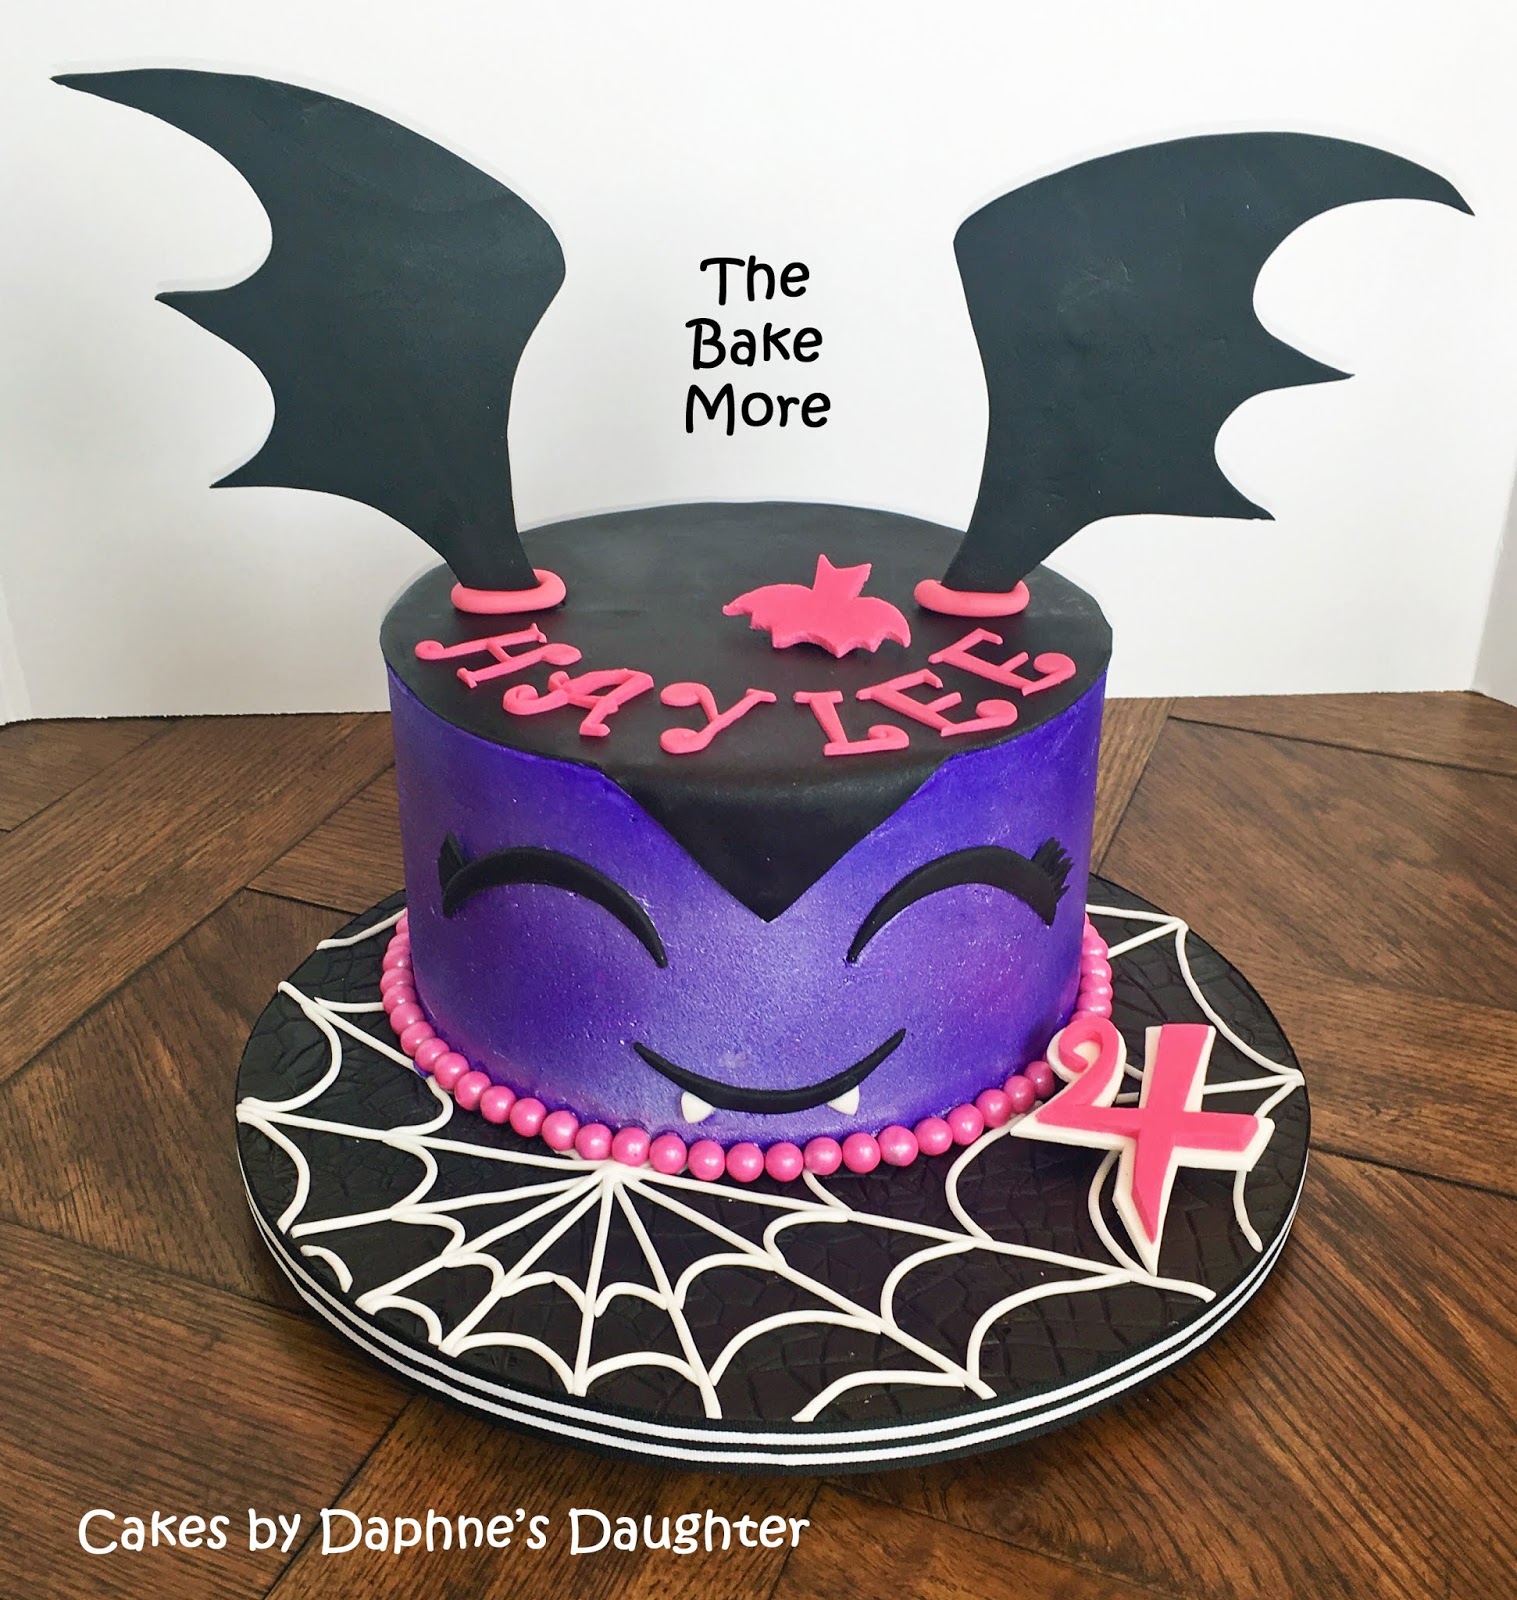
Next I moved onto the cake board.  Since Vampirina has a web design on her clothing, I decided to make a web on the cake drum.  I started with a 14" cake drum that I covered in black Dream fondant.  I also use my alligator skin impression mat to give it a little texture, but in hindsight I probably should have left it un-textured (it was a little busy looking).  After covering the drum I moved onto the "web".  I used my nifty ACE Extruder to make thin strands of white fondant, and then I started to form the web.


First I placed two perpendicular strands across the drum.  I deliberately positioned the center of the web on the side of the drum because I thought it would make it more interesting looking.


After the first two lines where down, I filled in the other lines like I was cutting a pizza.


The I just started filling in the arching pieces of the web.  I cut each little piece to fit its individual space so it was a time consuming process.


I used vodka to "glue" the white strands to the black fondant below, but I had some trouble with look.  The vodka should have evaporated without leaving a trace, but for some reason the sections of the fondant dampened with vodka stayed shiny.  Don't know why this happened.


After the drum was webified I went to work on the actual cake.  I crumb coated the cake and used my acrylic disks to get those perfectly smooth sides and sharp edges.  This method works great (see an example of the process here), but I unwisely used my 8-1/4" rounds instead of the 8-1/2" rounds.  The 8-1/4" round didn't give me enough depth to completely cover the underlying cake with a thick coating of violet buttercream.  I actually had places where the cake was poking through the icing!  (It almost looked like a naked cake.)  I should have switched out the acrylic disks and re-iced the cake, but I was lazy and just sprayed the cake with some  Wilton's Violet Color Mist to hide the boo-boos.  This hack worked like a charm.  The violet colored spray hid all the cake that was peeping through the violet buttercream and no one was the wiser.


I place the cake on my webby drum, and then used some hot pink Sixlet Chocolate Candies to form the boarder around the cake.  Next I placed a thin circle of black fondant on top of the cake to form Vampirina's "hair".  At this point I noticed a BIG problem.  The combination of the violet buttercream and the violet color mist had made the cake surface too dark.  When I placed the black "eyes" on the cake I could hardly see them.  The black eye just faded into the dark purple background.  Not good, not good at all.


But the Color Mist saved the day again.  This time I used Pearl Color Mist and sprayed it on the front of the cake where the eyes needed to go.  The Pearl mist lightened the area and also made it shimmer.  That Color Mist (or an airbrush machine) is a life saver.

Next the pigtails/bat wings went on top of the cake.


And then the birthday girl's name using pink colored gumpaste and my FMM Funky Alphabet Cutters.  Originally I was going to place the cutout letters on the cake drum, but it looked too busy so I just put the name on top.    At this point the cake was technically "finished", but I thought it looked a little plain.  It looked like something was missing.


I decided to add a mouth with the tiny little fangs poking out.

It looked good, but still missing something, so I cutout a tiny bat for the top and the number "4" to place on the cake drum.


I was happy with it at that point so I decided it was "finished". 

Happy Birthday, Haylee.  Hope you like your Vampirina.


Happy Decorating,

Carol


Supply List: 

Mona Lisa Fondant
ACE Food Safe Extruder
Tylose powder
14" Cake Drum
Alligator Impression Mat (used on the fondant covering the cake drums)
Violet Food Color Gel
Wilton's Violet Color Mist
Wilton's Pearl Color Mist
FMM Funky Alphabet Cutters
Hot Pink Sixlet Chocolate Candies
Dream Fondant