Monday, July 26, 2021

Foxy the Pirate Fox Cake - Five Nights at Freddy's

Can something be so ugly that it is cute?  As an example take this Pirate Fox (aka Foxy) cake inspired by Five Nights at Freddy's.  It is just Ewwww....  But Ewwwww in a cute way.


Cake construction started with a paper template of Foxy's face that I to cut up into the individual facial features.   I made the ears, the tuffs of hair, and the "10" topper ahead of time so they would have plenty of time to dry and harden.  

<< Disclosure: We are a participant in the Amazon Services LLC Associates Program, an affiliate advertising program designed to provide a means for us to ear fees by linking to Amazon.com and affiliated sites.>>

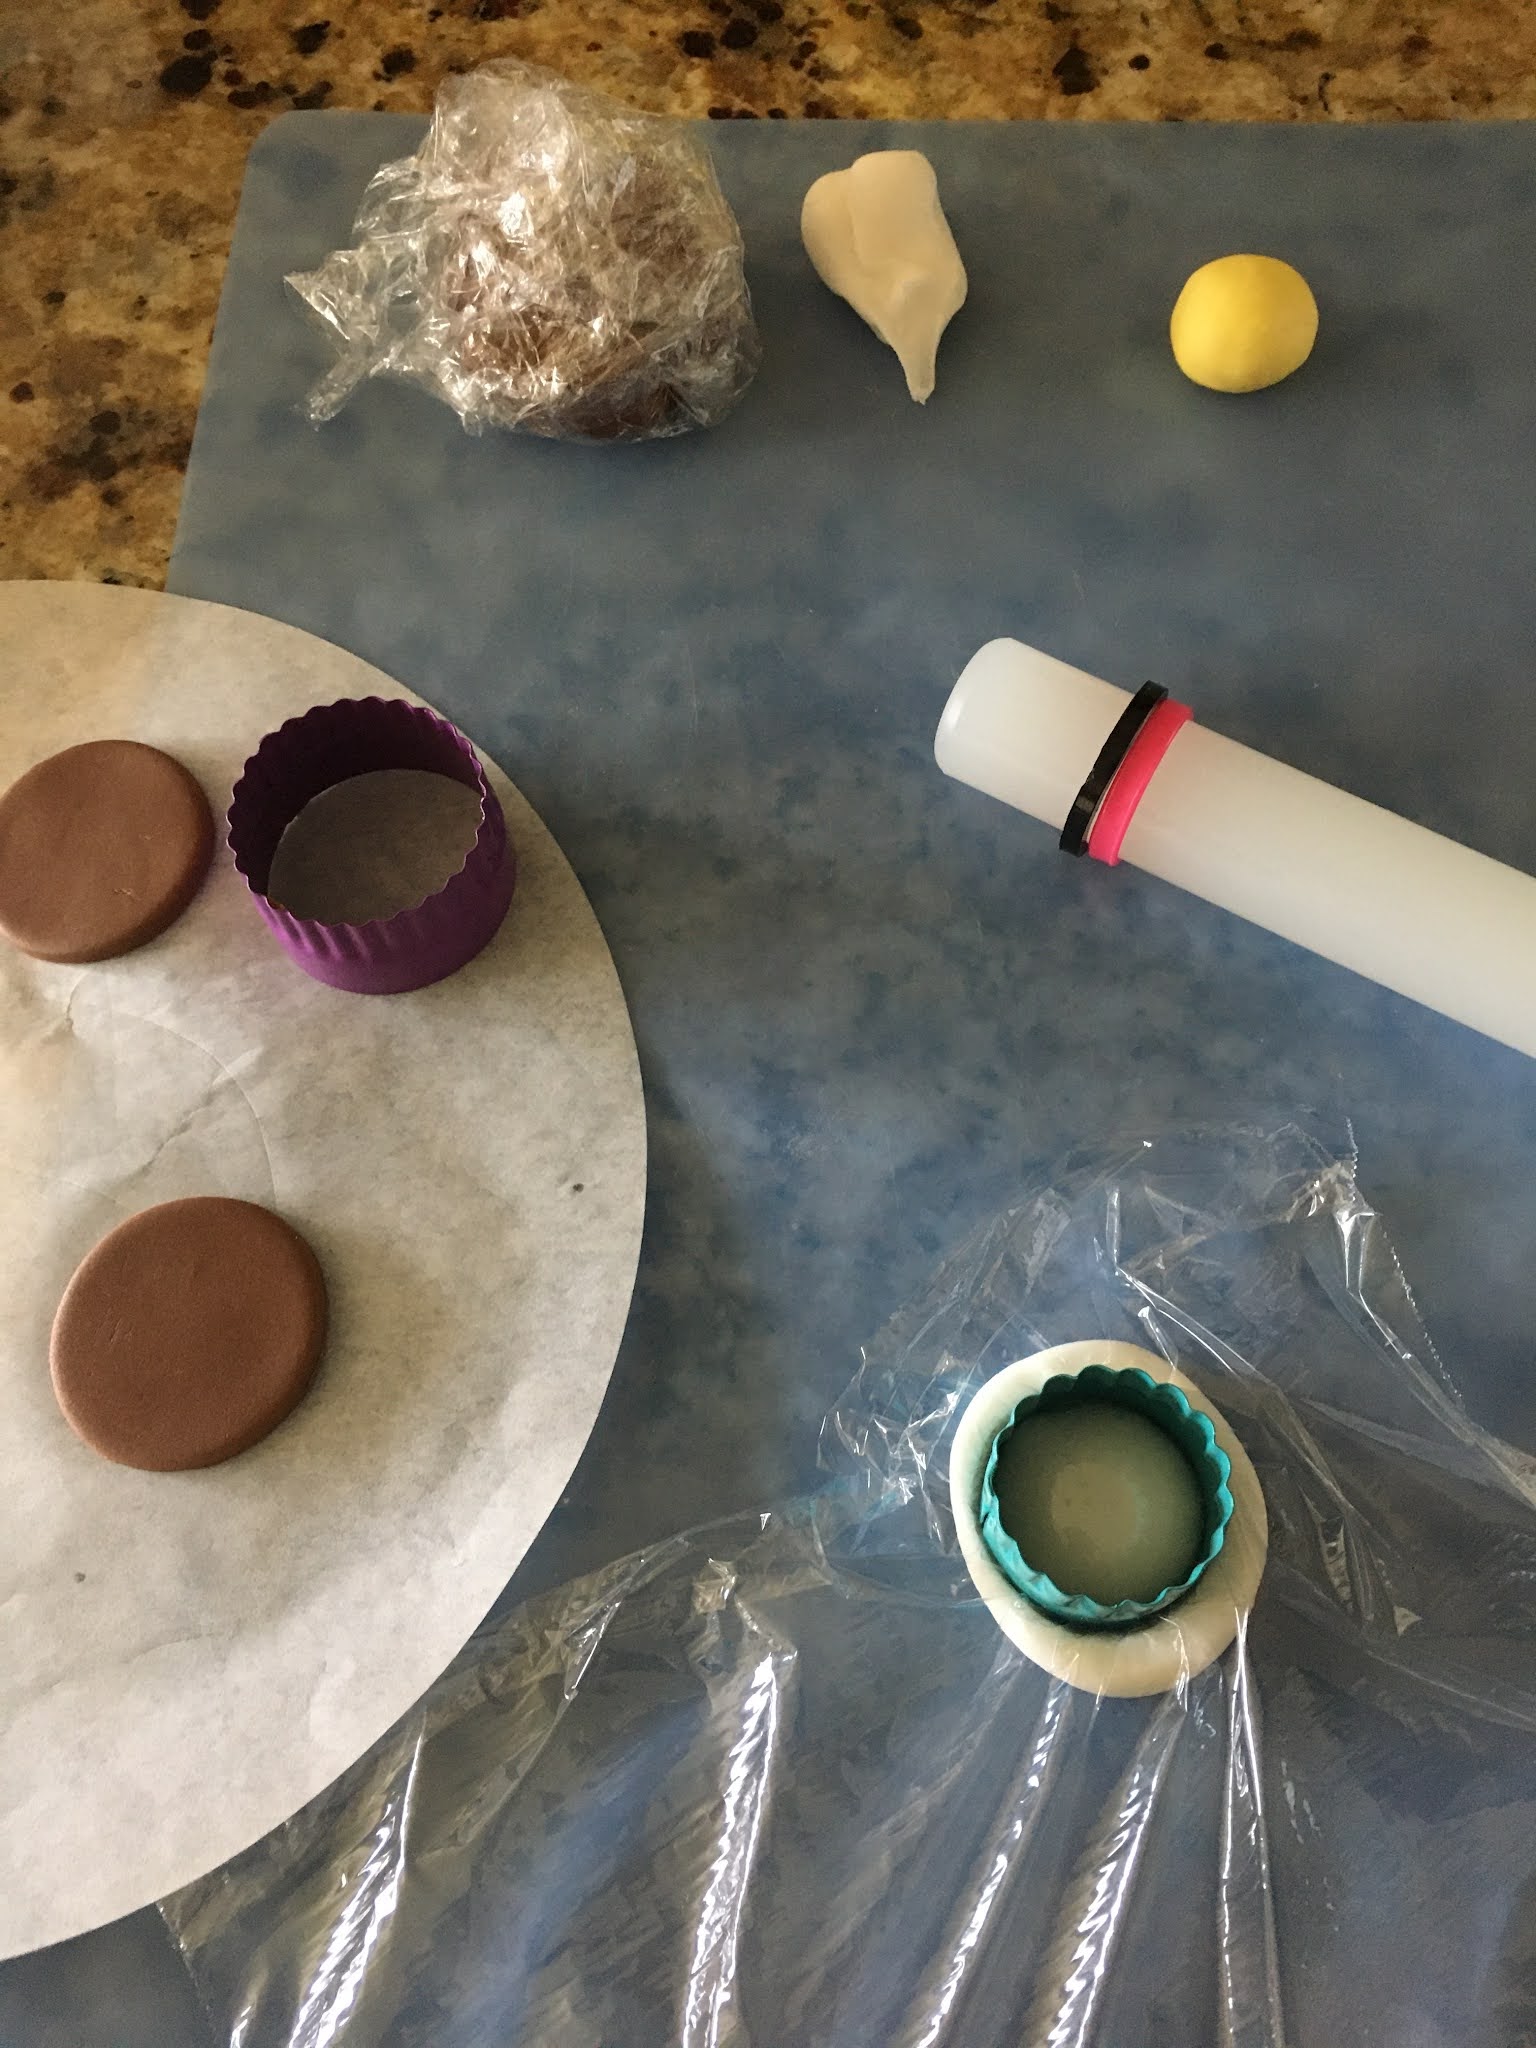
Here I am cutting out the muzzle and draping it over some crumpled aluminum foil.  (The oval cutter is from Sweet Sugarbelle.)  I could have made the whole thing from fondant, but I thought it would be too heavy.  The aluminum foil helps to lighten the load, and it saves money on fondant too.  In the background you can see the paper template that I used.  The templet was used to cut the head, ears, eyebrows, and nose and to get the sizing of the eyes correct.


Here I'm cutting out the eyes. They are just circles of different sizes that I layered on top of each other.  At the base is a black circle, then a slightly smaller brown circle, then a white circle, then a yellow circle for the glowing iris, a smaller brown circle for the pupil, and a very small white circle for the pin-point of light on the pupil.  I used a brown food marker to make the lines around the outer edge of the iris.


To give the white and yellow circle the curved or domed edges, I placed a piece of plastic cling wrap over the fondant before I cut it with the circle cutter.  The plastic wrap forces the circle into a nice domed shape.


After cutting out the head from red fondant, I started to layer all the facial features on top of it.  Note that I mixed the fondant with Tylose/Gum-Tex powder so it would dry stiff and hold its shape.  I draped the head over a Styrofoam cake dummy, and I used plastic cling wrap to propped up the tuffs of hair on the side of the face.  The wadded up cling wrap held the fondant while it dried in that shape.    For the tiny black circles on the muzzle I used this set of tiny, metal circle cutters, or you can use the opening of a piping tip. 


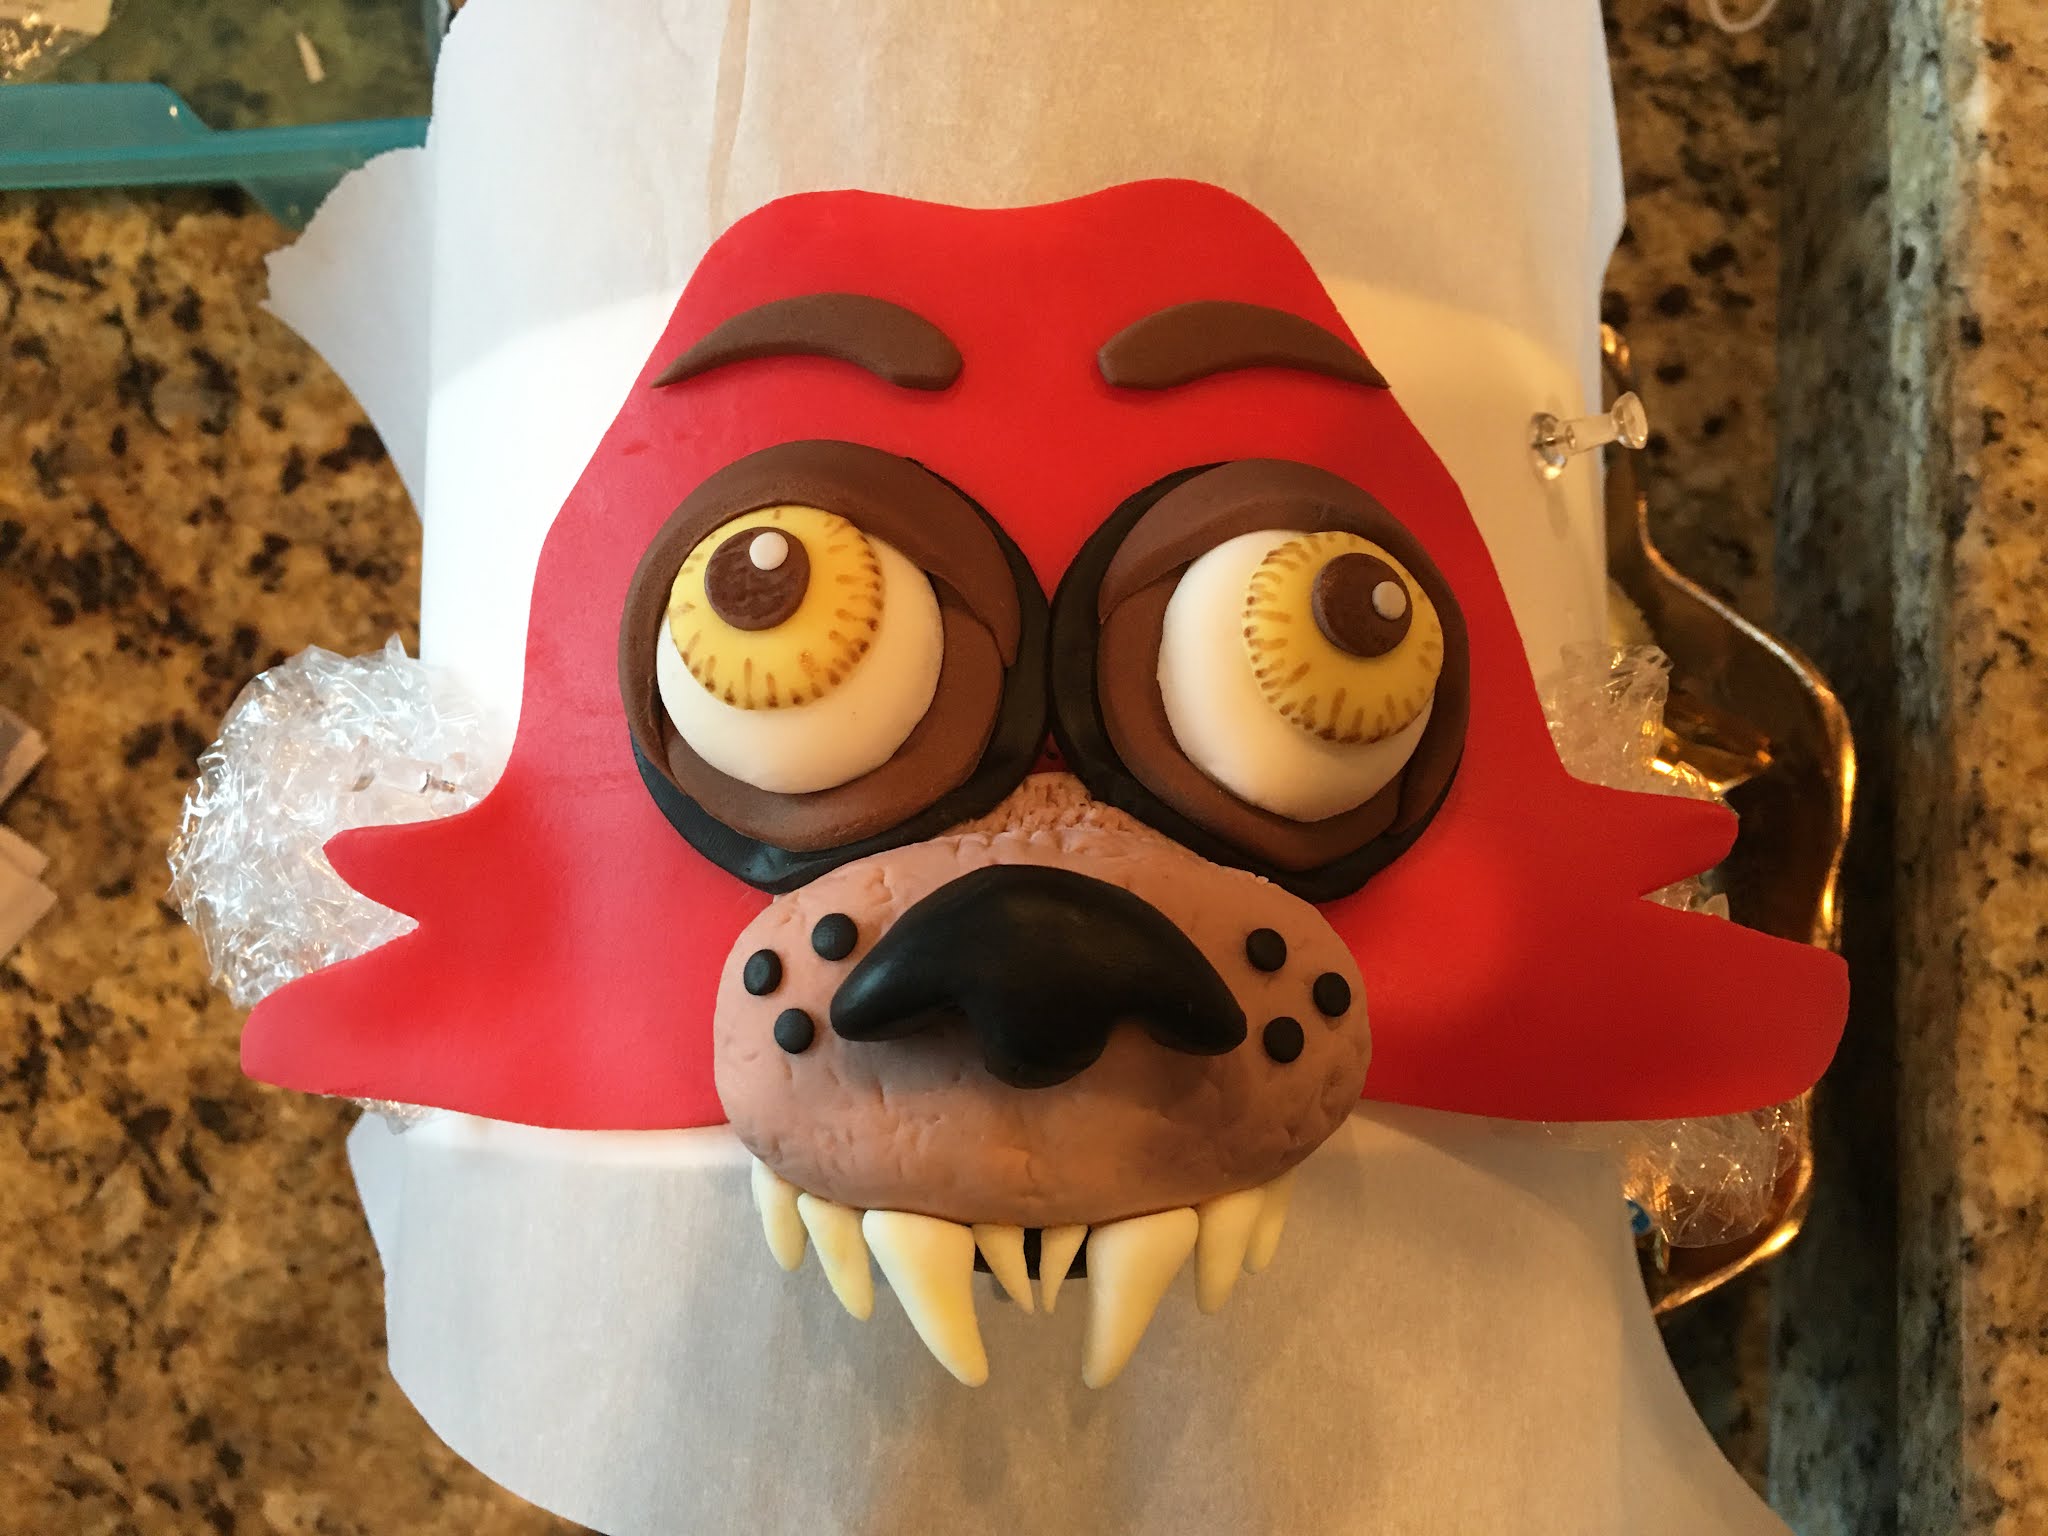
Next I rolled out the yellowish fondant for the teeth and stuck them in place.   I left it like this to dry for a few days.


I didn't make the lower jaw ahead of time because during final assembly of the cake the fondant needed to be soft so I could wedge it between the cake, cake drum, and hardened parts of the face.  But I did mix the fondant used to make the lower jaw with Tylose powder so once I squished it into pace, it hardened and stayed in position. 

So the day before the cake was due, I started to assemble everything.  I frosted the cakes using CakeSafe acrylic disks which gives the cake the sharp edges and straight sides.  (I have a blog post HERE explaining how I use them.)  This particular cake is 8" in size and it is sitting on a 14" black foil cake drum.  I used such a large drum because I needed lots of room for Freddy's bottom jaw to stick out from the face.


After frosting the cake it was just a matter of placing all my ready made pieces onto the cake - and making the bottom jaw with its yellow teeth.  Here is everything waiting to be placed on the cake.


The lettering on the cake drum was made of glitter cardstock and was cut using my Cricut Air Explorer.  The metallic looking parts of the cake (the number 10 and the bolts under the ears) were painted with silver edible luster dust to make them shine, and then dusted with black petal dust to give them some shadows and definition. 


Sorry I don't have more pictures of the final steps of the construction.  Sometimes I just get in the groove and forget to snap a few photos.


Happy Decorating,

Carol


Sunday, July 25, 2021

Coco / Day of the Dead / Fiesta Inspired Cake

This cake was inspired by Coco (the movie) and The Day of the Dead celebrations.  The party had a Fiesta theme, but the birthday girl asked for a black cake with a sugar skull and leaves/marigold petals like in the movie Coco.   This is what the Goth girl ended up with!  


<< Disclosure: We are a participant in the Amazon Services LLC Associates Program, an affiliate advertising program designed to provide a means for us to ear fees by linking to Amazon.com and affiliated sites.>>

The skull was made from cardstock using my Cricut Air Explorer.  I usually only use the Cricut to cut letters and text to go the the cake drum, so this topper was a little out of my comfort zone.  It took me forever!  Each color had to be cut separately and then glued together. 

The gum paste rose took a lot of time to make too.  I used a cutter and CK Rose Petal Veining Tool that put deep ridges in the rose petals.  Do you think the marks kind of resemble tooled leather???   It is a strange look, but I think I like it.


I also made the banner ahead of time.  I used these floral wooden stamps to make the impression in the fondant, and then I used a banner shaped cutter to cut out about the impression.  I made the cutter using my Creality Ender 3 v2 3D printer.  My 3D printed has become my most used cake decorating tool.  No joke.  If you want to read an intro into 3D printers for cookie cutters you can read my post HERE


For the marigold petals I used a daisy veining tool and a set of cutters I made with the 3D printer.  It took about 30 minutes to print the four sizes of the daisy cutter, and it cost about 10 cents in 3D filament.  


The cake itself is covered in Wilton's Black Fondant.  I started with a nice base of white chocolate ganache. I use Callebaut chocolate that I buy in 25lb bags from a local restaurant supply place.  This 10" x 5" cake took about 20 ounces of chocolate to cover.  I also use CakeSafe acrylic rounds to get the sharp edges and straight sides.  I have a blog post HERE explaining how I use them.   A lot of decorators can get their cakes to look like this with just a few minutes of smoothing, but I'm a spaz and I need the crutch of my acrylic disks.  And yes, I deliberately placed the cake off-center on the 12" black cake drum. I wanted and little extra room in the front for decorations. 

Here is my soft Wilton Black Fondant rolled out to about 18 inches round.  It looks fine doesn't it?


But I ended up with horrible cracking around the top edge.  There was a lot of torn/ripped sections on the side too.  I normally don't use Wilton to cover a cake, I only use it for fondant accents, but Wilton was the only black fondant I could buy locally.   I typically use Carma Massa but you can't get it in black, and adding food gel doesn't work.  I could have used Renshaw black fondant, but that gets a little sticky in the heat and humidity.  So I went with Wilton, and look at that horrible edge I got!  So disappointing.


Here are the marigold petals going on.  


To try and hid the cracking along the top edge of the cake I added a rope of bright blue fondant. (In hindsight I probably should have made the rope orange.)  I used my industrial strength, food safe ACE extruder to make the rope.  When I first started decorating cakes I used a small, hand crank clay extruder, but it was really difficult to use, it wasn't food safe, and it fell apart after just a few months.  After some research I decided to shelled out $150 for the ACE extruder.   The ACE has been going strong for about 3 years of constant use.  It is a beast.


The second to last step in this cake decorating adventure was placing the draped banner, better know as papel picado, on the side of the cake.  I was going to use little plunger cutters to cut out sections of each banner, but it didn't look right so I just left them uncut.


The roses and skull on the top went on last.  I added some ribbon to the banners to make them look more festive, and I added some tiny roses that I made with a silicone rose mold.

So here is the finished cake.  I hope it doesn't look too colorful for the Goth girl.


Happy Decorating,

Carol

Friday, July 23, 2021

Pink Ombre Cake with Gold Leaf

I'm not sure if I like the look of this cake.  It has gum paste flowers, macarons, and an entire pack of gold leaf.  Technically I don't think there is anything wrong with it, but it just doesn't make me smile.


Hummmm, Pink Ombre why don't I love you????

Happy Decorating,

Carol

Thursday, July 22, 2021

Bowling Alley Cake

I made this cake for a birthday party being held at a bowling alley, Rock n' Bowl in New Orleans to be exact.  It was a huge hit with the 90 year old birthday boy.  The cake is chocolate with chocolate frosting, the bowling pin are chocolate sugar cookies, and the bowling ball is a chocolate cocoa bomb.  It is a chocolate extravaganza. 


<< Disclosure: We are a participant in the Amazon Services LLC Associates Program, an affiliate advertising program designed to provide a means for us to ear fees by linking to Amazon.com and affiliated sites.>>

I started this cake by making the sugar cookie bowling pins.  


I made the cookie cutter using my Creality Ender 3 v2 3D printer.  My 3D printed has become my most used cake decorating tool.  No joke.  If you want to read an intro into 3D printers for cookie cutters you can read my post HERE.    The cookies are iced with glaze (I hate Royal Icing), and the red stripes are Red Wilton fondant.  I used the JEM Strip Cutter #2 to make the red stripes the same width.  The black accent marks on the sides of the cookie were made with a Black Americolor Gourmet Writer.  This particular pen has a wide tip and draws a dense, solid line with a single stroke.  It was perfect for the look I was after.  I also used bamboo chopsticks instead of paper lollipop sticks, because I wanted/needed to pound the sticks into the cake drum to hold them in place.  


I made the "bowling ball" from white and blue candy melts swirled together and poured into a Large Half Sphere silicone mold.  I also thinned the candy melts with some paramount crystals before I swirled the colors together.  When the chocolate in half spheres hardened, I simply unmold and stuck them together using a little melted white chocolate.


The cake itself was 9x13" in size, but when I started to assemble everything I thought it looked a little short for a bowling lane.  I thought about slicing some cake off the sides and adding it on the back, but I didn't have any more frosting to stick things back together.  Instead of making more frosting, I just added 5 extra inches to the back with Styrofoam.  (I covered the Styrofoam with plastic wrap so it would touch the cake itself.  


After the cake was covered in ganache, I started to apply the fondant strips for the wooden floor of the bowling lane.  For this I used Wilton's Chocolate fondant.  I twisted a little white fondant into the brown to make the color more interesting.  After rolling out the fondant, I pressed a wood grain impression mat into the fondant, and then cut it into strips using a strip cutter.  Note the black strips on the sides are supposed to represent the gutter.


Here it is with all the "wood" strips/planks applied.


Next I applied white strips to the sides and back of the cake.  I also made some half circle molding to trim the edges.  I have a heavy-duty food safe ACE extruder to do this.  I started with a small, hand crank clay extruder, but it gave out after a few months, so I shelled out $150 for the ACE extruder. 


Next I made some red and black diamond shaped cutouts for the side of the cake, and used the ACE extruder again to make the fancy red trim for the bottom edge.


Then it was just a matter of positioning the cookie, bowling ball, stars, and gum paste confetti on the cake.  The stars are chocolate cookies, but the "90" were made using a Cricut machine. 


And here is a photo showing the back of the cake.  I don't know why I spend time decorating the back of the cake, no one every looks at it.  LOL


 So Happy 90th Birthday, Lenny!  I hope I can do your cake next year too.


Happy Decorating,

Carol