Sunday, August 29, 2021

The Big One - Fish and Bobber Cake

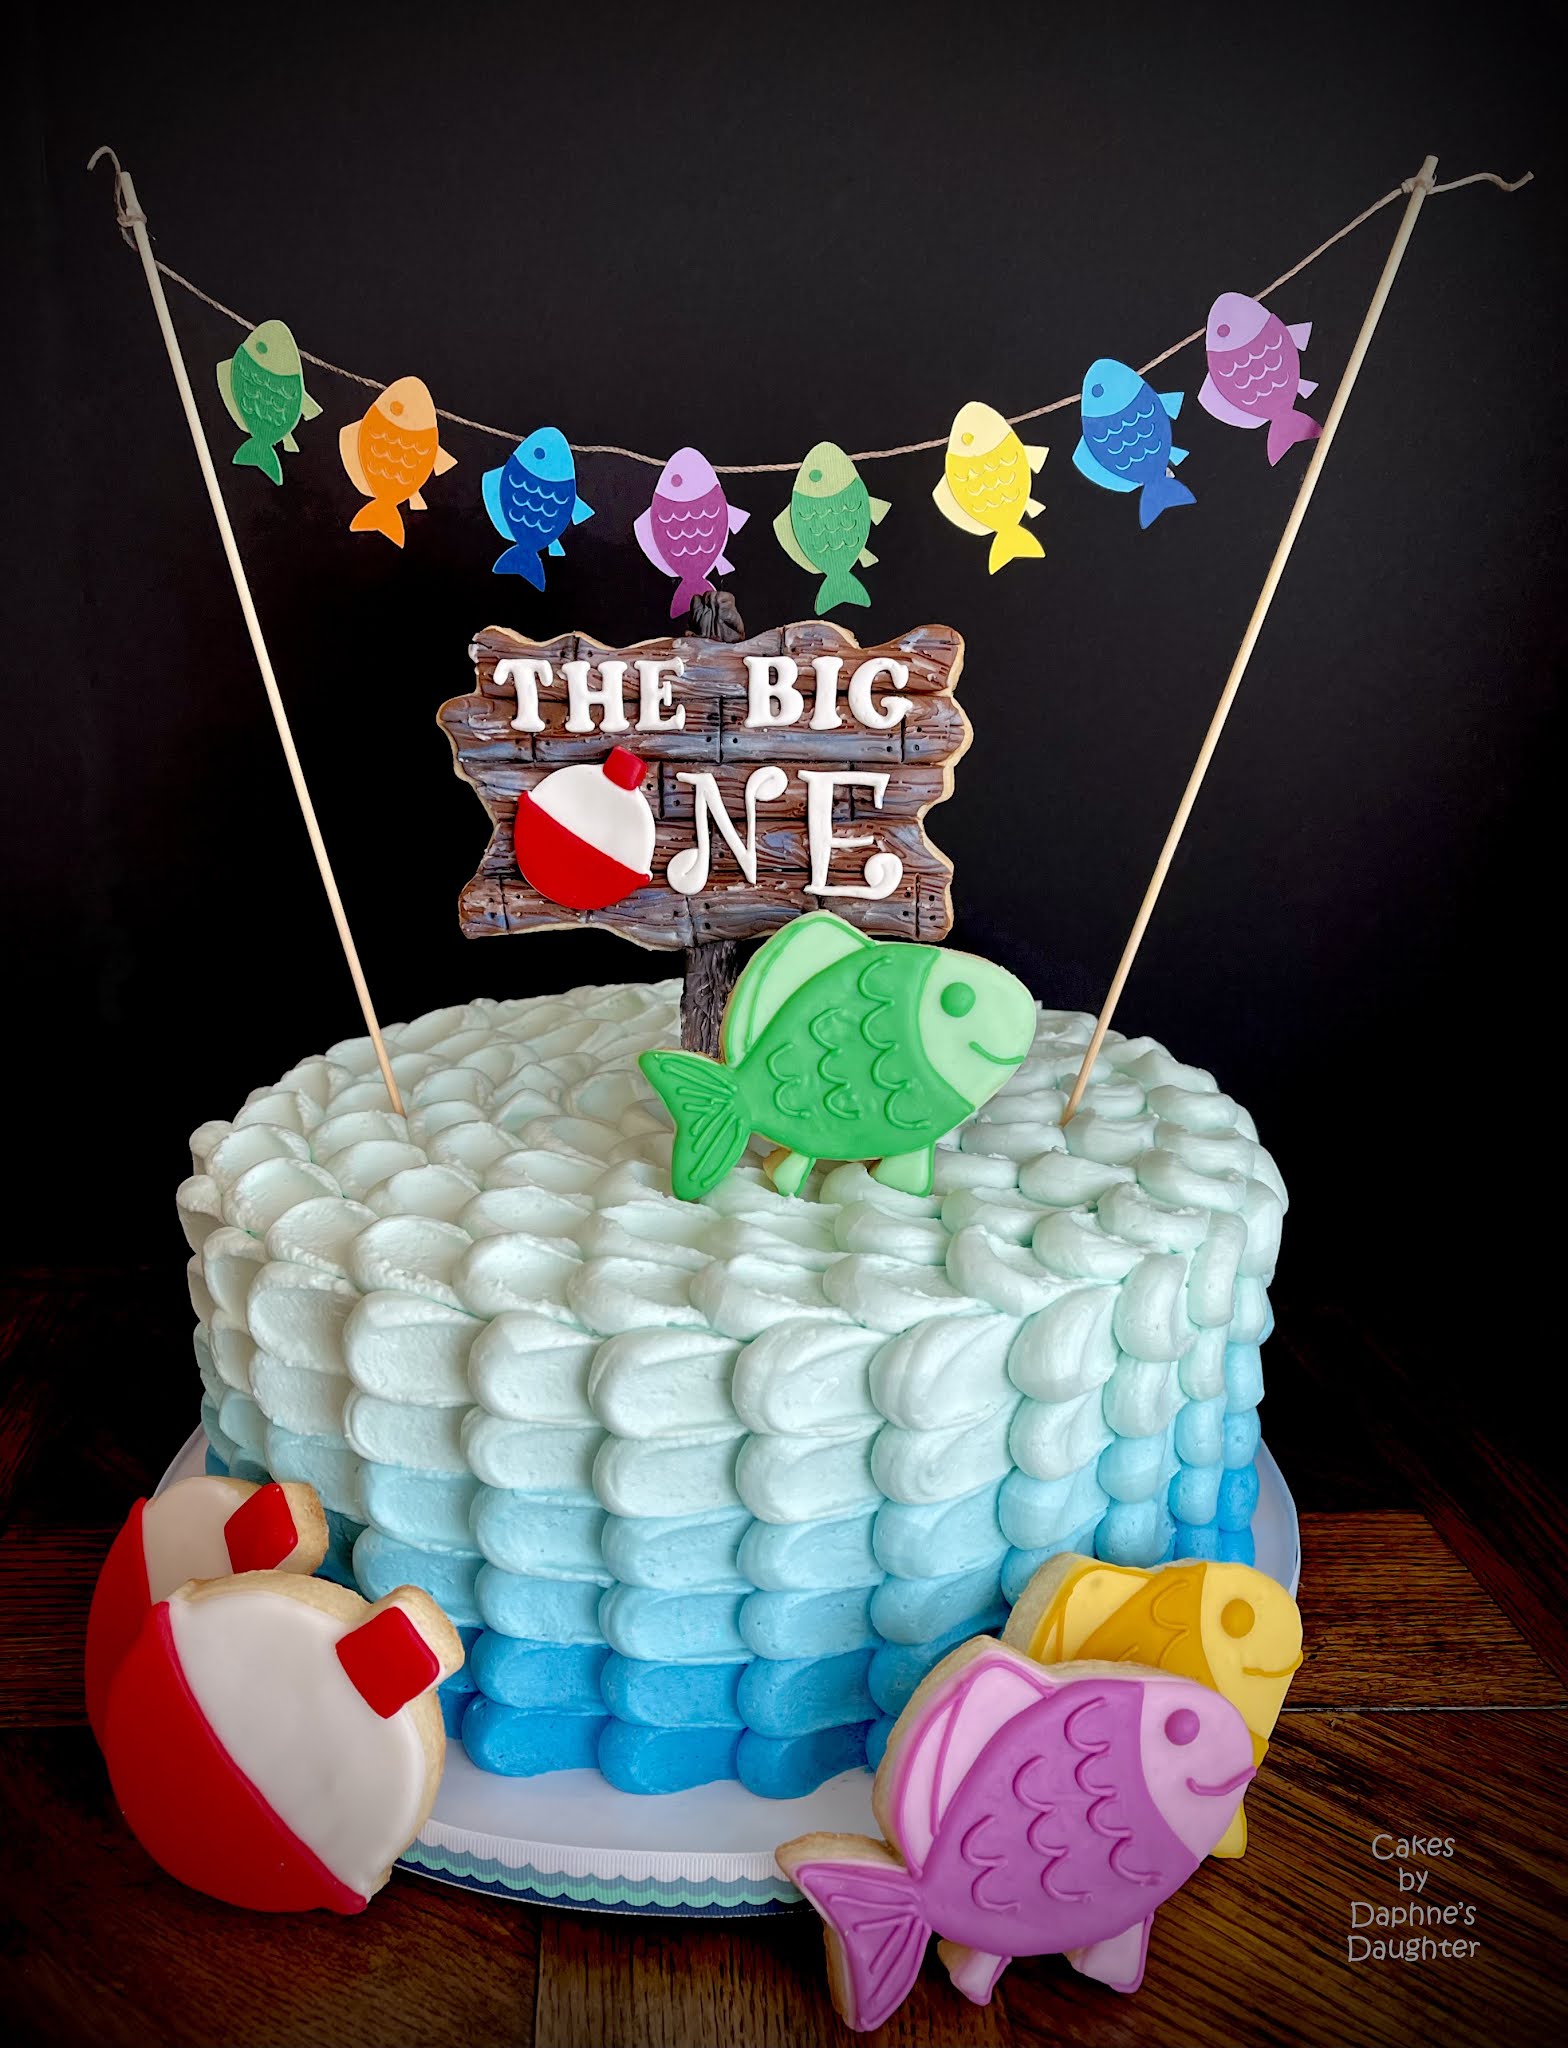
A cake celebrating Archer's first birthday was requested for August 29.  If you are from Southeast Louisiana that day sends shivers down your spine because it is the day that Hurricanes Katrina (2005) struck the coast of Louisiana and Mississippi. To compound the fear of that day, several other hurricanes were dancing around the gulf on that date: Gustav (2008), Isaac (2012), and Harvey (2017).  And now on August 29, 2021 we are watching Hurricane Ida racing toward the Louisiana coast.  Sadly the birthday party had to be canceled, and even sadder, I had already finished the cake. 

For this cake I decided to make the decorations out of cookies.  "The Big One" sign, the bobbers, and the big fish are all sugar cookies.  I've started using cookies as toppers because, well, you can actually eat them.  Fondant and gum paste topper are technically edible, but 99.9% of the time they are just tossed in the trash.   It is heartbreaking to see all that hard work just thrown in the garbage. Sniff.

<< Disclosure: We are a participant in the Amazon Services LLC Associates Program, an affiliate advertising program designed to provide a means for us to ear fees by linking to Amazon.com and affiliated sites.>>

So now I make the toppers out of cookies (when I can).  For the sign I covered the cookie in chocolate flavored fondant, and I used a wood grain impression mat to give it the look of wood.

I just used a straight edge to make the lines for the planks.

And I used powdered food color in white, black, and blue to give the "wood" a weathered look. 


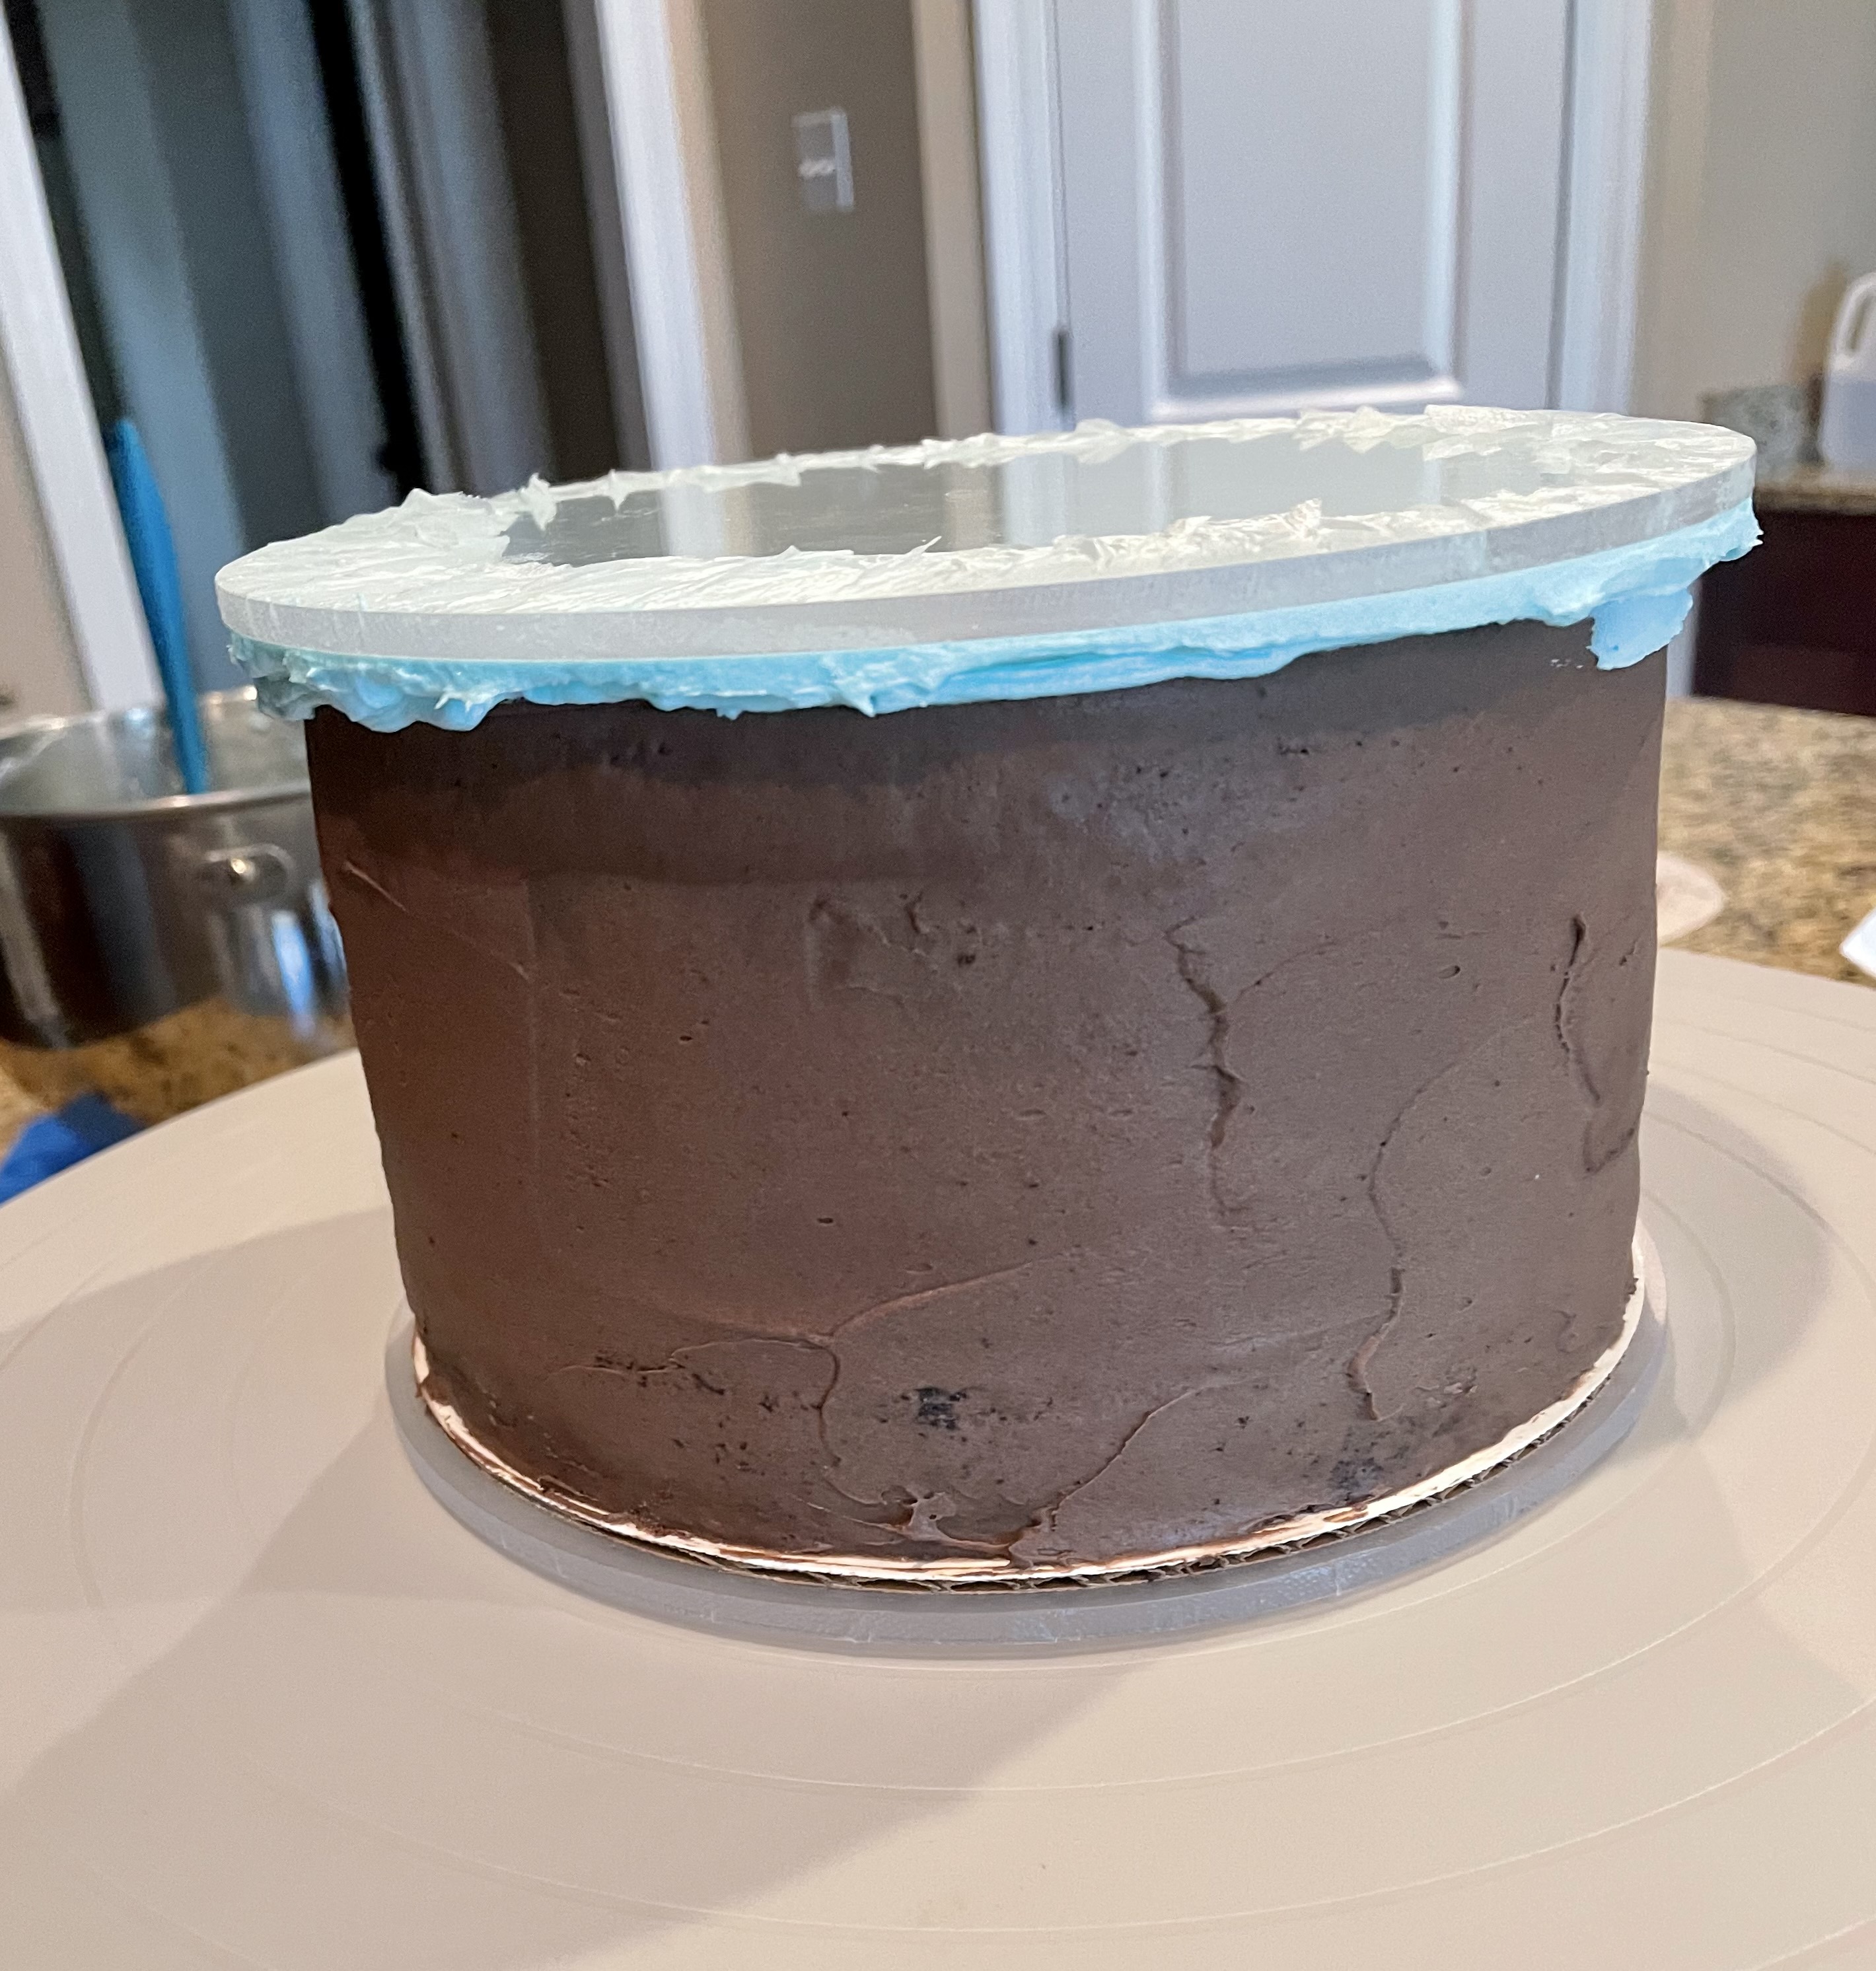
For the lettering I used the FMM Art Deco Alphabet 2cm Upper Case set and the Funky 4cm Upper Case set.  For the little bobber I used my Creality Ender 3 v2 3D printer to make the gum paste cutter.   In fact, I used my 3D printer to make cookie cutters for the sign, the bobber, and the fish. (If you want to read an intro into 3D printers for cookie cutters you can read my post HERE. )  


For the cake itself I used a technique where you pipe a blob of icing on the cake and smear the blob out into a tail using a spatula.  The technique is called blobs, petals, scallops, or scales depending on who you ask.  And I have to admit I have a hard time keeping lines of frosting straight, so I added some guide lines on the crumb coat of frosting to help with my "problem".  I used a Wilton icing comb to scrape the lines into the frosting. 


After crumb coating the cake in light sky blue, I made five additional shades of sky blue frosting.  I only had 3 of the "1A" tips, so I just use tipless piping bags for the other 3 colors.  And surprisingly the tipless bags worked just as well as the metal tips.  


Once all the colors were ready, it was just a matter of placing the blobs of frosting and dragging out the tail.   And see how the guild lines kept everything straight and even!


The technique was really easy, the only confusing part was how to finish off the last row.  It was hard trying to tuck the tail of the last blob under the first blob.  It looks a little messy, but this was the back of the cake so no one would notice.


After the cake was frosted, it was just a matter of sticking my premade cookies on top.  I made the little fish on the string with my Cricut Air Explorer


But sadly no one but me actually got to see the cake.  I took everything apart, boxed up the cake, and stuck it in the freezer.  (It will be eaten at our Labor Day party next week).  Archer's party has been rescheduled for September, so I will have to make the whole thing again.  Oh well, such is the life of a cake decorator in the hurricane zone.

Happy Decorating,

Carol


Sunday, August 22, 2021

Starbucks Caramel Frappuccino Cake

This week's cake was for my niece, Amanda, who is turning 21.  She is a big fan of Starbucks, so I made her a Caramel Frappuccino Cake.


For the cake itself I use a salt caramel recipe from Cupcake Jemma.  I even made the golden syrup and salted caramel that went into the batter.  And after all that work, I have to say I was a disappointed in the cake.  I found it a little dense, and overall lacking in flavor.  But the salted caramel frosting was awesome.  The frosting made up for the bland cake.


<< Disclosure: We are a participant in the Amazon Services LLC Associates Program, an affiliate advertising program designed to provide a means for us to ear fees by linking to Amazon.com and affiliated sites.>>

Prior to assembly, I made a few things for this cake.  I made tiny white chocolate bars using Merckens chocolate and some tiny silicone molds.  And did I mention that the molds were tiny?  I mean really, really small.  I didn't realize how small till I started to fill them with melted chocolate.  I also made some white chocolate hot cocoa bombs in a pretty diamond heart shaped mold.  I decorated them with white and gold sugar pearls.

And like a lot of my recent cakes, I used my Creality Ender 3 v2 3D printer to make an embosser for the Starbucks logo.  (If you want to read an intro into 3D printers for cookie cutters you can read my post HERE. )  I used Choco Pan Bright White Modeling Chocolate for the logo.  The modeling chocolate is stiffer than regular fondant, so I was able to get the fine details in the logo to show up.  And I should also mention that even though the modeling chocolate is labeled as Bright White, it is more of a pale ivory or off white color.


Assembly was pretty easy.  I just frosted the cake and then added a caramel drip, and I have to say I hate working with caramel.  It is so sticky and drippy.  Once the caramel was on the cake, it wouldn't stop dripping!  I put it in the refrigerator to stop the oozing, but as soon as I took the cake out and it warmed up - the drips started to slowly slide down the cake. It drove me crazy.  I've read recently that if you add some white chocolate to the caramel it will stop the constant downward creep of the caramel drip.


After the caramel drip was on, I added some buttercream rosettes and placed the white chocolate hearts, bars, and some almond cookies.  This was a pretty quick and easy cake to make.


Here is Amanda blowing out her candles.  Look at those drippy drips sliding down the cake.  Oh Well.... Happy Birthday, Amanda.


And here is what the inside looks like...


Happy Decorating,

Carol

Monday, August 16, 2021

Baby Shark Cake with Cookie Topper

This is a quickie Baby Shark cake that I made for my grand-nephew, Kristopher.  He is turning two!  The yellow Baby Shark and the "2" on the top are cookies, and I made Kristopher his own Baby Shark cookie to munch on. 

<< Disclosure: We are a participant in the Amazon Services LLC Associates Program, an affiliate advertising program designed to provide a means for us to ear fees by linking to Amazon.com and affiliated sites.>>

Like a lot of my recent cakes, I used my Creality Ender 3 v2 3D printer to make the cookie and fondant cutters.  I made the shark cutters, the "2" cutter, the wave shape cutter on the "2", and a few sizes and shapes of coral.    If you want to read an intro into 3D printers for cookie cutters you can read my post HERE.  

Here is a line drawing of shark that I sent to CookieCad to generate an STL file and then sent to the 3D printer for printing.


I didn't feel like mixing up icing for the cookies, so I used Satin Ice's Choco Pan Modeling Chocolate in yellow, black, and red.   The modeling chocolate is stiffer than fondant, so it is easier to cut and transfer to the cookie.  The modeling chocolate also tastes a lot better than fondant.  First layer on the cookie was yellow.  I used the same cutter for cutting out the dough and the modeling chocolate.


Then I added the red mouth, and white part of the body.  I had cookie cutters for each body part so it was super easy to cut of the pieces.  Note: I used regular white fondant for the belly of the shark.  The modeling chocolate comes in what they call "Bright White", but to me it is more ivory and not white.


Eyes and teeth went on last.  I also scored lines into the modeling chocolate to separate the fins from the main body.  This just gives it a little more interest.  


For the cake itself I used a blue Ombre effect to make it look like water.  
I frosted the cake using CakeSafe acrylic disks which gives the cake the sharp edges and straight sides.  (I have a blog post HERE explaining how I use them.)

I tinted the frosting in four shades of Wilton's Sky Blue gel, and slapped it on the cake.


Then I just used a bench scraper to remove all the excess frosting, leaving behind smooth sides with sharp edges and a flat top.  Note: after the first swipe of the bench scraper you go back and fill any holes in the frosting and then pass the bench scraper again.   In 10 minutes you are done.  The acrylic disks make it so easy.


 After frosting the cake it was just a matter of slapping on the decorations.  The coral I made with my 3D cutters, the sea shells were made with silicone molds that came in a Mermaid set.  I used the mermaid tails on another cake I made recently.


For the sand on the Baby Shark cake I used ground up graham crackers.  Below you can see where I placed the shark and the "2" topper on the cake.  I made a few different "2"s with different decorations.  In the end I just went with the plain one you see the in final picture.  I didn't like the one shown below with the white pearls and jimmies on it.  The lettering on the cake was made with fmm Art Deco Alphabet Set 2cm Upper Case.  I'm really bad at piping names using buttercream (especially on the side of a cake), so I just use the fmm cutters for all my lettering.  And what do you think about the nose on the Baby Shark?   I don't like it.  It looks too much like a pig's nose.  I should have use a different shape.  Oh well, live and learn.


And once again the final cake.  Super easy and simple to put together.


Happy Birthday, Kristopher!


Happy Decorating,

Carol

Sunday, August 8, 2021

Baseballs or Bows - Cake and Cookies

This was a pretty simple cake to put together.  It is a Baseballs or Bows theme for a gender reveal party.  I think it is going to be a girl, just because I loved how the pink bow cookies came out.


<< Disclosure: We are a participant in the Amazon Services LLC Associates Program, an affiliate advertising program designed to provide a means for us to ear fees by linking to Amazon.com and affiliated sites.>>

The pink bow on top of the cake was made from gum paste, and I made the topper using my Cricut Air Explorer.  The topper was made using black and white cardstock and glitter cardstock in gold, pink and blue.  At 10.5 inches in width, the finished topper was a little large for the 12" cake, but I didn't "hate" it enough to make a smaller one.  

I used my Creality Ender 3 v2 3D printer to make a gum paste cutter for the baseball bat and for the question marks on the side of the cake.    If you want to read an intro into 3D printers for cookie cutters you can read my post HERE.  I also used the 3D printer to make the plaque on the front of the cake.  I made an embosser and a debosser version to test both methods.  One pushes the text into the base fondant, and the other has the text raised above the base fondant.


I tried it both ways and the raised text seemed a little easier and less messy to paint.

I painted the text with a mixture of petal dust and Everclear liquor.


I used the same design on the cookies and the plaque cutter, and used a Mini Portable PICO projector to shine the text onto the cookie for piping the letters. 

Here is the cookie set.  Pink bows, baseballs with blue stitching, and the plaque with the caption "Baseballs or Bows".


And here is a picture of just the bows.  I LOVE those little bows.  The are just too cute.  Here is a link to Lilaloa's website showing the decorating steps.


The only problem with the cookie design is that the narrow spot (where the four parts join together) is very weak.  I had two cookies break in that area.  If you picked the cookie up at the tails instead of the loops, it just cracked in half.  Oh the horror.  But I glued the pieces back together with some melted white chocolate. 


To keep the bow cookies from snapping during transport and party setup, I added a piece of cardboard under the cookie.  I hope this keeps them from breaking in half.


So another cake and cookie combo completed.  But I have to say that the more cookie I do, the less I like doing them.  They are a PITB, and so time consuming.  Cakes are so much easier.

Happy Decorating,

Carol


Tuesday, August 3, 2021

Superhero Panel Cake

Here is a cake for a kid who doesn't have a favorite superhero.  We have the Hulk, Spiderman, Captain America, and Ironman each taking a quarter of the cake.  This is not my favorite look, but this is what John-John wanted.  Although the poor thing caught Covid-19 so I had to freeze the cake when the party was postponed.  :-( 

<< Disclosure: We are a participant in the Amazon Services LLC Associates Program, an affiliate advertising program designed to provide a means for us to ear fees by linking to Amazon.com and affiliated sites.>>

The cake started with me making a bunch of cutters using my nifty Creality Ender 3 v2 3D printer.  My 3D printed has become my most used cake decorating tool.  No joke.  If you want to read an intro into 3D printers for cookie cutters you can read my post HERE

I made a cutter for the Hulk fist.  It is a chunky, open hand cutter.  I cut and separated the fingers a little, drew in some lines in the palm, made lines for the knuckles and finger nails, and then I folded over the fingers to make the fist.  Easy Peasy.   But you don't really need a 3D cutter to make the hand, you can just use a paper template.


Looks like Hulk is hitchhiking here.  


I made a cutter for the Ironman mask, and made a cutter/embosser combo for the "heart". 


I made some circle cutters and a star for the Captain America shield.  I could have used other circle cutters I had, but it is easier to make cutters that are perfectly sized for what I want rather than hunt around for random circle cutters that would fit the job.  I know, I'm lazy.


I had a little oops moment with the Spiderman section.  


I made both the spider and the spider web in black.  When I placed the black spider on the black spider web it just didn't look right.  The spider was hardly visible.  I tried replacing the black  spider web with a white one, but the black fondant strings had stained the red fondant so I couldn't remove it without creating a mess.  As a workaround I used the Cricut Design Space Software and made an offset bubble around my spider image and then made a cutter of the offset.  (The black is the original image, and the red is the offset bubble.)  And you need to make an offset bubble because just enlarging the cutter size and stacking them on top of each other doesn't work.  (Been there, tried it, believe me it didn't work.)


Here are the two cutters.


I cut the bubble spider from white fondant, place the actual black fondant spider on top of that, and then placed the two on top of the black spider web. The white buffer between the black web and black spider made the spider a little more visible.  Next time (if there is a next time) I will make the spider web white, silver, or gray.


The cake itself is an 8" chocolate cake covered in chocolate ganache.  To cover it in fondant I cut a wedge of fondant (one in each of the 4 colors) that matched 1/4 of the cake.  I'm sure there is a better way to do this, but this is what I came up with.


After placing the fondant wedge on the cake there was a little bit of bunching at the corner edge, but I just trimmed it off and smoothed the fondant so the cut section was hardly noticeable.  I wasn't worried about the gap between the sections because I knew that would be covered with black fondant trim.


But I miscalculated on the size of my wedge and ended up with the yellow section being too small and the gray section being too large.  Oops.  Note:  I made the black edging using my handy ACE extruder


To hide the mistake I did what any respectable cake decorator would do - I hid it under fondant.  In this case I made some fancy yellow braided trim using a pie crust impression mat and covered the problem area.  See - problem gone.   Note: the blue bead looking trim on the Captain American side also used the pie crust impression mat.


For the lettering on the name plate I used  FMM's Art Deco Upper Alphabet set.  I haven't had much luck making little cutters like this with my 3D printer.  I also dusted Hulk's fist and the grout lines between the bricks with a little black petal dust.  The black dust just accentuates the markings and makes them more obvious. 


So here is the finished cake showing each section in all its glory.  I hope John-John gets better soon so I can see how the fondant decorations handle the freezer.  


Happy Decorating,

Carol