Wednesday, December 1, 2021

Crawfish Pirogue Cake with Cookie Crawfish, Corn, Potatoes, and Fixings

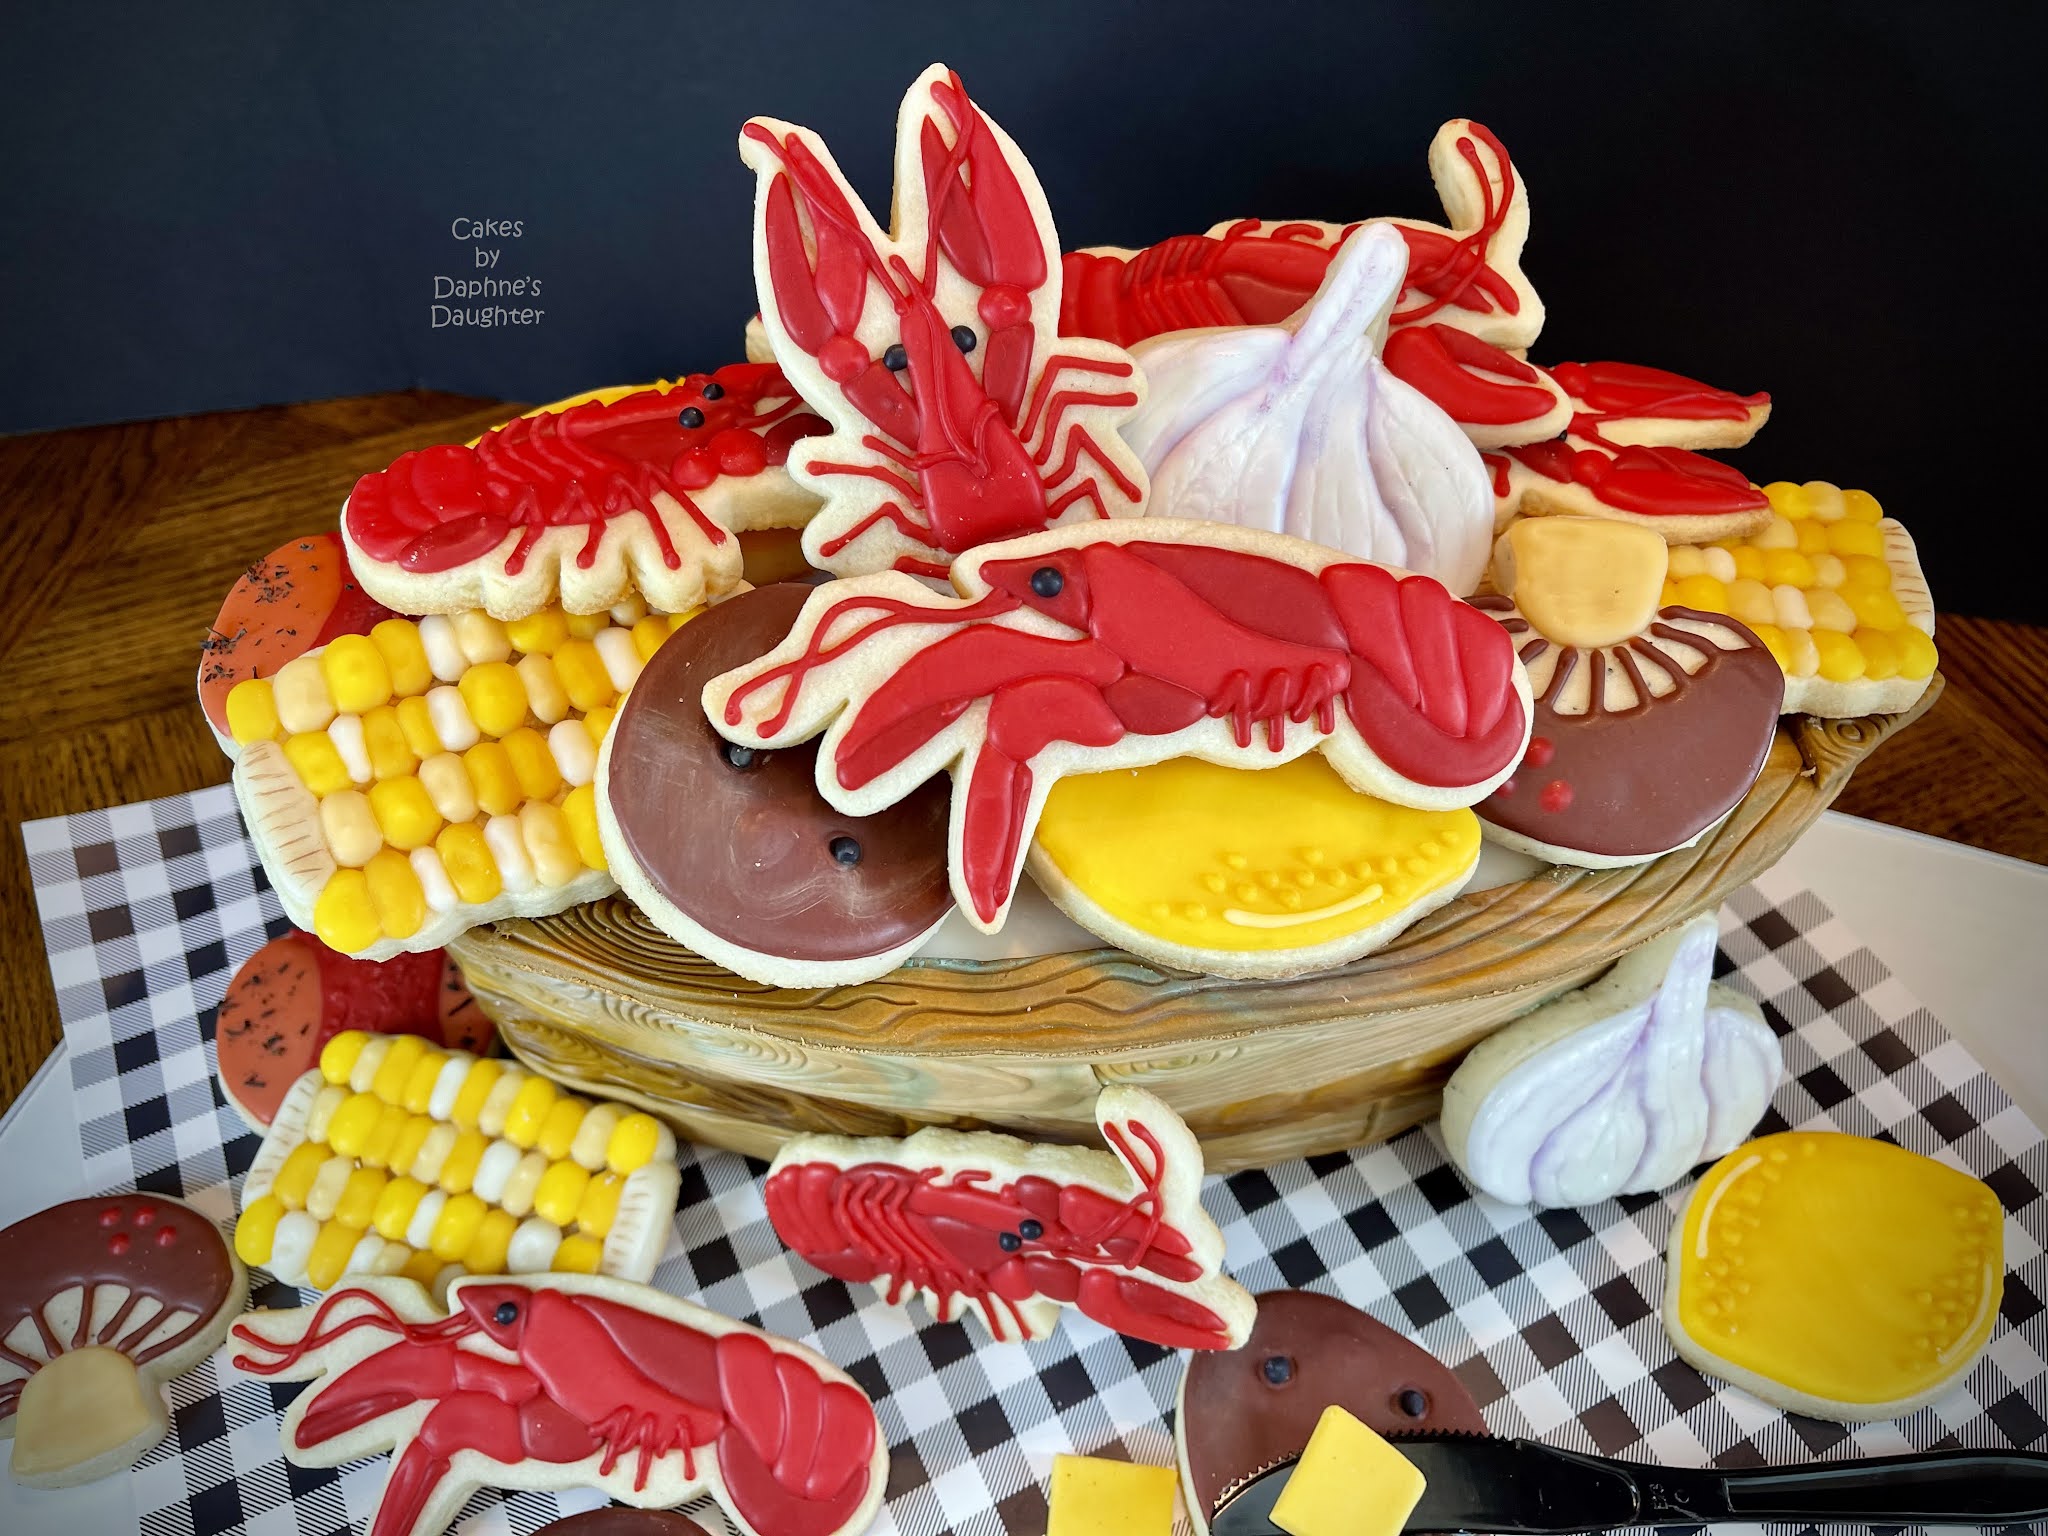
My family has a lot of crawfish boils, and one of the best ways to serve the steaming hot crawfish and fixings is in a miniature pirogue serving boat.  I tried to match that "look" in cake and cookies.  Sadly the shape of the boat wasn't quite right, it needed to be shorter in height and longer in length, but everyone at the party got the idea.

The crawfish, corn, potatoes, sausage, lemon, mushrooms, and garlic are cookies.  Some are regular sugar cookies and some are Earl Gray Tea infused shortbread with orange flavored glaze.  Yum.  I like the shortbread ones the best.


First step in this cake adventure was to make some cookie cutters based on actual pictures of the crawfish.  I outlined three different shapes. 


<< Disclosure: We are a participant in the Amazon Services LLC Associates Program, an affiliate advertising program designed to provide a means for us to earn fees by linking to Amazon.com and affiliated sites.>>

Then I loaded them into the CookieCad.com app to generate the cookies cutter STL files.  The STL files were converted to GCODE files which I printed on my Creality Ender 3 V2 3D printer.  I just LOVE my 3D printer; I use it on almost every cake.  You can read more about the process in my blog post HERE.

Here are the cookies getting iced.  I use glaze instead of Royal Icing because I hate the taste of Royal Icing.  Glaze is just Powdered Sugar, Corn Syrup, and Milk that you stir together with a spatula.   It is super easy to make.  For the crawfish I used two shades of red and black for the eye.

The corn was fun to make.  I used four different colors to make the little blobs of icing that kind-of sort-of look like kernels of corn.  It was super easy but a little time consuming.


With the cookies all finished and dry, I started on the cake.  First I cut some cake boards to fit the shape of my cake, and then I used the cardboard as a guide to carve the cake.  


Next I crumb coated the cake...


And then I started adding planks of fondant "wood" to the side of the cake.  The fondant is just a hodge-podge of other tinted fondant I had leftover from other cakes.  It is a marbled mixture of brown, beige, green and yellow.  I rolled out the marbled fondant, textured it with a wood-grained texture mat, and then cut it into strips.  Then it was just a matter of sticking the fondant planks onto the cake.


I placed the cake onto the prepared cake drum, and then I added some extra pieces of fondant to the front and back of the pirogue to make bow and stern.


Once the pirogue was in place and secured with a wooden dowel, I arranged the cookies on top and around the base of the cake.


So here is the finished cake again.  Like I mentioned earlier, the proportions of the pirogue isn't correct.  Given the height, it should have been much longer, but I only had to feed 10 people with the cake so I didn't want to make it huge.


And here are the cookies.  Love me some crawfish...


Lets EAT!

Happy Decorating,

Carol

Thursday, November 25, 2021

Welcome Little Pumpkin Cake - See it come together

The "My Little Pumpkin" theme is so cute for a baby shower cake.  The peachy-orange cake with the beige pumpkin and the soft pink roses is so girly and sweet.  Personally I would have preferred a small plaque or banner with just the baby's first name, but the mom-to-be wanted the full name so that is what I did.  I aim to please...

<< Disclosure: We are a participant in the Amazon Services LLC Associates Program, an affiliate advertising program designed to provide a means for us to earn fees by linking to Amazon.com and affiliated sites.>>

So the cake started with the gum paste flowers which I made a few days ahead of time.  I used a rose cutter and petal veiner, a leaf cutter and veiner, and a hydrangea cutter/veiner.

For the pumpkin I used a Nordic Ware 3D Baby Pumpkin shaped pan.  It is 5-1/2" inches across and 2-1/2" deep (double that height for two stacked together).  It is a really cute pan, but sadly it has been discontinued.  I have not tried this alternative pan, but it might work as well.  

Here are the naked pumpkin cakes stacked together.  You can really see the details.

And then like a crazy person I cover all the details in buttercream.

But not to worry... with a little bit of smoothing the pumpkin-ish shape comes back.  I used a sugar smoother to scrape off the excess icing and reveled the highs and lows of the pumpkin shape.  FYI: The rod in the cake helped me to hold onto the cake as I was smoothing it, and later the rod also secured the pumpkin to the main cake.  And finally the rod was used to support the stem of the pumpkin (which went on last).  That rod did a lot of work!  So below is the cake with the first pass at smoothing completed.  It still doesn't look much like a pumpkin, but just wait.

After the sugar smoother gave me the rough shape of the pumpkin, I used a slightly wet finger to smooth out the buttercream.  Yes, a wet finger.  That is all it took.  I dampen my finger in some water and brush my finger over the contours of the cake, smoothing the buttercream and leaving behind a silky-smooth surface.  And I wasn't worried about the brown of the cake peaking through because later I dusted the pumpkin with orange and brown powder food color to give it a more rustic look.

After the pumpkin was shaped it went into the refrigerator to chill, and once it was firm I plopped into onto the top of the main cake.  I added the pumpkin stem, which is just brown fondant marbled with some white and black fondant.  I know from this angle the stem looks like the head of a snake, but really - it is a stem.  The leaves on the pumpkin are actually made using an ivy cutter.  (I really hope no one noticed.  LOL)  As a final touch I dusted the leaves with some green petal dust to give them some dimension.   You can also see the touch of orange and brown petal dust/powder food color that I added to the pumpkin itself.


The name on the side of the cake was made using the fmm Tappit Magical Alphabet set.  I have a collection of these fmm alphabet sets, but this Magical font is my favorite.

So here is the final cake again.  Welcome baby Brooklyn!


Happy Decorating,

Carol


Tuesday, November 23, 2021

Chocolate Sphere Cake

 A chocolate sphere cake should be easy to make, right?  Throw a few spheres on and call it a day.  Well take my word for it -  it is NOT easy!


I've made Chocolate Cocoa Bombs before so I thought this cake would be easy to throw together.  Well, making one or two bombs isn't a issue but when you make seventy-five of these chocolate babies (in all different sizes and colors) you start praying for someone to put you out of your misery.    

<< Disclosure: We are a participant in the Amazon Services LLC Associates Program, an affiliate advertising program designed to provide a means for us to earn fees by linking to Amazon.com and affiliated sites.>>

I used four different sized silicone sphere molds and filled them with dark, milk, and white Merckens melting wafers.   I also used peanut butter flavored candy melts that I picked up a Michaels.  In addition to the spheres, I used mini candy coated chocolate balls and some sugar pearls in goldsilver, and black.   


Here is the cake itself.  All stacked and waiting for the spheres to be placed.  It is a 6" top tier, a 9" bottom tier, and a 14" cake drum.  I placed white sugar pearls around the top tier to hide the gap/seam.


Then I started the tedious part of placing the spheres.  I placed the largest spheres first, and I used plastic picks inserted into the cake to help support the weight of the monster spheres.  Melt chocolate was used to "glue" the sphere to the pick and to glue the spheres to each other.  Freeze spray is a must when making a cake like this.  The freeze spray instantaneously hardens the melted chocolate and lets you quickly place the spheres.  But be careful because once the chocolate glue hardens, it is almost impossible to move the spheres without breaking them.


When I was "finished" placing the spheres, I had a lot of openings that were too small for a sphere and too large for a sugar pearl.  To fill up these gaps I made balls from Choco-Pan white modeling chocolate and stuck those in the openings.  The modeling chocolate worked great because I could make the ball the exact size I needed.  The modeling chocolate was also firm enough to hold its shape but sticky enough to cling to the chocolate spheres without the need for more melted chocolate glue.

So here is the finished cake again.  I hope those sphere don't fall off during transport!


Happy Decorating,

Carol


Friday, November 19, 2021

Boho Rainbow Cake

Here is a Boho inspired cake that I made recently.  I tried to match the colors in the rainbow to the balloon arch that was being used at the party, but in the end my colors were a little less pink than the rest of the decorations.  Oh well....

<< Disclosure: We are a participant in the Amazon Services LLC Associates Program, an affiliate advertising program designed to provide a means for us to earn fees by linking to Amazon.com and affiliated sites.>>

I used gum paste and a peony cutter to make the big flower.


And macarons with simple leaves and spiky lavender-shaped flowers for filler.  My cousin didn't want anything too frou-frou. 

The rainbow was the hardest part of this cake to make.  At first I thought about making it out of yarn, but in the end I just made it from fondant (mixed with lots and lots of Tylose/Gum-Tex/CMC powder to make it stiff).  I also used an armature of wire to help support the fondant rainbow.  I used my ACE fondant extruder to make the rope shaped strands and placed the rope stand next to the curved lengths of wire.  Originally I tried to push the wire through the fondant rope, but that didn't work very well.  I guess the rope was just too long.  Here is the first fondant rope with wire pressed against both side.

Then I placed the second fondant rope next to the first and glued them together with water.   

On the front side of the rainbow the wires were completely hidden, but a few hours later when I flipped it over, I found that the wires where still showing through.  You can see I had to place some extra fondant to hide the wires.  It didn't look very neat, but it was the back side so hopefully no one noticed.  In the picture below you can see where I covered two of the wires with beige fondant, and I am about to cover the other two with the peachy fondant.


For the itself cake I made an 11" round bottom tier that was about 3" tall.  The upper tier is a double barrel 8" round cake that is about 7-1/2" tall.   I offset the top tier so I would have enough room for the base of the rainbow to sit.   I also didn't have a 14" white cake drum, so I had to use a black drum and cover it in beige fondant.  I used this fancy patterned impression mat to make the pattern in the fondant before covering the drum.  Note the edge of the black drum will be covered in ribbon at a later point.


I also used the Wilton Pie Edge Mold to make the beaded edges around the base of the cakes.  I always end up with a gap between the bottom and top tier.  It is so frustrating. 


After stacking the cakes it was just a matter of placing the rainbow and adding the flowers and macarons.  Easy stuff.  And here is the cake at the party.  They didn't have everything setup yet, but you can see that my colors matched the banner a lot closer than those pink balloons.   I should have put more pinky-pink in the rainbow.


Happy Decorating,

Carol


Wednesday, November 17, 2021

Paris Inspired Cake

Here is a Paris inspired cake I made recently.  It is supposed to represent the shops and sights of Paris.  There is a dress shop, a shoe store, and a bakery.  There is a wedding shop, and outdoor café, a fancy house with potted plants and a snooty poodle.  There are picture frames to represent the museums, a scooter, and plants and greenery for the parks.   There are macarons, and roses, and lots and lots of lamp posts.  


And that wimpy paper Eiffel Tower??  That was replaced by a nice metal 3D version once the cake arrived at the venue.   But sadly my picture didn't come out very good - too much light in the room.


<< Disclosure: We are a participant in the Amazon Services LLC Associates Program, an affiliate advertising program designed to provide a means for us to earn fees by linking to Amazon.com and affiliated sites.>>

Construction of the cake started with the bottom tier.  I used a mold to make the rosette ruffle.  It was easy but a little time consuming.  It took me about and hour and a half to cover the 10" cake base.  First I had to tint the fondant a soft pink color.  Then, per the instructions on the mold, I mixed the fondant with a little Tylose powder  (aka Gum-Tex and CMC).  I dusted the mold with LOTS of corn starch, and then I just pressed the fondant into the mold to form the rose rosettes.


Then it was just a matter of placing the rosette panels on the cake and joining the panels together.  If you look close you can see where the panels where joined, and at the back of the cake (although there really isn't a back to the cake), I had to cut one of the panels to make it fit.   I also made sure my base tier was 4" tall so it would match the height of the mold.  
 

With the base finished, I added the second tier and started to place my "shops".   I pretty much just cut random squares, rectangles, and arches to make the shops.  I used Choco Pan Modeling Chocolate instead of fondant to make the cutouts.  The modeling chocolate is stiff and holds its shape when you pick it up and transfer it to the side of the cake.  The modeling chocolate doesn't need the yucky Tylose to stiffen it up, and it tastes good too (unlike most fondant).  


And I did make a few custom fondant cutters and embossers using my Creality Ender 3D Printer: the lamp post, the little fleur-de-lis, the poodle, and the scooter.  I also didn't care for the way the top of the rosette panels looked, so I used a Wilton pie edge mold to cover the top with a beaded edge of fondant.


Sorry, I forgot to take pictures as I was working on the top tier.  I've been doing that a lot.  I just get into the groove and forget to take step-by-step photos.  Once I got all the "shops" in place I added the final touches.  I used a mold for the dress, purse, and shoes.  Another mold for the picture frames.  For the items in the bridal shop window.  For the roses and butterflies


Happy Decorating,

Carol