The "My Little Pumpkin" theme is so cute for a baby shower cake. The peachy-orange cake with the beige pumpkin and the soft pink roses is so girly and sweet. Personally I would have preferred a small plaque or banner with just the baby's first name, but the mom-to-be wanted the full name so that is what I did. I aim to please...
<< Disclosure: We are a participant in the Amazon Services LLC Associates Program, an affiliate advertising program designed to provide a means for us to earn fees by linking to Amazon.com and affiliated sites.>>
So the cake started with the gum paste flowers which I made a few days ahead of time. I used a rose cutter and petal veiner, a leaf cutter and veiner, and a hydrangea cutter/veiner.
For the pumpkin I used a Nordic Ware 3D Baby Pumpkin shaped pan. It is 5-1/2" inches across and 2-1/2" deep (double that height for two stacked together). It is a really cute pan, but sadly it has been discontinued. I have not tried this alternative pan, but it might work as well.
Here are the naked pumpkin cakes stacked together. You can really see the details.
And then like a crazy person I cover all the details in buttercream.
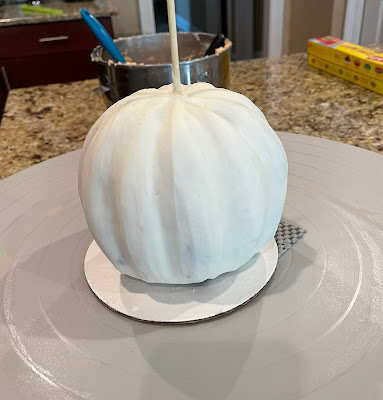
But not to worry... with a little bit of smoothing the pumpkin-ish shape comes back. I used a sugar smoother to scrape off the excess icing and reveled the highs and lows of the pumpkin shape. FYI: The rod in the cake helped me to hold onto the cake as I was smoothing it, and later the rod also secured the pumpkin to the main cake. And finally the rod was used to support the stem of the pumpkin (which went on last). That rod did a lot of work! So below is the cake with the first pass at smoothing completed. It still doesn't look much like a pumpkin, but just wait.
After the sugar smoother gave me the rough shape of the pumpkin, I used a slightly wet finger to smooth out the buttercream. Yes, a wet finger. That is all it took. I dampen my finger in some water and brush my finger over the contours of the cake, smoothing the buttercream and leaving behind a silky-smooth surface. And I wasn't worried about the brown of the cake peaking through because later I dusted the pumpkin with orange and brown powder food color to give it a more rustic look.
After the pumpkin was shaped it went into the refrigerator to chill, and once it was firm I plopped into onto the top of the main cake. I added the pumpkin stem, which is just brown fondant marbled with some white and black fondant. I know from this angle the stem looks like the head of a snake, but really - it is a stem. The leaves on the pumpkin are actually made using an ivy cutter. (I really hope no one noticed. LOL) As a final touch I dusted the leaves with some green petal dust to give them some dimension. You can also see the touch of orange and brown petal dust/powder food color that I added to the pumpkin itself.
The name on the side of the cake was made using the fmm Tappit Magical Alphabet set. I have a collection of these fmm alphabet sets, but this Magical font is my favorite.
So here is the final cake again. Welcome baby Brooklyn!
Carol


I think this is so cute! You do such a great job of making things non only relatable but adorable as well.
ReplyDelete