
I was never very good at getting the sides of my frosted cakes perfectly straight or the tops completely flat. I tried, and tried, but my cakes always seemed to lean to one side and look lumpy.
But then I discovered a wondrous thing called Acrylic Disks (aka known as Discs or Rounds). These disks make frosting a cake quicker, easier, and a lot less stressful. Less stress is a good thing, and so are cakes with vertical sides and razor sharp edges. Ta Da….

If you search on YouTube you will find several videos on different ways of using these acrylic disks. Some are good, some are not so good, and some are downright scary. IMO the scariest method is the Upside Down Method. WTH! In this method you actually frost the cake upside down and then flip it over when it is finished. How flippin’ crazy is that??? In my clumsy hands the Upside Down Method is a colossal disaster waiting to happen. (Update to add 2/19/2021 - I have seen the light and I am now flipping my cakes upside down to remove the bottom disk. Step 14 has been changed to show this flipping method. It really is much easier. Honest!)
So after much YouTube viewing (and horrible nightmares about flipping cakes), I finally settled on a method that uses Glad’s Press and Seal Wrap. This process seems the easiest and most forgiving method for a novice cake decorator like me. Here is a peek at the cake near the end of the "Acrylic Disk" process. It is a double barrel cake and stands almost 9 inches tall. I’ve fallen in love with double barrels. They are so tall, so elegant…

Sorry, back to the topic. The supplies you need to frost a cake using acrylic disks include:
- Acrylic disks (See Note at the bottom for tips on selecting which size disks to use).
- Glad Press & Seal Wrap
- Cardboard Cake Boards (aka Cake Rounds)
- Non-skid grip shelf liner cut into appropriately sized pieces
- Bench Scraper
- Construction Leveler
- Heavy Duty Cake Turntable
- Turntable Extender (if making a cake larger than 8")
- Ganache (or real butter Buttercream)
And below is the process broken down into 19 EASY steps…
Step 1 – Dust one side of each disk with corn starch. Just dust the center area, leaving about a 1" area along the edge of the disk free of the corn starch. This dusting will make it so much easier to remove the disk.

Cover the acrylic disks in Press and Seal Wrap. Cut a piece of wrap larger enough to cover the disc, place the disk on top of the sticky side, and then trim off the square edges to make it round. Note: cutting these edges will reduce the bulk and make it easier to fit the plastic around the disc.

Once trimmed, pinch a piece of the wrap between your finger and thumb and pull it up slightly to stretch the wrap. Press the stretched section of the sticky wrap against the edge of the disk, and then flatten and stick the tail end you were holding against the top of the disk. Make sure the sticky wrap fits flush and snug against the edge of the disk. In later steps you will be running the bench scraper along this plastic wrap covered edge, so you want it as snug and flat as possible.

Work your way around the disc, sticking the plastic wrap to the edge. When you are finished, run your finger around the edged to make sure it is secure and smooth.
Step 2 – Frost the smooth side of the covered acrylic disk with a thick coating of ganache (or buttercream). Make it about 1/4 + inch thick. Use a scraper to clean off the edge of the disk. If using ganache place the ganache covered disk in the freezer for a 10-15 minutes till it hardens. If you are using buttercream you don't need to chill it and can move directly to the next step.

Step 3 – Next comes the stacking. You will need a turntable, 2 non-skid grip mats, the second acrylic disc, and your crumb-coated cake that is sitting atop a cardboard cake board. First you will need a turntable that is at least 4 inches larger than your cake. If I am working on an 8” or smaller cake then my 12” turntable is large enough, but anything bigger than 8” you will need a turntable extender. Place a non-skid grip mat on top of the turntable and then place the second acrylic disk on top of the grip-mat. (I cut these mats from a big roll of shelf liner. The mats work great and can be washed if you get frosting on them. When you cut them, make sure the edges don't extend beyond the disks.) (Update: 2/19/2021 - see note at the end of this step to see a slight change I have made in the process...)

Place another non-skid grip mat on top of the acrylic disk, and then place the cardboard cake board of your filled and crumb-coated cake on top of the grip-mat. Make sure the cake is centered on the acrylic disc. You want the same size gap between the cake board and the edge of the acrylic.
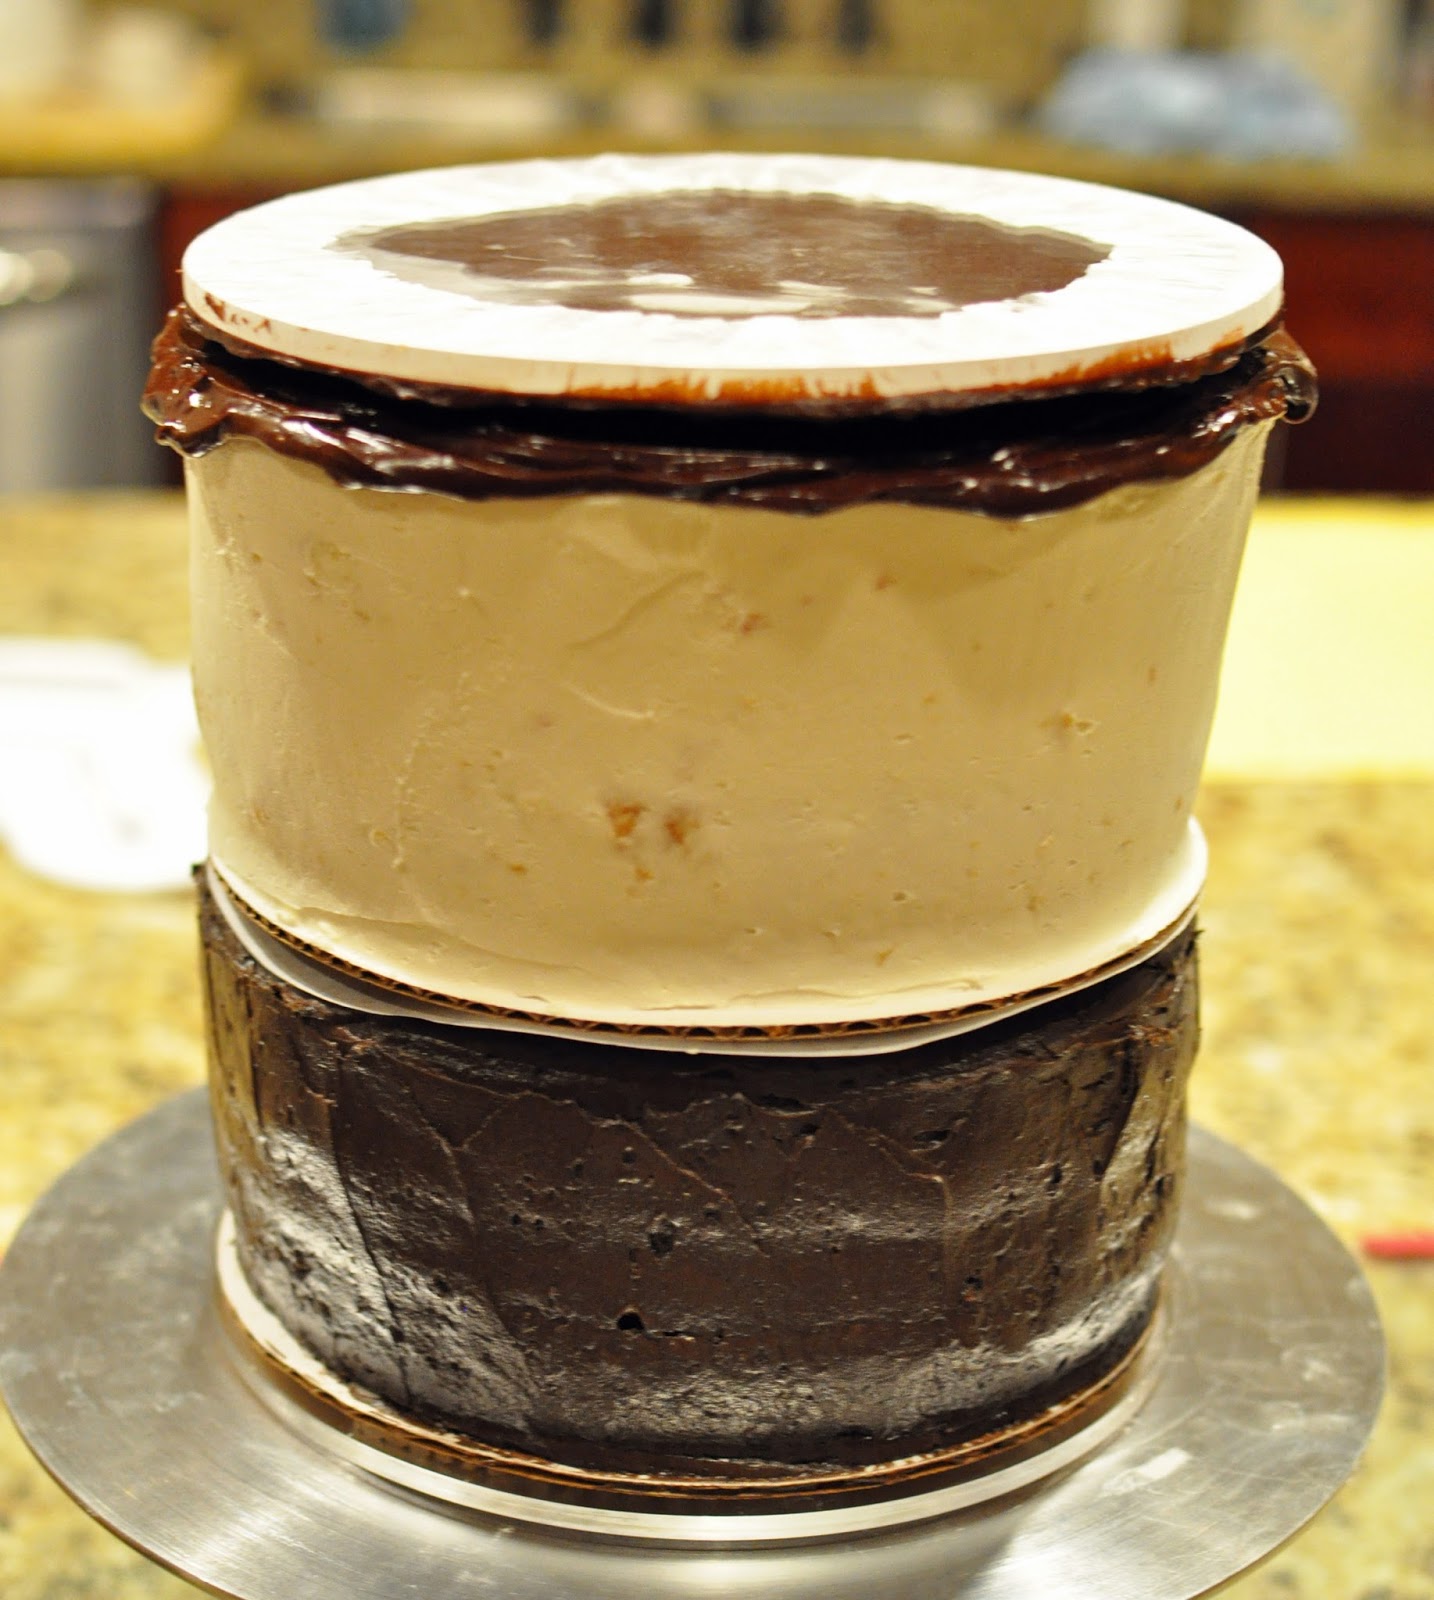
Here is an example of the stack. In this example I’m ganache-ing a double barrel cake. One cake is chocolate and one is vanilla. Notice that the cakes aren’t flat or straight. This is not “proper” cake decorating protocol, but wonky sides and a poofy top is not a problem with this method.

In summary the arrangement so far from bottom to top is: turntable, non-skid grip mat, acrylic disk, non-skid grip mat, cardboard cake board, cake(s). On these double barrel cakes I also put parchment paper between the cakes so it is easier to take them apart when I cut and serve. Without the parchment, the cake board of the upper cake sticks to the frosting of the bottom cake and they won't come apart.
I also like to work directly on my turntable, but if you want to work on a rigid prep board just add it to the stacking order so that you have: turntable, non-skid grip mat, rigid prep board, non-skid grip mat, acrylic disk, non-skid grip mat, cardboard cake board, cake.

Once trimmed, pinch a piece of the wrap between your finger and thumb and pull it up slightly to stretch the wrap. Press the stretched section of the sticky wrap against the edge of the disk, and then flatten and stick the tail end you were holding against the top of the disk. Make sure the sticky wrap fits flush and snug against the edge of the disk. In later steps you will be running the bench scraper along this plastic wrap covered edge, so you want it as snug and flat as possible.

Step 2 – Frost the smooth side of the covered acrylic disk with a thick coating of ganache (or buttercream). Make it about 1/4 + inch thick. Use a scraper to clean off the edge of the disk. If using ganache place the ganache covered disk in the freezer for a 10-15 minutes till it hardens. If you are using buttercream you don't need to chill it and can move directly to the next step.


Place another non-skid grip mat on top of the acrylic disk, and then place the cardboard cake board of your filled and crumb-coated cake on top of the grip-mat. Make sure the cake is centered on the acrylic disc. You want the same size gap between the cake board and the edge of the acrylic.
Here is an example of the stack. In this example I’m ganache-ing a double barrel cake. One cake is chocolate and one is vanilla. Notice that the cakes aren’t flat or straight. This is not “proper” cake decorating protocol, but wonky sides and a poofy top is not a problem with this method.

In summary the arrangement so far from bottom to top is: turntable, non-skid grip mat, acrylic disk, non-skid grip mat, cardboard cake board, cake(s). On these double barrel cakes I also put parchment paper between the cakes so it is easier to take them apart when I cut and serve. Without the parchment, the cake board of the upper cake sticks to the frosting of the bottom cake and they won't come apart.
I also like to work directly on my turntable, but if you want to work on a rigid prep board just add it to the stacking order so that you have: turntable, non-skid grip mat, rigid prep board, non-skid grip mat, acrylic disk, non-skid grip mat, cardboard cake board, cake.
Update: 2/19/2021 - Since I originally wrote this tutorial I have changed how I handle the bottom disk. I now cover the bottom disk in the same Glad Press and Seal wrap, and I have eliminated the non-skid grip mat between the bottom disk and the cardboard cake board. I use a few dabs of frosting to help glue/stick the acrylic disk to the cardboard cake board.
Step 4 – Once everything is stacked, frost the top of the cake with a thick layer of ganache (or buttercream). My cakes are never completely flat so I like to build up the outside edge of the cake so it matches the height of the center. I could slice off the top of the cake to make it flat, but I’m lazy, and I also don’t want cake scraps around that I would be tempted to eat!!

Step 5 – Take the acrylic disk with the hardened/frozen/chilled ganache and place it, ganache side down on the frosted cake top. Press down gently so it sticks.

Step 6 – Place a leveling device on top of the top acrylic disk and test to see if the cake is level. If not level, press the acrylic disk down till the bubble in the leveler is dead center. The thick layer of ganache will allow you to squeeze out excess ganache and allow the top acrylic disk to lay completely flat. Move the leveler around the top of the cake and check that it is level in several different positions.

Step 7 – Now use a large bench scraper to make sure that the two acrylic disks are perfectly aligned. (My bench scraper is just a rectangle piece of acrylic. Please note that you need a bench scraper that doesn't have a lip on the handle. A lip would stop the scraper from sitting flush against the turntable.) Put the flat base of the bench scraper against the turntable and then press the vertical edge against the bottom acrylic disk. If the top acrylic disk is aligned with the bottom disk, it will touch the upper portion of the bench scraper. If the top acrylic disk isn’t touching the bench scraper, nudge the top disk into position. Move the bench scraper around the cake, checking the alignment in several locations. Also watch the bubble in the Level to make sure the top remains flat as you nudge the top acrylic disk around.

Step 8 – Now that the disks are aligned and the top is flat, pipe ganache into the gaps between your stacked cakes and between the frosted top of the cake and the chilled, ganache covered acrylic disc. If the gap isn’t too large, you can just push ganache into the opening with an offset spatula. If you are good at trimming and leveling your cakes before you frost them, this step won’t be necessary. But I need to push lots and lots of ganache into the many gaps.

Step 9 – Do one last check and make sure the top of level and the two acrylic disks are aligned.
Step 10 – Now the fun part. Generously cover the sides of the cake with ganache (or buttercream). Just slap it on. Let your inner Jackson Pollock emerge and paint the glossy ganache on the cake with wild abandon. You want to build up enough ganache so that it extends beyond the edge of the acrylic disks.

Step 10 – Position the bench scraper so that it rest flat against the turntable and perpendicular to both the top and bottom acrylic disk. Hold the bench scraper steady as you slowly rotate the turntable. Any ganache that extends beyond the acrylic disks will be scraped away. If too much ganache builds up on the bench scraper, scrape the ganache back into the bowl.

Step 11 – After the first pass of the bench scraper around the cake, fill in any holes or gaps with more ganache. Scrape the cake again. Do this step as many times as necessary till the sides are smooth.

Step 12 – When the sides are smooth, use a small pallet knife (or your finger) to gently remove any ganache still clinging to the outer edge of the acrylic disks.

Step 13 – Chill the cake to set the ganache (or buttercream). I usually let it chill for an hour.
Step 14 – (Update: 2/19/2021 - This is the step that I changed. Instead of remove the top acrylic disk and then the bottom, I flip/invert the cake and remove the bottom disk first.) Once the ganache/buttercream is rigid to the touch, the acrylic disks needs to be removed. Here is a buttercream cover cake just out of the refrigerator. It is a little hard to tell but this is the top of the cake. I rest one hand on the top and one hand on the bottom and flip the cake over so the cake is resting upside down. (It is not as hard or as scary as it sounds... Honest!)
Step 4 – Once everything is stacked, frost the top of the cake with a thick layer of ganache (or buttercream). My cakes are never completely flat so I like to build up the outside edge of the cake so it matches the height of the center. I could slice off the top of the cake to make it flat, but I’m lazy, and I also don’t want cake scraps around that I would be tempted to eat!!

Step 5 – Take the acrylic disk with the hardened/frozen/chilled ganache and place it, ganache side down on the frosted cake top. Press down gently so it sticks.
Step 6 – Place a leveling device on top of the top acrylic disk and test to see if the cake is level. If not level, press the acrylic disk down till the bubble in the leveler is dead center. The thick layer of ganache will allow you to squeeze out excess ganache and allow the top acrylic disk to lay completely flat. Move the leveler around the top of the cake and check that it is level in several different positions.

Step 7 – Now use a large bench scraper to make sure that the two acrylic disks are perfectly aligned. (My bench scraper is just a rectangle piece of acrylic. Please note that you need a bench scraper that doesn't have a lip on the handle. A lip would stop the scraper from sitting flush against the turntable.) Put the flat base of the bench scraper against the turntable and then press the vertical edge against the bottom acrylic disk. If the top acrylic disk is aligned with the bottom disk, it will touch the upper portion of the bench scraper. If the top acrylic disk isn’t touching the bench scraper, nudge the top disk into position. Move the bench scraper around the cake, checking the alignment in several locations. Also watch the bubble in the Level to make sure the top remains flat as you nudge the top acrylic disk around.

Step 8 – Now that the disks are aligned and the top is flat, pipe ganache into the gaps between your stacked cakes and between the frosted top of the cake and the chilled, ganache covered acrylic disc. If the gap isn’t too large, you can just push ganache into the opening with an offset spatula. If you are good at trimming and leveling your cakes before you frost them, this step won’t be necessary. But I need to push lots and lots of ganache into the many gaps.

Step 9 – Do one last check and make sure the top of level and the two acrylic disks are aligned.
Step 10 – Now the fun part. Generously cover the sides of the cake with ganache (or buttercream). Just slap it on. Let your inner Jackson Pollock emerge and paint the glossy ganache on the cake with wild abandon. You want to build up enough ganache so that it extends beyond the edge of the acrylic disks.

Step 10 – Position the bench scraper so that it rest flat against the turntable and perpendicular to both the top and bottom acrylic disk. Hold the bench scraper steady as you slowly rotate the turntable. Any ganache that extends beyond the acrylic disks will be scraped away. If too much ganache builds up on the bench scraper, scrape the ganache back into the bowl.


Step 12 – When the sides are smooth, use a small pallet knife (or your finger) to gently remove any ganache still clinging to the outer edge of the acrylic disks.

Step 13 – Chill the cake to set the ganache (or buttercream). I usually let it chill for an hour.
Step 14 – (Update: 2/19/2021 - This is the step that I changed. Instead of remove the top acrylic disk and then the bottom, I flip/invert the cake and remove the bottom disk first.) Once the ganache/buttercream is rigid to the touch, the acrylic disks needs to be removed. Here is a buttercream cover cake just out of the refrigerator. It is a little hard to tell but this is the top of the cake. I rest one hand on the top and one hand on the bottom and flip the cake over so the cake is resting upside down. (It is not as hard or as scary as it sounds... Honest!)


Before I flip the cake back to its upright position, I dab some frosting on the drum and stick it to the bottom of the cake.

Like before I put one hand on the cake drum, put the other hand on the top acrylic disk, squeeze them gently together so nothing slip, and flip the cake right side up.

Then I peel the plastic wrap away from the outer edge of the "top" acrylic disk.

Step 15 - Insert a small palette knife between the top acrylic disk and plastic wrap and lift the disk away from the plastic. You may need to run the palette knife between the wrap and the disk to get them apart. Once the acrylic disk is lifted, the plastic will remain on the cake.

Step 16 - Now gently peel the plastic away from the cake.

Step 17 – Fill any holes on the top of the cake with softened ganache (or buttercream).

Step 18 – (Update: 2/19/2021: I stopped removing the bottom acrylic disk this way and started flipping the cake, but you can still use this method if you don't want to flip the cake.) To remove the bottom acrylic disc, warm a small palette knife and insert it between the acrylic disk and the cardboard round under the cake. The presence of the non-skid grip mat between the cardboard and the acrylic disk will give you plenty of room to insert the palette knife. Rotate the turntable and cut through the ganache with the warm knife.
Step 19 – Lift your cake (with its vertical sides and perfectly flat top) onto a waiting prep board or presentation cake drum. Or leave it on the turntable and cover it with fondant.

See how easy it is to get a cake with a flat top and straight sides! Hey, if klutzy Carol can do it, anyone can.

Happy Decorating,
Carol
Note on Acrylic Disks: You can buy disks that are either 0.0", 0.25" or 0.5" larger than your cake. If your cake is 8” you can select either the 8-1/4” or 8-1/2” sized disks. I have tried both gap sizes, and I prefer the disks with the 1/4" gap. For me the 1/2" gap made the ganache layer much too thick, especially if your cake has shrunk or had to be trimmed. I purchased my disks from several different manufactures, but I have to say that my favorite are from Cakesafe. Cakesafe has etched the size of the disk into the acrylic (which is very helpful when you have lots of disks in lots of sizes). Their disks also have guide lines etched onto the acrylic that helps you to center the cake correctly on the bottom disk. And they offer lots and lots of different sizes and shapes; bench scrapers too. They even have disks to match the fancy Fat Daddio’s and Wilton cake pans. (Note: I have no relationship with Cakesafe.)
So if you have a hankering to make ganache (or buttercream) cakes with perfectly straight sides and completely flat tops - give the Acrylic Disks a try...

I purchased some discs a while back and never used them. I hope mine turns out like yours! Thanks for the tutorial.
ReplyDeleteHi Katiebug17, Give your disks a try, and let me know how it goes. But I'm sure your cake will turn out amazing.
DeleteCarol
Great pictorial! Will be doing this Friday coming
ReplyDelete