Thursday, January 25, 2024

Glam Stencil Cake

 Using a stencil is an easy way to add a touch of glamor and elegance to a cake. 


For Goldie's 102nd birthday I wanted something elegant but not too fussy.  I also wanted something quick and easy because I accidently booked another cake for the same day.  (I hate it when that happens!)  The cake is a 7" double barrel cake that stands about 9" tall. 

<< Disclosure: We are a participant in the Amazon Services LLC Associates Program, an affiliate advertising program designed to provide a means for us to earn fees by linking to Amazon.com and affiliated sites.>>

The stencil is called GLAM and it is sold by Lacupella Cake Designs.  I really like the Lacupella stencils.  They are expensive, but they are made with high quality plastic and the cutouts are precise and detailed.  On this particular stencil, some of the tiny circle cutouts were a little too small for buttercream, but I still think the cake shows a lot of the details.  This particular stencil design would probably work better with an air brush or aerosol color application. 

To use the stencil I just held it in place with one hand and then started applying the buttercream in the center.  Once a little buttercream was applied, the stencil stayed in place and I could remove my hand and start applying more buttercream out toward the edges of the stencil.  The stencil does have cutouts where you use push pins or a strap to hold the stencil in place, but for me it was just easier to secure it with buttercream.  

Once everything was coated in buttercream, I just peeled off the stencil.  I had to go through the same process 3 times to cover the entire cake, but the pattern matched exactly along the edges, so you really couldn't see the line where I matched up the stencils.  In hindsight I should have used more buttercream on top of the stencil.  The sections with the thicker coating looked much better than the areas where the buttercream was thinner. 

To finish the cake I  added a buttercream layer to the bottom using a simple fault line technique, and then painted the fault line edge with some edible silver paint.  I also added some silver glitter flakes to give it added sparkle.  The Goldie and 102 toppers are made of glitter cardstock and cut using my Cricut Air Explore 2.  The font for the name is called Amarillo and the font for the number is called Forte. I get my fonts from the website DAfont.com

So here is Goldie with her birthday cake.  She wasn't too happy with me.  She was telling everyone she was 87 and then she saw the cake with a big 102 on the top.


Oh well, she was happy once she started opening her gifts!


Happy Decorating,

Carol

Saturday, January 20, 2024

Highland Cow Cake with Flowers

I thought the Highland Cow trend was over, but I guess not.  This one includes the cow and an explosion of flowers.


<< Disclosure: We are a participant in the Amazon Services LLC Associates Program, an affiliate advertising program designed to provide a means for us to earn fees by linking to Amazon.com and affiliated sites.>>

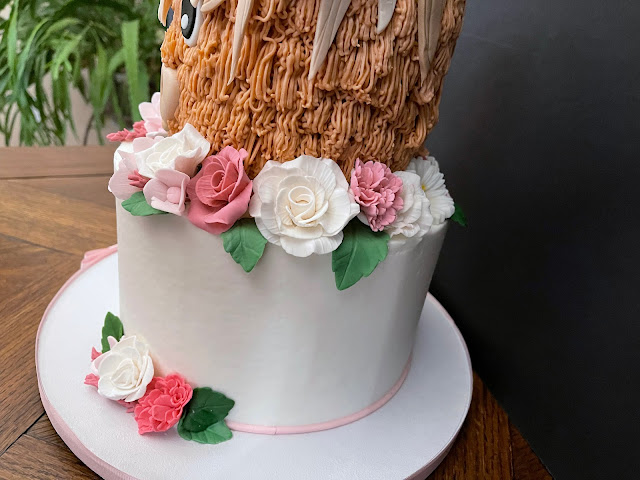
This cake is a 5" round on top and an 8" on the bottom.  Each tier is about 5" tall.  I made the gum paste flowers ahead of time, so on decorating day is was a snap to put together.  I have roses, chrysanthemumscarnations, hydrangeas, and a generic 5 petal daisy flower that I used this veiner on.

For the cow's horns, eyes, and nose/mouth I used the pattern below.  I made cutters using my 3D printer, but you could just cut them out by hand. To make the nostrils of the cow's nose more noticeable, I dusted them with some ColorPop Petal Dust Brown #9.  To make the horns, I mixed some CMC powder (makes the fondant dry rock hard) with white fondant and then rolled out a long sausage shape to fit the size of the horn cutter.  Then I inserted a bamboo skewer into the horn and finally pushed and molded the fondant into the curved shaped. I didn't use the cutter to cut out the horn because I didn't want the horns to be flat.  Instead the cutter was a template, and I used it to mold the long tube of fondant into the appropriate shape.  


The thin pink line of fondant around the base of the bottom tier was made using the JEM Strip Cutter #2.  I love these strip cutters, I have them in all sizes.  They come in so handy. 

For the top tier I finished the cake as I normally do (using my acrylic discs to get straight sides and flat top), and then I used a Wilton Grass Tip to make the cow's hair.  It was an easy although time-consuming process.  I used about 400grams of buttercream to coat the 5" round by 5" tall cake in "hair".


Here are some other views of the flowers....


So, this was an interesting cake to make, too bad the party was canceled due to all the snow, sleet, and icy roads.  Damn you Mother Nature!


Happy Decorating,

Carol

Sunday, January 14, 2024

Party Dino Cake - So Cute and Easy to make

Some cakes are easy to make, yet the finished product still looks impressive.  Take this cute little Party Dino cake for example.


As with all my cakes, I made some fondant cutters to help make the decorations.  I used my 3D printer to make the cutters, but you could just use paper templates and cut them out by hand. I wasn't sure what size hat/banner I was going to use, so I made several sizes.  I also made several sizes for the plates that line the back and neck of the dinosaur.  (For more into on using a 3D printer to make cookie and fondant cutters, click HERE.)


<< Disclosure: We are a participant in the Amazon Services LLC Associates Program, an affiliate advertising program designed to provide a means for us to earn fees by linking to Amazon.com and affiliated sites.>>

For the dinosaur I used Wilton green fondant mixed with some Juniper Green food gel.  I thought the packaged Wilton green fondant was a little too bright, so I toned it down with the Juniper Green.  Then to a small blob of green fondant I mixed a lot of the Juniper Green to make a really dark shade for the back plates, the lettering, and the leaves.   Once all the back plates were cut, I stuck them to the body of the dinosaur with a touch of water.  For the mouth, eye, and nose I used black fondant


For the dinosaur's party hat, I mixed Wilton Orange food gel to white fondant, but I thought the color was too orangey so I added a touch of red.  The yellow is just a mixture of Wilton Yellow fondant and white fondant.  While the fondant of the dinosaur and the party hat were still soft, I stuck the two together with a touch of water.  Once the dinosaur was assembled, I put it to the side and allowed it to dry.

For the #1 topper I took my orange fondant and added some Gum-Tex/Tylos/CMC powder to it.  The Gum-Tex will make the fondant dry rock hard, and allow it to stand upright on its own.   I added the Gum-Tex to the green fondant I used for the dinosaur plates, and made some additional plates to go on the #1.  While the number and plates were still soft, I stuck them together with a touch of water, and then allowed them to dry flat.  Once the #1 was dry, I used some melted orange candy melts to glued a bamboo skewer to the back of the #1.


On decorating day all the decorations were premade, so I just needed to arrange everything onto the cake.  The cake is 8" and I have it sitting on a white 12" cake drum.  The final touch was to add a black ribbon to the edge of the drum.


Now wasn't that EASY!


Happy Decorating,

Carol

Sunday, January 7, 2024

Toilet Paper Cake

My first cake of 2024 was a Toilet Paper / Poop cake!!  I hope this is not a harbinger of things to come. LOL


 And here is a better view of the poop!  


<< Disclosure: We are a participant in the Amazon Services LLC Associates Program, an affiliate advertising program designed to provide a means for us to earn fees by linking to Amazon.com and affiliated sites.>>

For the top of the cake/toilet paper roll, I used circle cutters to make the ring-like marks in the fondant.  I had a set of regular size cutters (1/2" through 4-1/2") that I used for the center rings, but for the larger sizes (5"-7") I made cutters using my 3D printer.  Using a smaller cutter, I cut out the center from the white fondant and replaced it with a circle of brown.  The top piece went onto the prepared 7" cake.


Here are some of the circle cutters I made.


Then I rolled out a long strip of white fondant, embossed it with an impression mat, cut it to a height to match the height of my cake (5"), and finally using a stitching tool I made marks every 4" (to represent the pieces of toilet paper).  Once the long strip of fondant was prepared, I gently rolled it onto a small rolling pin, and then unrolled it onto the side of the cake.  Easy.


For the lettering on the side of the cake I used FMM Art Deco Upper and Lower case letters, and for the lettering on the 12" cake drum I used the FMM Alphabet set Upper 1.5cm and Lower 1cm.  Side note: The poop was made with chocolate fondant, so the birthday boy ATE IT!


This was a fun cake to make for Jan 1, 2024.

Happy Decorating,

Carol