Saturday, July 18, 2020

Monogrammed Floral & Leaf Flourish Cookies

I made these monogrammed cookies to test out a set of cookie cutters that I purchased and never got to use.  The cutters were for a baby shower with a "greenery" theme.  The party got canceled due to State mandated lock-downs - damn you Covid-19! 


The cutters came from an Etsy shop called Bobbi's Cutters.  The banner cutter is called Andy Kay's Leaf Flourish Banner, and the other two cutters are called Leaf Flourish #1 and Leaf Flourish #2.  The #2 is a 2.5" cookie, but it was a little on the small side so I might buy the 3.0" to add to the collection.

I don't like royal icing (yuck), so the cookies are iced using Toba Garrette's glace recipe.  The glace is runnier and more difficult to work with than royal icing, but the glace dries semi-hard and shiny and it doesn't chip teeth when you bite into it - always a plus.

<< Disclosure: We are a participant in the Amazon Services LLC Associates Program, an affiliate advertising program designed to provide a means for us to ear fees by linking to Amazon.com and affiliated sites.>>

For the monogram I used FMM's Upper Cake Funky Alphabet Tappit Cutters, and I painted them with edible gold luster dust mixed with Everclear.  I could have pipped the letter onto the cookie, but I didn't feel like mixing up a batch of royal icing - I'm so lazy sometimes.  I also didn't feel like setting up my mini projector just for a few cookies.  I suck at lettering on cookies so I never do it freehand.  I always project the text onto the cookie and use the projected image as a guide.  My Pico (what mini projectors are called), is one of my favorite tools.

For the flowers I again took the lazy route.  Instead of piping them from royal icing, I just cut the flowers from Bright White Choco Pan Modeling Chocolate that I tinted a Creamy Peach color.  I used a Hydrangea cutter and veiner, and I dusted the petals with a little pink powder food color to give them some depth.   A gold sugar pearl was used for the center, and I also sprinkled edible gold glitter flakes on the cookies to give them added sparkle.


So I was happy with the cookies, but my FaceBook followers (ie my family) weren't too impressed.  I'm not sure why; I thought they were pretty.

Happy Decorating,

Carol

Monday, July 13, 2020

Galaxy Fortnite Cake with Loot Llama and Switch Controller

This is the second Fortnite Cake I made in the last few months.  This one was for my next door neighbor's grandson.


<< Disclosure: We are a participant in the Amazon Services LLC Associates Program, an affiliate advertising program designed to provide a means for us to ear fees by linking to Amazon.com and affiliated sites.>>

The Loot Llama is a Funko Pop plastic toy, but the rest of the items are made from fondant and gum paste.

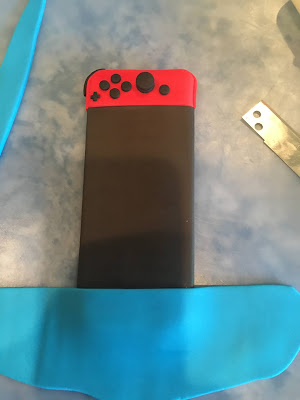
Making the Switch controller was a snap.  I cut out a piece of cardboard to match a printout of the controller, and then wrapped a thin piece of black gum paste around the center of the cardboard.


I wrapped red gum paste around one end and blue around the other.


I used some tiny circle cutters to cut out the "buttons" for the controller, and trimmed the edges with blue, red, and black strips of gum paste.


For the screen image on the controller I just cut out a regular printed image (not an edible image), glued the printout to a piece of black gum paste using a dot runner (note: I prefer the "dot runner" over the "glue runner" the glue runner is a little messy), and then used the same dot runner to stick the gum paste backed image to the gum paste controller.


Here is the finished controller.  I put the X,Y,A & B on the buttons with a white edible marker.


The tree is just globs of greenish fondant rolled out into tear-drop shapes and stuck to an aluminium foil tree.


The Drop Box is six panels stuck to an aluminium foil shaped cube.


Making the "Galaxy" like colors on the cake itself was also a first.  I started with a white base.  Note, I use CakeSafe acrylic rounds to get my sides perfectly straight and the edges very sharp.  I have a blog post on it here.


Added some dollops of electric purple, electric pink, and sky blue buttercream.


Scrape and smeared the colors.


Added some black buttercream.


And scraped and smeared them all together.


The lettering I cut out by hand using a paper templet.


 And then I stuck the letters to a cutout of the Fortnite logo which was also made from gum paste.  I placed the white logo on a foam cake dummy so it would dry/harden in the curved shape.


The final touches on the galaxy cake were some edible silver stars and sugar pearls to give it a more spacey feel.  Some purple and blue sugar rock, Whopper candies, and some Oreo truffles I had hanging around my kitchen were also scattered around the cake.  At the last minute I also made some ear buds out of fondant.  I think the red and blue strings tie the top and bottom of the cake together.


I hope Jaxsen likes it.

Happy Decorating,

Carol

Sunday, July 12, 2020

Bee Keeper Groom's Cake

My cousin, Randy, is a avid bee keeper.  He even has his own line of bottled honey - Casa Fernandez.  So for his wedding day, the bride-to-be asked me to surprise him with a Bee Keeper themed cake.  This is what I came up with....


<< Disclosure: We are a participant in the Amazon Services LLC Associates Program, an affiliate advertising program designed to provide a means for us to ear fees by linking to Amazon.com and affiliated sites.>>

The cake is an 11"x 9" chocolate cake that I covered in chocolate ganache.  For the wood gain look of the sides I just tinted white Renshaw fondant with a little Ivory and Warm Brown gel color; mixing the colors till they gave a marbled color pattern.  I rolled out the fondant and then pressed a Woodgrain fondant impression mat into the fondant to give the pattern.  Next I cut 1-1/2" strips using a Wilton strip cutter, and then positioned the strips on the cake.  After all the strips were in place, I dusted the textured fondant with powder food color in yellow, brown, and black.   The color dusting gives the fondant "wood" a much more realistic look.


Beside the main bee box, the cake had a few other accent pieces.  The first thing I made was a hive tray that would sit on top of the cake and made to look like it was being pulled from the box. For the honeycomb section I used gum paste tinted with buttercup yellow food gel and a honeycomb impression mat.  I trimmed the sides and top of the honeycomb will strips of the wood-grain fondant that I stiffened with Tylose Powder, and embedded two wooded skewers into the sides to hold the tray upright on the cake.


I made the "Bee Smoker" out of white Wilton gum paste.  (Don't use Satin Ice gum paste because it doesn't harden like the Wilton or Hobby Lobby brand.) The body of the smoker is just a rectangular piece of gum paste that I formed around a glass bottle.  For the top section I wrapped another rectangular piece of gum paste around a funnel.  For the curved handle I just formed the curly piece and allowed it to dry on its side.  Once all the pieces were dry, I painted them with black food color gel mixed with Everclear.  Once the black base coat was dry, I painted it again with a mixture of edible silver colored food power mixed with Everclear.   When all the paint was dry, I stuck the pieces together using melt chocolate.  The final touch to the smoker was the puffs of wispy cotton-ball smoke coming out of the top.  (Doesn't the smoker remind you of the Tin Man from the Wizard of Oz?)


For the honeycomb pieces I used gum pasted tinted with buttercup yellow food gel and a honeycomb impression mat. The little honey jar is glass OUI yoguart container filled with melted yellow candy melts mixed with a little heavy cream to make it flow.


The little bees are made with a teardrop shaped glob of buttercup yellow gum paste, 20 gauge black wire for the antenna and stinger, and wafer paper for the wings.  To elevate the flying bees I used a 20 gauge silver wire, but I should have used something thicker because the weight of the bees was too much for the wire and the wire kept bending over.


So this was a unique cake to make.  I hope my cousin likes it.

Happy Decorating,

Carol