Saturday, July 13, 2024

Flamingo Tropical Cake

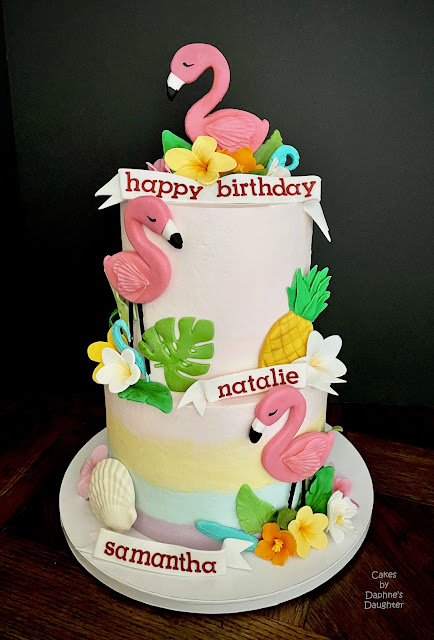
Flamingo / Tropical cakes are always popular.  I usually get at least one a year.  Here is 2024's offering.  The cake was for two little girls that were sharing a cake & party.  I wasn't sure how to arrange the names on the cake, so I took pictures of three different versions and let the customer decide.

So version 1 - without the names:


   Version 2:


And Version 3:  


I think I like Version 2 the best, but the customer wanted Version 3.

And here are different views of the cake...


And here are all the decorations before they went on the cake;


<< Disclosure: We are a participant in the Amazon Services LLC Associates Program, an affiliate advertising program designed to provide a means for us to earn fees by linking to Amazon.com and affiliated sites.>>


For the tropical green leaves, I used these cutters.  For the hibiscus flowers I used this cutter.  For the flamingo and pineapple I made a cutter using my 3D printer.  Here is the sketch for the flamingo.


And this is for the pineapple. 


Happy Decorating,

Carol

Saturday, July 6, 2024

Bayou Themed Cake with googly eyed alligator

Next to my T-Rex cake, this Bayou themed cake has become my favorite.  I love the soft colors and the googly eyes of the swamp critters. 

The first animal I made for this cake was the turtle.  This is the video tutorial I used as the example.  I started with the shell and used a wood carving tool to make the octagon impressions.  (You can use a lot of wood working and clay tools when sculpting fondant pieces.)


Next I wrapped a thin fondant string around the shell.


I added the flippers..


And then finished off with a round fondant ball for the head.


<< Disclosure: We are a participant in the Amazon Services LLC Associates Program, an affiliate advertising program designed to provide a means for us to earn fees by linking to Amazon.com and affiliated sites.>>

The frog came next.  For this figure I used a Frog Prince figurine as the inspiration.  I made the body, legs, and arms.


Sorry I forgot to take pictures as I made the frog's head.  Sometimes I get so involved with the fondant that I forget I'm supposed to be making a tutorial.  Anyway, here is the finished frog prince.


The alligator was the hardest part to make.  I had to redo the head a few times to get it right.  I started with the upper jaw and head section. I made a tapered shape and then used a craft blade to cut in the deep lines along the nose.


For the bottom jaw I made the same tapered shape, and then I added some pink fondant to represent the inside of the mouth.  A long piece of pink fondant was used for the tongue.  I also propped the upper jaw against the handle of a carving tool so the nose would dry and harden with an upwards slant, and rested the lower jaw on a ball of fondant so it would dry with a curved shape.


All the teeth went on next.  They are just little balls of white fondant rolled to a point.


Next I dabbed water onto the upper and lower jaws, and stuck them together.  The googly eyes and spines were the finishing touches along with some brown and black petal dust to make the alligator look old and weathered.


Next I made the Happy Birthday sign, the cattails, grass, and honey bees.  For the lettering on the sign I used Tappit FMM Alphabet Set 1.5cm Upper Case and the Lower Case 1 cm set.  


For the bees, I used a bee silicon mold.  I used white and yellow fondant for the main parts of the bee, and then I just drew in the black lines using an edible marker.


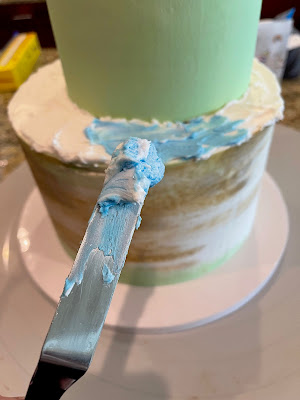
The cake itself is made with a 9 inch round cake on the bottom and a 6 inch cake on the top tier.  Each cake is about 5-1/2 to 6 inches tall.  I stacked the cakes a little off-center so I had more room the perch the alligator on the front of the cake.  For the water, I added globs of blue and white frosting on a spatula and just dabbed it on the cake.  Swamp water isn't really that pretty color, but I took some liberties and used blue instead of dingy brown.


Once the "water" was in place, I added the alligator.


To make the "stump" effect on the bottom tier, I melted Walmart's Great Value Chocolate Almond Bark and then smeared out lines that were about 3/4" thick and 5-1/2" tall. It took the entire pack of Almond Bark (24 ounces) to cover the 9 inch cake in bark. 


Once the chocolate hardened, I just placed the lines of chocolate on the cake and added dabs of melted chocolate to glue everything in place.  The melted chocolate was also used to hide any gaps in the strips of "bark".  I also dusted the chocolate bark with some white, yellow, brown, and black petal dust to give it a more realistic look.


After the chocolate bark and the alligator were in place, it was just a matter of adding all my premade decorations.  Here is a view of the top.


And a closeup of the bottom.  I added the peach and purple flowers just to give the cake a little pop of color.


And here is the finished cake again.  I was very happy with this one!


Happy Decorating,

Carol

Tuesday, March 5, 2024

Raggedy Ann & Rags Baby Shower Cake

 A recent request for a Raggedy Ann baby shower cake caught me by surprise.  Was Raggedy Ann still popular after the whole Annabelle horror movie thing?   

I looked around for inspiration, but most of the cakes freaked me out (too creepy).  Then I found an inspiration cake that had Raggedy Ann sitting on top of the cake.  I was going to buy an actual doll to place on top, but I couldn't find the right size.  So I ended up just making one out of fondant.  How does my Raggedy Ann look?  Hope she doesn't look too creepy!


<< Disclosure: We are a participant in the Amazon Services LLC Associates Program, an affiliate advertising program designed to provide a means for us to earn fees by linking to Amazon.com and affiliated sites.>>

To make the doll, I started with the lower body.  For the legs I rolled out two sausage shapes from white fondant and wrapped a thin strip of red fondant around the legs.  I used the PME Strip Cutter #1 to cut the strips, but you can just do it with a long razor blade.  To make the shoes, I flatten tear drop shapes from black fondant.  I used a ball tool to make a depression in the shoe and then stuck a leg to each shoe and glued it in place with a dab of water.   

For the body I mixed some CMC powder to leftover brown fondant and made a crude body shape.  The CMC powder makes the fondant harden to a rock-like consistency and allows it to support the weight of the head and dress without collapsing.  The tooth pick is for extra support and to attach the head to the body.  I added a loop of blue fondant  around the base of the body to help the dress flare out.  Also notice that I added some bloomers to the legs. I thought they looked cute, but sadly most of the bloomers got covered up by the dress.

Next I made the dress.  I rolled out a circle of blue fondant and added the tiny red flowers and a white dot to the center of each flower.  Then I simply draped the circle over the body of the doll.  I added tube shaped pieces of blue fondant for the sleeves/arms and stuck the red flowers on the sleeves in random places.  I added an apron with a frilly edge and blobs of copper tinted fondant for the hands and neck.

Then came the hard part - the head and face.  I tried so hard to make her look friendly.  The eyes, mouth and nose are fondant, and I drew on the eyebrows and lashes with an edible black marker.  I put too many eyelashes on, but once they were on I couldn't remove them.  I also added CMC powder to the fondant used to make the head, and once it dried a little, I placed it on the body.  


The hair came next.  I cut out a bunch of red fondant strips.


I moistened the head with some water, and just started placing the strips.  It was very time consuming.


And here is the (almost) finished doll.  Later on I removed the second white dot on her eye because some people thought it looked strange.  I also miscalculated the placement of the eyebrows.  I should have put them closer to her eyes because the hair/bangs covered them up.  Oh well, can't fix it now.  I also added some fondant buttons to the apron and some frilled fondant around her neck.


I also thought she looked a little lonely on top of the cake, so I added her dog, Rags.  I used this YouTube video to make the dog.  You can see a tool at the lower right corner of the picture below.  This was what I used to cut into the fondant to make it look like "hair".  It is actually a woodcarving tool.  Clay, woodcarving, and pottery tools work great for fondant.


Rag's neck looks a little thin, but once I added the collar it looked okay.


The toppers were finished ahead of time, so on decorating day the cake went together pretty easily.  I used a triangle cutter to make the bunting flags that hung around the cake.  I made them in different patterns and colors.


Once all the flags were cut, I draped strings of fondant around the cake, and then placed the flags below it.  As a final step I added the red flower buttons, to give it a more girly touch.


Last step was to place the topper.  I set the topper on a blanket of white fondant so it would be easier to put on and take off.  There is also parchment paper under the blanket so the blue buttercream wouldn't get on the topper.  I wanted to keep it clean just incase the mom-to-be wanted to keep the topper.

Here is a closeup of the topper.  


Hope she likes it!

Happy Decorating,

Carol


Friday, February 9, 2024

Butterfly Cake

This was a really simple cake to throw together, but it still looks good enough for a dear friend's birthday.  Happy Birthday, Melissa!


<< Disclosure: We are a participant in the Amazon Services LLC Associates Program, an affiliate advertising program designed to provide a means for us to earn fees by linking to Amazon.com and affiliated sites.>>

This is a 7 inch round cake that stands about 5-1/2 inches tall.  The cake is sitting on a 12 inch cake drum.  The 12 inch drum is much too big and I should have use a 10inch, but I was all out.  I need to order some from Amazon ASAP.

The cake is frosted in American Buttercream that I tinted purple using Regal Purple food gel.  I like the Regal Purple better than the Wilton Violet or Purple gels.  The Violet and Purple look dull and a little too blue for me, so I tend to stick with the Regal Purple.

The butterflies are paper cutouts.  The pack comes with both pink and purple, and have a range of sizes.  These butterflies are handy to have around. 

The white balls are a combination of sugar pearls (the two smallest sizes), white candy covered chocolate Sixlets, and plastic balls (the three largest sizes).

The Happy Birthday topper was made using a Cricut Air Explore.  The font for the Happy Birthday is called Hunters, and the font for the name is called Channel.  I download my fonts from dafont.com  

I wish all the cakes were this easy.

Happy Decorating,

Carol

Tuesday, February 6, 2024

Duck Hunting Cake for 1st Birthday

I made this cake for my niece-in-law's son's first birthday - Happy Birthday, Luca!  Luca's dad is an avid duck hunter, so of course the party had a duck hunting theme.


The bottom tier is a 9" round cake and stands about 5" tall.  The top tier is a 6" round cake and stands about 5-1/3" tall.  They are both frosted in American Buttercream.  

<< Disclosure: We are a participant in the Amazon Services LLC Associates Program, an affiliate advertising program designed to provide a means for us to earn fees by linking to Amazon.com and affiliated sites.>>

The background color of the cake is a soft green.  I was trying to match the color of the invitations so I tested three gel colors that I had on hand: Juniper Green, Moss Green, and Avocado.  In the end I picked the Juniper Green as the best color match.

After frosting and stacking the cakes, I moved onto the decorations.  I found some images of flying ducks and a dog silhouette, and I made some cutters using my 3D printer.  The dog cutter is about 3-3/4" tall, and the ducks range in size from 1-1/4" to 2-3/4" wide.  

I also made some grass cutters, but they didn't work very well.   The thin blades of fondant grass kept getting stuck in the cutter.   After the disaster with the grass cutters, I planned on using frosting and a grass tip to make the grass, but sadly I ran out of frosting.  I was lazy and didn't want to make another batch of frosting, so I ended up using a long razor blade to cut out each blade of grass from the fondant.  It was a little time consuming to say the least, but in the end I got it done.  

The dog and duck silhouettes were all cut from Wilton's Black fondant, and the grass was just random colors of green and brown fondant.  Below is everything cut out and ready to go on the stacked cake.


When I frosted the cake I originally wanted the top tier to be mostly white with a swatch of light green at the base and the bottom tier to be lighter green and a swatch of darker green at the base.  But something went wrong in my icing calculations and I didn't make enough, and then I colored too much with the light green color and didn't leave enough white.  Below is what I had left after frosting the two cakes.  I like to minimize the frosting I have left over (because it gets thrown away), but this was just too close for comfort.  I should have given in and make more frosting.


So, because I didn't have enough white frosting, the top tier ended up being mostly green. No big deal, I guess.  After the cake was frosted, I started putting on the silhouettes.  Below is my first arrangement, but I didn't like the look of the big ducks, so I repositioned the dog on the other side of the cake and used more of the smaller ducks above the dog.  I left the larger ducks on the cake, but they ended up  being on the back of the cake.  And at this point you can still see the darker green at the base - I should have made it taller, because later it got covered up by the fondant grass. - Oh well.... 

For the two mallard ducks sitting on the cake I used this YouTube video.  They were super easy to make and took all of 10 minutes.  I love it when things are quick and easy. 


Here is the front of the cake again.  It shows the dog staring longingly at the smaller ducks flying away.  And don't you just love those little Mallard ducks!


So Happy Birthday, little Luca Man. 

Happy Decorating,

Carol