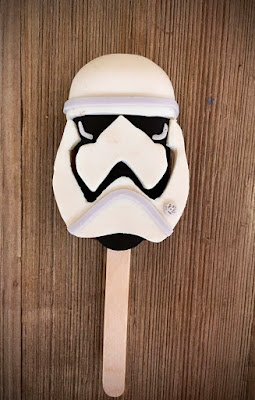
For a friend's daughter's birthday party I made Baby Yoda, Rey Skywalker with her blue lightsaber, R2D2, Darth Vader, and a Stormtrooper. I must be crazy! The birthday girl only wanted Rey, but I wanted the kids to have a choice so I went a little overboard.
<< Disclosure: We are a participant in the Amazon Services LLC Associates Program, an affiliate advertising program designed to provide a means for us to ear fees by linking to Amazon.com and affiliated sites.>>
To make the cakesicles I use a mini popsicle mold, and coat the cavity with melted Ghirardelli White Melting Candy Wafers. Once the chocolate hardened, I filled the cavity with a brownie/chocolate chip cookie combo and seal the back with more melted white chocolate.
Once the chocolate coating on the cakesicles was set, I started decorating them. I started with Baby Yoda because, Baby Yoda is just the cutest thing ever...
First up I made some Baby Yoda shaped ears out of Wilton gum paste and allowed them to dry. I dusted the inside of the ear with a little pink petal dust just to give them a little dimension.
Baby Yoda's robe came next. I cut a rectangle out of Deep Brown Covering Chocolate that long enough to wrap around the cakesicle, and scored some random lines in it. I mixed a little of the Deep Brown covering Chocolate with some White Covering Chocolate to get the tan color for the fur trim of Baby Yoda's robe. I pressed a balled up piece of aluminum foil into the tan trim to give it some texture. Note: I like using covering chocolate on cakesicles because it taste better than fondant, and the covering chocolate has a firmer texture that holds its shape better than fondant. Side note here - The covering chocolate was previous made by a company named Choco-Pan, but Satin Ice recently bought them out.
Here I am wrapping the robe around the cakesicle. The coating on the cakesicle is made from Ghirardelli White Melting Candy Wafers colored with Electric Green food gel.
I glued the ears to the body using more of the green tinted white chocolate, added black circles for the eyes, a tiny ball for the nose, and some tiny eyebrows.
I also added a tiny white dot to the eyes, and some tiny green dots at the bottom of his robe to represent Baby Yoda's toes peaking out from under the robe. At the last minute I realized Yoda's eyes were too close together so I moved them further apart. I couldn't get the eyebrows off without breaking them so I just left them there.
The Stormtropper came next. This one was pretty easy to make. I just used a paper pattern to cut out the shapes from White and Black Covering Chocolate. (The paper patterns are in the upper left of the picture.)
And then attached the cut pieces of covering chocolate to the cakesicle.
Then I added some accent pieces in white covering chocolate tinted in a pale gray.
Darth Vader was easy too. Again I used a paper pattern to cut out the black and white pieces of covering chocolate. I trimmed the edge of the helmet in some white just so it would show up better. Without the white strip the helmet just blended into the face mask.
To make the eye are I first put down a piece of white covering chocolate, and then covered it with the black piece. This way it looks like the white eyes are behind the face mask.
Then I placed the white triangle and the helmet.
And as a final touch I added some white accent pieces.
R2D2 was by far the easiest.
I dipped the white cakesicle into some gray tinted white chocolate to form the top of R2D2's body/head.
Then I just added a bunch of circles, squares, and rectangles cut from red, black, blue and gray covering chocolate.
Easy Peasy.
Making Rey was by far the most difficult. I started by adding gray stripes to represent the top of her outfit. I tinted the white covering chocolate with a little Flesh colored gel, and cut out the shape of her face using a paper pattern. I also marked where the eyes would go on the face.
Rey's hair came next. I cut it from the Deep Brown Covering chocolate, and scored some lines in the chocolate to represent the strands of hair. I made a "hair" bun from the same deep brown, and I also stuck on some blobs of flesh colored covering chocolate to represent her ears.
Here is the hair in place.
The final touch was the light saber. I took a thin piece of pasta, coated it in melted white chocolate and then rolled it in blue sanding sugar.
I then cut some various sized circles from black covering chocolate and strung them onto the pasta. The exposed end of the pasta was broken off leaving the blue light saber.
For the final touches I added, eyebrows, a nose, mouth, and a hand to hold the light saber.
So I've said it before (and I'm sure I will say it again) - I'm never making cakesicles AGAIN. They take way too much time.
Happy Decorating,
Carol


Hi!!where can find the pattern.This are so cute
ReplyDeleteFor the pattern I just found images on google, sized them to fit my cakesicles, and printed. I cut the paper images into pieces and used the paper template to cut out the fondant/modeling chocolate pieces.
Delete