I think the bag came out cute despite the fact that my two experiments were a flop.<< sad face >>
The first experiment was the Slutty Brownie Cake. What's Cooking Gabby’s Slutty Brownie Cake is amazing – a truly drool worthy cake. The cake is three layers of goodness: one layer is Oreo Cookie Cake, one Chocolate Chip Cookie Cake, and the third is a Brownie. Gabby uses a white cake as the base, and then adds an ingredient to customize each layer.
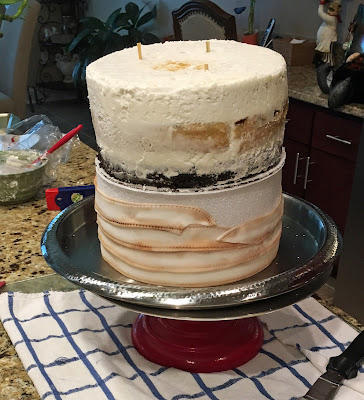
The second experiment was building/stacking the cake layers and filling inside a 4” high pan, and then freezing. Once firm you can heat the sides of the pan, and in theory the cake should slide out of the pan with perfectly straight sides and top.
Umm, No. Didn’t work for me. First off the cake would NOT come out of the pan!! I beat on the top and sides, and warmed the aluminum pan but the cake wouldn't slide out. In desperation I ran a butter knife between the cake and the side of the pan, and the cake finally slid out. And after all that angst I found that the top of the cake was very slanted.
At this point I was shooting 0 for 2. I really didn’t have a good feeling about the taste of my Slutty Brownie Cake, but I decided to decorate it anyway because I needed a centerpiece for the Halloween Party treat table. I didn’t have much time to decorate, so I needed something quick and easy. The day before I had gotten an email from Cake Central showing how to decorate a cutesy Frankenstein Trick-or-Treat bag. I liked the concept but didn’t want to do Frankenstein so I searched the web for other Trick-or-Treat bags and found a cute Mummy bag.
Yes! It was cute and decorating would be quick and easy. To make the bag I needed more height than my 3-layer Slutty Cake gave me, so I added a 4" cake dummy to the bottom of the stack. I rolled out 1 inch strips of fondant, scored the edge of the strips to give it a stitched look, dusted the edges with cocoa power to give it a dirty look, and finally started wrapping the cake. it was so easy. There were no worries about straight sides, flat tops, or bulging middles. Note: I tried dusting with different things (cinnamon, powdered ginger, etc) but the cocoa worked the best.
When I got to the top of the cake I extended the last strips about 1/2 inch above the cake. This accomplished two things 1) it kept the candy from sliding off the top of the cake, and 2) it made it look like the candy was sitting inside the bag.
Next I slapped on some eyes. I just cut out fondant circles and them stretched them into a more oval shape.
Then I added a few shorter strips of fondant to cover the tops of the eyes and make it look like they were peaking out from beneath the strips. I also added some strips to suggest a mouth, and I darkened the inside of the mouth with cocoa to make it stand out even more. I should have added a nose too, but I didn't think of it till I was at the party.
Last step was the handle for the bag. I used some wire to give the fondant handle some support, and I just kept adding strips on top of the wire till the wire was deeply embedded inside the fondant. Dusted it with cocoa and stuck it through the cake and into the foam cake dummy at the bottom. I know you are not supposed to stick wire in cake (the wire is not food safe), but I figured the cake was not going to get eaten.
The final touch was adding the candy to the top of the Mummy Cake to make it actually look like a Trick-or-Treat Candy Bag, and Voila I had a decorated cake in less than two hours. Boom.
Best part is, a lot of people at the party didn't even realize it was a cake! They just thought it was a Trick-or-Treat bag full of candy. How cool it that!
Happy Decorating,
Carol


No comments:
Post a Comment