

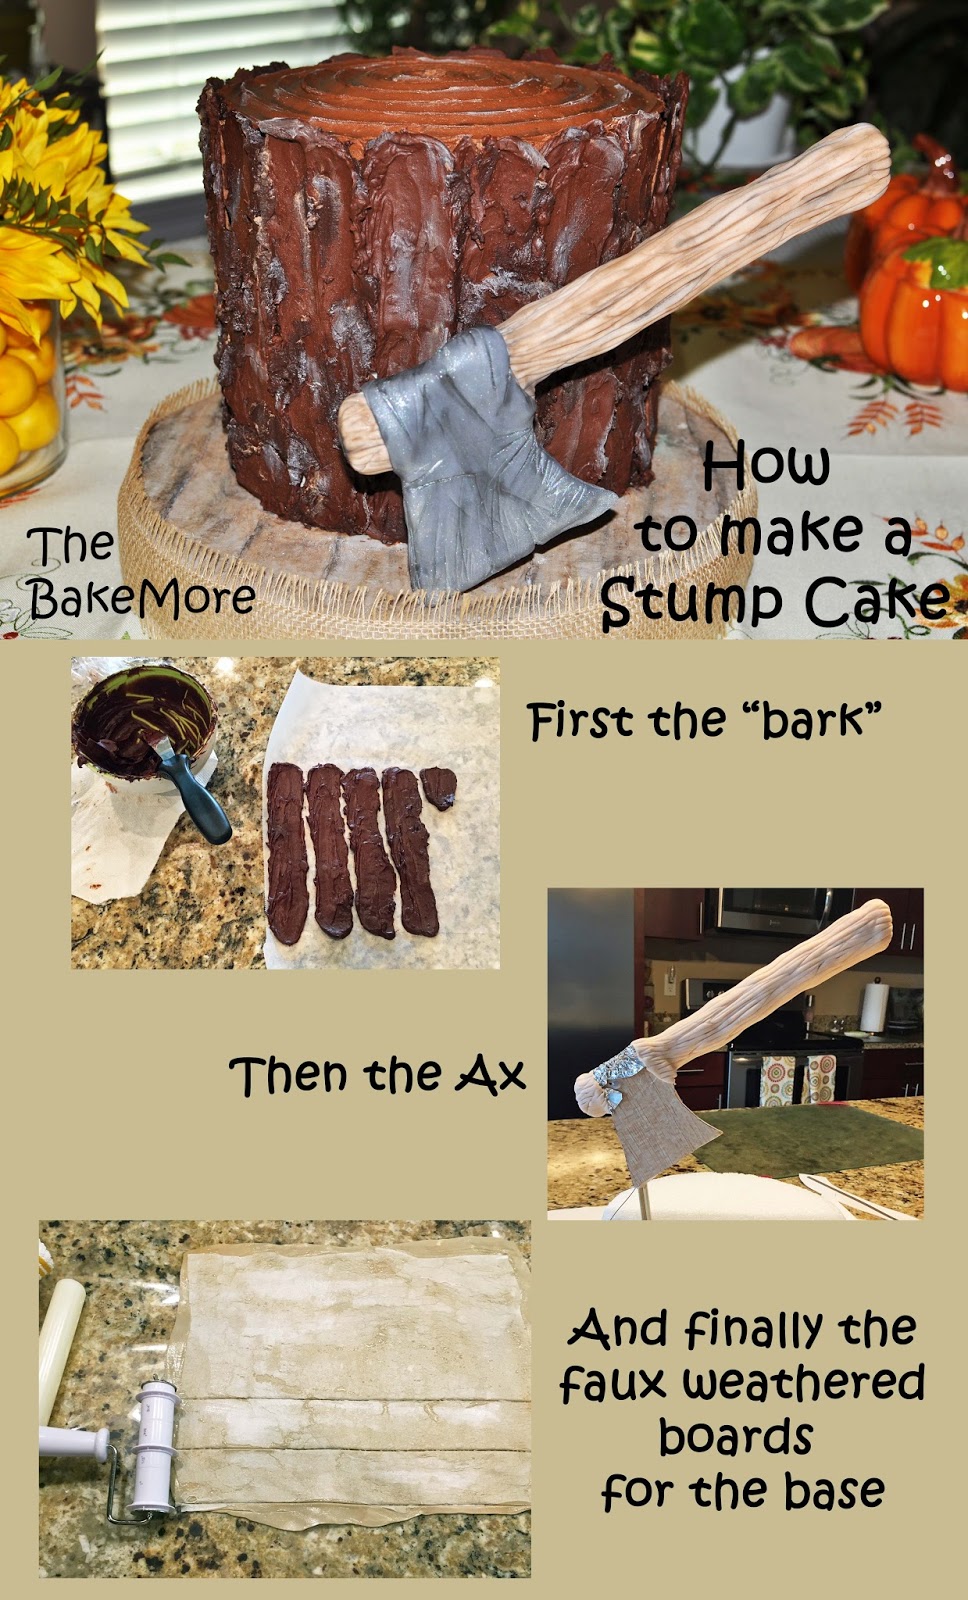
There were three parts to this cake: 1) the Ax, 2) a cake board that looked like wood and was thick enough to hold up the Ax, and 3) the "bark" of the stump.
To me the "bark" was the biggest unknown. I researched a few different ways of making the bark (chocolate curls, fondant ropes, bark impression mats, etc), but decided on the easiest method I could find: melted dark chocolate.
I just melted some dark chocolate, and used an offset spatula smeared lines of chocolate on some wax paper. My cake was 7-1/2 inches tall so I marked off lines on the wax paper to make sure my chocolate lines were long enough. I made the surface extra lumpy and uneven, because, hey, when have you ever seen a smooth piece of tree bark. And make sure you make them relatively thick - if the chocolate is too thin it will crumble when you peal them from the paper.

After the wax paper was filled with "bark", I popped it into the freezer till it harden. Then carefully, cautiously I removed the harden strips of chocolate from the paper. Once free from the wax paper, I stuck them to the side of the cake using chocolate buttercream as glue.

How easy is that? And don't worry if the strips break into pieces. Just slap the pieces anywhere you want. The beauty of a stump cake is that you DON'T want it to look perfect.


Just use a paint brush and fill in the holes with a little bit of melted chocolate. But what if your melted chocolate is a different color from your chocolate bark strips?? Well, that's all the better. The various shades will make your Stump Cake look even more realistic.


<< Disclosure: We are a participant in the Amazon Services LLC Associates Program, an affiliate advertising program designed to provide a means for us to ear fees by linking to Amazon.com and affiliated sites.>>
Next to give the bark a little "life", I painted on some edible luster dust. I used brown and black and some white. I tried green for a moss-like effect, but it didn't look very good.

I went a little overboard with the white, but after a night in the refrigerator the white dulled down a bit.

PS: Here is the top of the cake. I just swirled the "tree rings" into the buttercream using a spoon.

The second challenge to this cake was the Ax. I thought about using a real one, but they were too expensive (and not really food safe). So I made my own!! I built an armature out of balsa wood and aluminum foil, and then covered the handle section in tan fondant. I scored the length of the handle to give it a wood-like look.


And then a final touch of edible silver powder food color to give the blade a shiny look...


The first step to making the weathered board is to choose the fondant for the base color. For the Stump Cake I wanted a brown toned board, so I gathered up a bunch of fondant scraps in all different colors and squished them together. I know it looks like some strange sea creature, but it is fondant.


Wet the wafer paper with water.

Use a small roller to roll the fondant and wafer paper together. The fondant will stretch and thin as you roll it, but the wafer paper can't stretch so it will rip and tear instead.

The more you roll, the more the wafer paper will be shredded and the more the "wood" will look weathered.

When you get the look you want, use a strip cutter to cut the fondant into evenly sized "planks".

Then simply place the planks on your cake board. I wasn't sure if I would have enough of my "sea creature" colored fondant, so I skimped and left the center of the cake board empty.


And below is the finished "weathered wood" fondant board. A night in the refrigerator also increased the "weathered" look. The cold air really dried out the wafer paper and made it curl up even more. This technique is so neat.
So this ends my Stump Cake adventure. Give it a try for your next Guy party, it really is a fun (and easy) cake to make.
Happy Decorating,
Carol
Wow Carol, I absolutely love this cake. If I ever make a stump cake I'm certainly going to use your idea(s) for the chocolate "bark". Also, the ax is terrific too! XXX, Edith
ReplyDeleteThanks, Edith. This was a fun cake to make. Decorating is so much easier when the cake it supposed to look lumpy :-)
ReplyDeleteI love the internet! Going to use your bark idea. Thanks!
ReplyDeleteI'm curious about the ganache you used for the bark. Any chance you could share the recipe? I'd like to use ganache as well and am wondering if you used the type that you drip on cakes and it is just set up so it's firmer?
ReplyDeleteHi, I just use the basic ganache recipe. 2:1 - Two parts dark chocolate and 1 part cream. So for 200g of chocolate I use 100g of heavy whipping cream. You can also use candy melts. They would work too.
DeleteI made ganache but it never set in the fridge or the freezer, it remained soft and couldn't be used. So just ended up doing melted chocolate. I Googled, and ganache must be made with DARK CHOCOLATE to set! lesson learnt.
ReplyDeleteYou can make ganache out of milk or white chocolate (I do it all the time), but it has a different ratio of chocolate to cream than dark chocolate. I use a 2 to 1 ratio of dark chocolate to cream, and I use a 3.25 to 1 ratio for white and milk chocolate. If you want the chocolate to set even harder you can use even higher ratios. Say a 2.5 to 1 for dark, and a 4 to 1 for white and milk.
DeleteWhat kind of chocolate did you use and what ratio of chocolate to cream?
Also it is risky to use baking chips to make ganache. Some baking chips have a lot of oil in them that can prevent the ganache from setting.
I used milk chocolate baking melts (specifically for melting) and went by your recipe in the Post of 2 to 1. But I didn't realize that you had used dark chocolate. I should have done my research on it first. Thank you.
ReplyDeleteAh, that is the problem. Like you said, ganache is made with real chocolate, and Baking Melts / Candy Melts / Candy Wafers / Almond Bark is just a candy coating made from sugar, hydrogenated palm oil, milk powder, and flavoring. The melts contain no chocolate, and because the baking melts are made with oil they don't need anything else added to them to make them melt and flow. Sorry your bark was a flop.
Delete