This was the last cake I finished and it was by far the easiest. It was a navy and white three tiered cake with pink peonies. I was making this cake for a friend's daughter so I got to choose the design. I had been wanting to try the Rose Ruffle style cake so this was my chance.
<< Disclosure: We are a participant in the Amazon Services LLC Associates Program, an affiliate advertising program designed to provide a means for us to ear fees by linking to Amazon.com and affiliated sites.>>
I started out stacking the cakes, and covering the gaps between the tiers with fondant strings and strips that I made from my nifty new ACE Food Safe Extruder. Next to the 20" Expander for my cake turntable, this is my favorite tool. The ACE looks and functions a lot like a chalk gun. You just load the fondant into the barrel, choose a disc design, squeeze the handle, and out comes the fondant in the shape of your choosing. It is so easy.
Next I placed the flowers. I made peonies yet again. They are my favorite flower and so quick and easy to make. I also think they look more exotic and dramatic than the common rose. To make the peonies I used the FMM cutter and a 2" Styrofoam ball. I made the flowers and leaves a few days ahead of time to give them a chance to dry nice a hard.
After placing the flowers I started on the rose ruffles. There is nothing hard about making them, but they are very time consuming. I calculated that it takes about 1 minute to make each ruffle. That doesn't sound like a lot of time, but when I realized I need HUNDREDS of them I started to panic.
To make the ruffles you simply cut out a circle shape, and ruffle the edges with a ball tool. I used my normal Mona Lisa fondant mixed with a little Tylose powder. You want the fondant a little stiffer than normal so that ruffles will hold their shape when you start stacking them on the side of the cake.
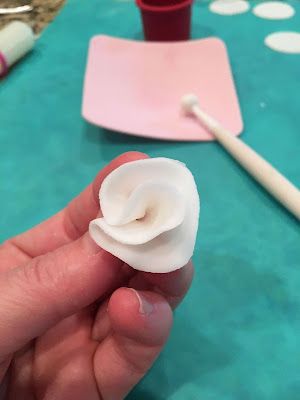
Once the edges are ruffled you just fold up the circle any way you want to. Some I folded like this...
And others like this...
But whatever the shape, the bottom gets pinched.
I worked with enough fondant to cut out and shape 15 ruffles at a time. As I made the ruffles I would prop them up on some tissue paper so them could dry out slightly. By the time I finished the 15th ruffle, the first was hardened enough to place on the cake. But don't let the ruffles dry out too much. You want them stiff enough to hold their shape but still soft enough that you can fluff the ruffled edges without breaking them. In hindsight I guess the most time efficient process would be to make about half of the ruffles ahead of time and during construction you could stagger the hard ruffles with the still soft ruffles. The hardened ruffles would hold their shape, and the still soft ruffles could be fluffed to hide holes and gaps. Sounds like a great plan - too bad I didn't think about it till AFTER the cake was made. Oh well, such is life for a hobby baker. Live and Learn - Bake and Learn.
Here are the first few ruffles in place.
And here are the ruffles when I finally gave up and called it a night.
Originally I wanted the ruffles to completely cover the bottom tier, but I spent about 2 hours making just these ruffles and I didn't want to stay up for another 5 hours. So my tier of ruffles became three rows of ruffles. I know, I'm a quitter.
But the bride-to-be was very happy with her cake, and she didn't even realize that she got gypped on ruffles.
Happy Decorating Folks,
Carol
Supply List:
Mona Lisa Fondant
ACE Food Safe Extruder
Tylose powder
14" Cake Drum
Alligator Impression Mat (used on the fondant covering the cake drums)
FMM Peony Cutter
Royal Blue and Black Wilton Food Color Gel (royal blue with a touch of black makes navy)
AmeriColor Dusty Rose Soft Gel Paste Food Color (for the peonies)


No comments:
Post a Comment