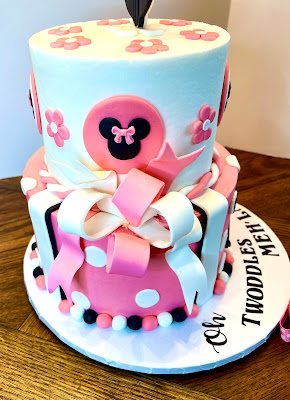
My family has always been big Disney fans, and the newest generation is no different. Here is a cake I made for my grand-niece.
And here is a side view of the gum paste bows. Those things were a pain in the butt to make.
<< Disclosure: We are a participant in the Amazon Services LLC Associates Program, an affiliate advertising program designed to provide a means for us to ear fees by linking to Amazon.com and affiliated sites.>>I started by make the gum paste topper. Instead of using a paper templet and cutting the shape by hand, I made a plastic cutter using my nifty Creality Ender Pro v2 - 3D Printer. That thing has come in so handy; it is now my favorite cake decorating tool! I wrote a blog post about 3D printers for cake decorating. The post can be found HERE.
I made cutters for each feature.
And here is the finished topper. I drew in the eyelashes with an
edible black marker, and dusted the creases in the bow with
Roxy & Rich Princess Pink petal dust. To make the little dots I use
tiny little circle cutters. The cutters are advertised as a clay tool, but they work great for fondant and gum paste too.
I also made the gum paste bows and streamers ahead of time which gave them plenty of time to dry and harden. I used
foam cake dummies (in the size of my cake) so I would get the size and proportions of bows correct. Nothing worse then making stuff ahead of time and having it too big or too small for the cake.
Construction of the cake began with an 8" tier frosted with American Buttercream. I used a 12" white foil cake drum and a chop stick for the center dowel. I like using chop sticks because I find them the perfect thickness and height for a two tier cake. I don't show it in this picture, but I used 4 Extra Wide Fat Boba Straws to support the top tier. For the fondant accents I just used Wilton's Black and White fondant. If I'm covering a cake in fondant, I use a better tasting brand, but for accent work the Wilton (or the Sunny Side Up brand from Hobby Lobby) works fine. I used the Wilton Strip cutter to make the fondant strips all the same width.
The second tier is 6", and here I am removing the top acrylic disk. I use acrylic disks to get the straight sides, flat top, and sharp edges. The disks make the task so easy, and they are really worth the investment. I got mine from
Cake Safe. I have a blog post about how to use them
HERE.
Next I rolled a bunch of balls in black, white, and pink fondant. I cut out white fondant circles and made another cutter (using my 3D printer) to make the number 2.
I also make the tiny mouse silhouettes using circle cutters. The pink
gum paste bows were made using a silicone mold, and I used
edible glue to stick the bow to the silhouettes.
Once I had all the accents made it was just a matter of putting everything on the cake.
Easy, peasy. NOT! It only took me about 10 hours to make the cake. LOL. Good thing I like my family.
Happy Decorating,
Carol


This is gorgeous! What brand fondant do you recommend for covering the whole cake? I read your blog from 8 years ago about the taste test you did but wanted to see if you had any suggestions (in real time). Thanks
ReplyDeleteSherri. I was using Mona Lisa brand of fondant, but they stopped making it. I was so disappointed. So now I use Dream or sometimes Renshaw. I also like Choco-Pan's Covering Chocolate if I'm covering the cake in multiple pieces instead of one big piece. The Choco-Pan is very stiff so it holds it shape and doesn't stretch when you move it to the cake. if I'm just putting on fondant accents on the cake I will use Wilton or the Hobby Lobby brand.
DeleteHope this helps, Carol
Thanks so much! I've never done any fondant work other than in classes, but I figured if I'm going to cover a whole cake, I want it to taste good!
DeleteLOL, most people will just scrape the frosting off the fondant and eat everything but the fondant. It is such a waste of time and money so on most cakes I just use buttercream. But I still use fondant on craved cakes, you can never get an oddly shape cake to look good with just buttercream.
Delete