Sunday, March 19, 2017

Gunging - Sugar Spackle that Hides ALL Fondant Flaws


Do you ever get rips, tears, gouges, or holes in your fondant covered cakes?  ME TOO!!

But I no longer yank out my hair when my fondant starts misbehaving because I recently discovered the power of GUNGE.   Have you ever seen home repair shows where they patch holes in the walls with spackle?  Well gunge is like that.  It is sugar spackle for your cake.  You just smooth it on, scrape it off, and the flaws (almost) disappear!!!

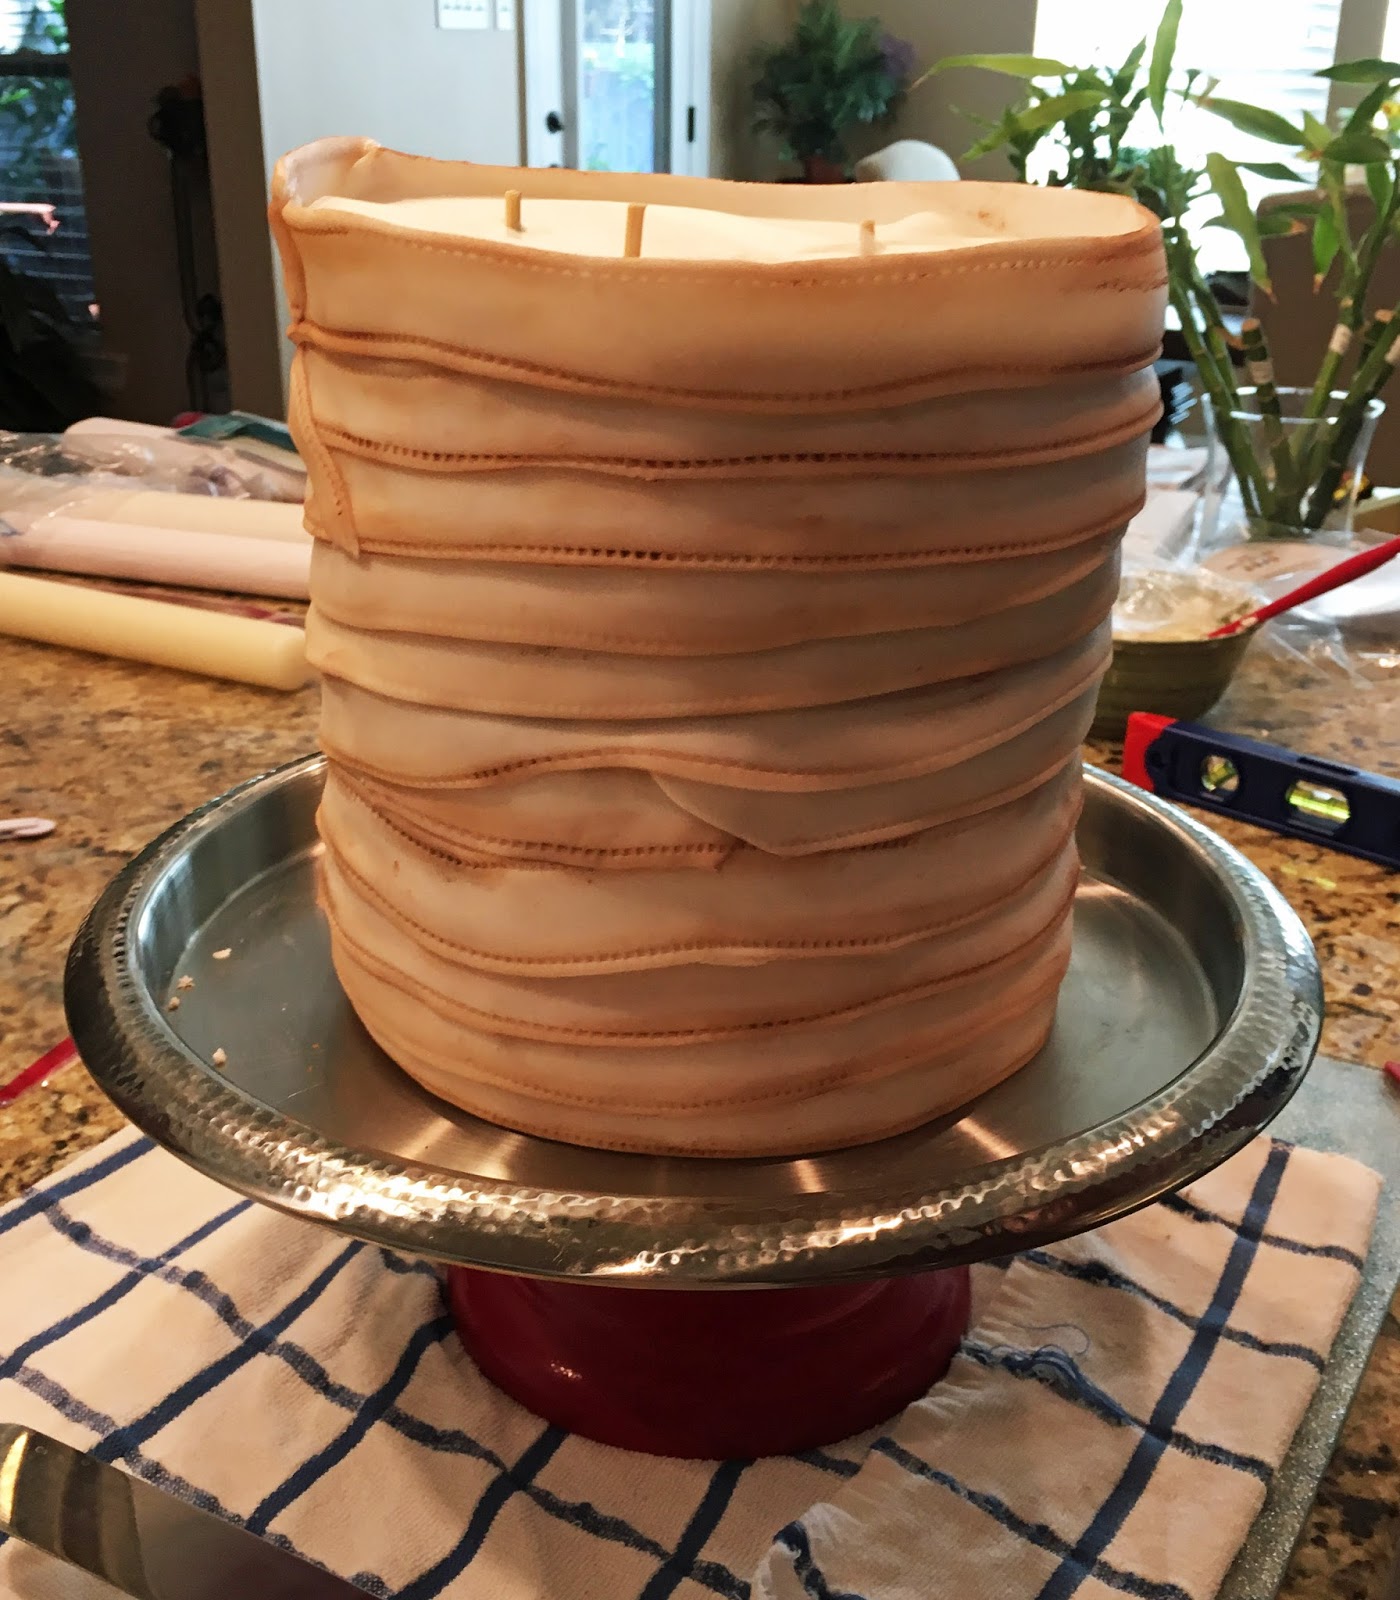
So why am I talking about gunge?  Well it once again saved a cake, and my pride from total humiliation.  Here is my latest problem cake. Doesn't it make you cringe?  It is by far my worst attempt at covering a cake with fondant. 


And the problems continue on the other side of the cake...


I'm not sure what happened.  The rolling of the fondant and the cake prep went fine...


The cake is an 8" double barrel, but I have successfully covered cakes this high and narrow before.  I was also using a new fondant, so maybe that was the problem??  (Note: The fondant was Fondx Salted Carmel, and I bought it on the spur of the moment because the flavor description had me intrigued.  Well I'm sorry to say that it tasted neither Salted, or Carmel; it just tasted like marshmallow fondant.)

But back to the problem... So possibly the fondant was the problem.  Or could it have been the temperature of the cake?  The cake was very cold, so maybe that dried out the fondant??  I'm not sure, but you can see that I had problems from the beginning...


I tried covering the cake three times, and each time the fondant stretched and split at the top edge of the cake.  By the third unsuccessful attempt, I just accepted the tear at the top and moved on.  I figured I could conceal the flaws with my secret decorating weapon: GUNGE.

So gunge is just a mixture of fondant and liquid.  Some people say to use water, but I have found that using water causes the gunge patch to look shiny after it dries.   Kaysie Lackey from Innovative Sugar Works suggest using a mixture of half whole milk and half vodka, and this works great.  If you use just water or just vodka it will dry shiny but if you add some milk, the milk fats will cause it to dry with a matte look.

To make the gunge you just whip 200 grams of fondant with 15 grams of whole milk and 15 grams of vodka. (See Kaysie Lackey's full recipe with directions and notes at bottom of post.)  You can also make a smaller batch with 100 g fondant, 7 g whole milk, 8 g of vodka or even 50 g or an even smaller batch with 50 g of fondant, 4 g whole milk, 4 g of vodka.


First start out mixing 100 grams of the fondant with the liquid...


...and when the fondant gets incorporated into the liquid slowing start adding pieces of the remaining 100 grams of fondant until the mixture starts to look like stiff peak royal icing.  You don't need to add all the remaining fondant; just add enough till the consistency look right.  And FYI, it takes a long time to mix, so just be patient.

You can also make a smaller batch if you don't don't have that many flaws to cover.  And you can also use colored fondant so your gunge will be the exact same shade as the fondant covering your cake.  How cool it that.


Next start filling all the holes and imperfections on the cake.  Just goop it on...


And then scrape it off...

Disclosure: We are a participant in the Amazon Services LLC Associates Program, an affiliate advertising program designed to provide a means for us to earn fees by linking to Amazon.com and affiliated sites.


You may have to do it a few times to get it smooth.  To scrape off the excess gunge I use these little scrapers called Sugar Smoothers.  They work great, and can be used for many different things, like smoothing the fondant, or protecting the fondant from hand prints as you move it, or cutting away the excess fondant from the bottom of the cake. 

So back to gunging.  You dollop it on, and scrape it off, filling the holes in the process.


And after a little gunge, and a few scrapes, the flaws are almost invisible.   Yes, if you look close enough you can still see the flaws.  But to me THIS version looks so much better....


... than THIS version ...


The gunge is also great for filling the the gap between two stacked cakes, or for filling the gap between the cake and the cake drum or board.  Just put the gunge in a piping bag with a size 2 tip, and pipe the gunge into the seam.  Use the damp tip of your finger to push the gunge into the seam and wipe away the excess. Or if you are into nifty tools you can use these soft tipped, food safe shaping tools to push the gunge into the seam and clear away the excess.  The food safe shaping tools are identical to the much cheaper (but not food safe) clay sculpting & shaping tools I use when playing with Fimo and Sculpey III clays.

So with the gunge the gap between tiers will go from this....


To this....


Again, my "after" fix is not perfect, but it masked the worst of the problems.


And here is the finished cake.  I thought it look kind of pretty till someone said it looked like a hat!  Actually more than one person said it looked like a hat.  Oh well, I guess I should have used a square cake board.


But my mom like it, and that is really all that matters.


Happy Decorating,

Carol 


Gunge (recipe from  Kaysie Lackey at Innovative Sugar Works)

Ingredients:
 
200 grams  Fondant
15 grams  Whole Milk  (Soy Milk works too)
15 grams  Vodka

Directions:
  • Start out mixing 100 grams of the fondant will all of the liquid.  I use an electric hand mixer fitted with a whisk.  Be patient, this takes a while.
  • When the original 100 g of fondant gets incorporated into the liquid, slowing start adding pieces of the remaining 100 grams of fondant until the mixture starts to look like stiff peak royal icing.  You don't need to add all the remaining fondant; just add enough till the consistency look right. 

Tools Used:
  • Sugar Smoother/Scraper by  Innovative Sugar Works - This tool is great for scraping the gunge from the cake.  It is light and thin, but super strong.  The scrapper has other uses, but it is the go-to tool for gunge repairs.  You can get Smoothers with a ruler inked on the side or Ink Free.
  • Sugar Shapers are another great tool to use with gunging.  If you have a gap between your stacked tiers, you can pip the gunge in the gap and smooth it out using the Sugar Shapers.
  • An the best tool of all the the TurnTable Expander.  When draping the fondant over the cake, my regular turntable is not large enough to hold all the extra fondant that pools at the base.   The TurnTable Expander gives you an extra 8 inches of working space. The Expander fits my Cake Boss Turntable perfectly, but Innovative Sugar Works now sells their own turntable.
  • And, No, I don't work-for or have any relationship with Innovative Sugar Works.  As a hobby baker I just love their products.

Note 1: You can also half or quarter this recipe.

Note 2: If you use just water or just vodka as the liquid, the gunge patch will have a shiny appearance and stand out from the fondant around it.  The milk is used because the fat in the milk gives the gunge patch a matte finish that will make the repaired area blend seamlessly into the surrounding fondant. I have also used Soy Milk and it works just as well as the whole milk.

Note 3: The vodka is used because it quickly evaporates when exposed to air so it helps the repaired area dry quickly and lose its stickiness.  If you use water, the gunge will stay sticky for a much longer period.


So if your fondant isn't perfect, don't despair --- just GUNGE IT!


Monday, February 20, 2017

Another Fondant To Test - Dream by Choco-Pan

Disclosure: We are a participant in the Amazon Services LLC Associates Program, an affiliate advertising program designed to provide a means for us to earn fees by linking to Amazon.com and affiliated sites.

My quest for the perfect fondant continues....

I thought I had found the perfect fondant with Via Roma Bakery Fondant, but my last 5lb tub of the stuff was less than perfect (it formed the dreaded elephant skin).  So I'm back on the hunt, searching for the "Perfect Fondant" that is consistently perfect.    Next to be tested is...

Dream Fondant by Choco-Pan


(If you want to read about other fondants I've tested you can checkout the 7 fondant comparison, the Via Roma, the Cake Craftthe Carma Massa, or the Fat Daddio's comparisons.)

In my non-expert analysis of the fondants I use nine different criteria: Taste, Texture, Rolling, Coverage, Draping/Smoothing, Cutting/Trimming, Drying Time, Tinting, and The Final Look.

Taste - I have to say I was impressed with the taste of this Dream Fondant.  It has a hint of White Chocolate and a touch of vanilla.  The fondant feels creamy in the mouth and dissolves easily on the tongue.  It doesn't feel tough and is not chewy at all.  Dream is more like firm buttercream instead of icky, chew, fondant.  I have to say that Dream is one of the best tasting fondants I have sampled.  (But in my book, Pettinice is still the best tasting.)

Texture -  Out of the pail this Dream Fondant was as hard as a rock, but a few seconds in the microwave had it soft and malleable.  It is very easy to knead and condition, and very easy to fold and stretch.


The photo below show exactly how soft the fondant is.  I had the fondant sitting on a paper towel, and in just a few short minutes the fondant pick up the pattern from the paper.  I didn't press the fondant into the paper, honest I didn't.


The fondant also had this strange paradox of textures.  On the one hand it felt dry and cool to the touch, but it also left a greasy film on my hands. 


And even more contradictions: the Dream Fondant comes out of the pail as hard as a rock, but after warming the fondant is soft to the touch and will stay that way for days.   The fondant feels soft, but strangely, if you don't work quickly it can tear.   And while the fondant is soft and malleable, it is not floppy.  It will hold its shape without bending.  A good analogy for this fondant is modeling clay.   It is soft and workable, but it will hold its shape after it is formed.  So this his Dream Fondant is full of contradiction, but contradictions that (for the most part) all work in the cake maker's favor. 

Rolling - After softening  and working the fondant for a few minutes, I found that it rolled very easily.  I didn't have to use a lot of effort or muscle to flatten it to 1/8".  I did find the bottom of the fondant stuck a little to The Mat, but nothing too bad.  The rolled, outer edges of the fondant also stayed soft and supple and didn't crack.  

Coverage - In all of my fondant comparison I used the same amount of fondant (5 ounces) rolled to the same thickness (1/8") to see how far each brand would spread. At 11-1/2 inches round, this Dream Fondant was one of the best performers (tied with Fondarific and Via Roma). The worst performers, at 9" round, were Duff & Satin Ice


Draping/Smoothing - When compared to other fondants, I found the Dream Fondant a little stiffer and more difficult to work with.  When placed over my "dummy" cake it acted more like a piece of aluminum foil rather than a piece of Saran Wrap.  The fondant just didn't want to drape and flow down the sides of the cake.  It was also a little difficult to fluffy out the folds.


And below is something that really surprised me given how the fondant is so soft...  I was in the middle of smoothing the fondant over the dummy cake.  I was taking my time, slowly moving back and forth trying to fluff out the folds, when the fondant start to rip.  Gasp!!  This is a cake maker's worst nightmare.  


I yanked the fondant off, squished it a bit, re-rolled, and started over.  The second attempt was much better.  I worked faster this time, although it still took a lot of time to smooth, fluff, and work out the folds.  I also trimmed off the excess skirt fondant away from the base before I started smoothing.  In the end I finished without creating any tears.  And best of all there was none of that dreamed Elephant Skin, and NO bubbles.  I hate bubbles in my fondant (see the Carma Massa drama).

Cutting/Trimming - The Dream Fondant performed very well at the cutting/trimming stage.  No ragged edges are unsightly pulls.  I have started using these Sugar Smoothers to cut/trim the bottom of the cakes...


But a wheel cutter works just as well.


Drying Time - The Dream Fondant has a slow drying time. I had a small ball of the fondant sitting on the counter for over 30 hours and after all that time it was still soft and moist.  I was able to rework the ball, and roll it out like it had just come out of the pail.

Tinting - After all the problems I had coloring the Carma Massa fondant a pretty mauve color, I started testing the fondants to see how they handle  U.S. Certified Red #3 dye.  The Dream Fondant had no trouble with the Red #3 dye.  The mauve looked pinkish just like it was supposed to look.


Final Look - Well in the end, this Dream covered cake dummy looked pretty damn good.  Not perfect, but pretty close.  The fondant finish was smooth and velvety, and seemed to float above the nooks and crannies of the dummy cake underneath. It really looked good.  About the only negative I could mention is that I found the surface of the fondant to be a little delicate.  Even hours after the fondant is applied, it is very easy to gouge the surface of the fondant with finger tips or other tools.  But on the positive side, the same character that makes the fondant surface easy to gouge also make it easy to buff out the imperfections.


So this Dream Fondant is a real contender for the crown of Perfect Fondant.  Until I find something better, this will probably be my go to fondant. 

Happy Baking (and Decorating),


Carol


Saturday, February 11, 2017

First Ombre Cake

My first attempt at an Ombre Cake.  Not too bad, but I think the line between the colors should have been a bit more blurred.  Oh well, I'll do better next time.


Saturday, November 12, 2016

Harry Potter Lesson Books Cake

Disclosure: We are a participant in the Amazon Services LLC Associates Program, an affiliate advertising program designed to provide a means for us to earn fees by linking to Amazon.com and affiliated sites.
 
My first Groom’s Cake!!!

Both the bride and groom (close friends of my niece) are big Harry Potter fans, so they requested a Golden Snitch Cake. I didn’t want to do just the snitch, so I decided to build a tower of Harry Potter lesson books with a wand and the golden snitch sitting on top.

(Hey, free cake so I kind-of get to do what I want.)


Not surprising, the snitch was the hardest piece to make. I started with a fondant covered foam ball, and then used various sized fondant ropes (used a clay extruder to form the ropes) to decorate the outer shell.


Next came the wings for the snitch. I rolled out Wilton ready-to-use gumpaste very thin, and then sandwiched a curved metal wire between the upper and lower layer.


I cut out the shape of the wing, and then cut parallel lines through the gumpaste to make the individual feathers of the wing.


As a final step I sprayed (using Wilton's color mist) the wings sliver and the body gold.


The wand came next, and unlike the snitch I was able to whip it out in just with a few minutes of work. I made the wand in three stages, allowing the gumpaste to dry at each stage. First I rolled out a thin log of gumpaste and then inserted a wooden skewer down the center. After the first section dried I built up a second layer near the end of the wand and gave it a little texture to make it look like wood. The third stage was a lumpy wad of gumpaste that I stuck on the end of the wand. I cut deep grooves into the gumpaste, and stuck some wart-like little knobs to make it look like a stick from a tree. As a final step I painted it with some Wilton Black food color and Americolor chocolate brown food color gel.


I finished the snitch and wand a few days before the event so on the day before the wedding I only had to worry about the stack of books.  I didn't need a whole lot of actual cake, so I made the top two books out of foam.  There are lots of detailed instructions on the web on how to construct the closed book cakes so I won't repeat all the steps.  But essentially you cover three sides of the foam with white fondant.  All the instructions I read said to carefully measuring the cake/foam to get a piece of white fondant exactly the right size, but I just got "close" and smeared the extra fondant over the top of the foam.  I used a bit of shortening to stick the fondant to the foam.  To make the "pages" of the book I just ran a scoring tool into the fondant to make parallel lines.  The lines don't have to be exact.  You just want to give the impression of pages.


The books "cover" was the next step. You need to be a more precise when you cut this piece, and I learned the hard way that you also need fondant that is a little stiff.  If your fondant is too soft, it will get pulled out of shape when you try and place it on the cake/foam.  I used my last bit of Carma Messa fondant on the first dummy cake and didn't have any trouble with the fondant pulling out of shape. On the second foam book I used Fondarific, and had so much trouble I almost yanked my hair out in frustration.  The Fondarific was so soft it just wouldn't stay square when I tried to place it on the cake, and the edges that extended beyond the "page" section of the book kept flopping down.  The Fondarific was just too soft to use in this fashion.  In the end I used some tylose gum tex power to stiffen the fondant.  I could get away with this because this fondant was going to cover the foam/dummy cake, and no one was going to eat it. 

The final step in the construction was to cut thin strips that are position around the bottom of the cake to form what looks like the bottom cover of the book.


Other than the Fondaric issue, the foam cakes went together pretty easily.  But I did have some real trouble constructing the book that was actually made out of cake.  I'm not real good at getting my cakes level, so after I putting on the ganache I had to build up the top outer edges with pieces of fondant to get the top somewhat flat and even.  I also couldn't roll out a strip of white fondant that was long enough to cover all three sides, so I just cut three pieces and patched them together.  If you look closely at the edge along the front left side you can see where I overlapped the two pieces. 


And once again I had trouble placing the "cover" on the book.  I was using the Fondarific again because that was all I hand, and again it was just way too soft to hold its shape (and I couldn't add any tylose to this one because people might actually eat the fondant).  It took me three tries to get the top cover on without stretching it out of shape.  I used my SweetWise Pro Mat to help position the cover on top of the cake, and then pull the mat away from the cut edges of the fondant very gently.  I also had the prop the corners up with tooth picks so they wouldn't droop.  In the end the book made out of cake looked a lot more rustic than the books made out of the foam. The foam "cakes" had sharp edges and smooth sides, and the real cake looked a little lumpy.  But remember - free cake.


Final step on the book construction was to add some embellishments to make it look more realistic.  You can't really see in the picture, but I used an impression mat on the dark colored bands to get some texture on the fondant.  I also dusted it with Chef Alan  Tetreault edible gold dust to make it sparkle.  


The three books were then stacked, and the titles added to the book.  On the top book I cut out the letters using my Cricut paper cutting machine, but I wasn't too happy with the look.  The letters were too perfect and precise looking so they didn't match the rest of the book.  But I didn't have time to re-cut them by hand so I had to use the Cricut letters.


I hand lettered the titles along the spine using Wilton edible markers, and the final step to complete the books was dusting them with cocoa power to give everything an aged look.  I added a few extra things here and there like the "HP" logo and the "parchment letter" with the names of the bride and groom and the date.  Funny story but I had a white owl perched on the edge of the book delivering the letter, but the owl look so bad I decided not to use it.


So all-in-all the cake turned out well, and the bride and groom were happy.  But I have come to realize that the hardest part about making an elaborate cake is watching as hours and hours of painstaking work is destroyed in a matter of seconds. 


Happy Decorating,

Carol

Saturday, November 5, 2016

Mummy Trick-or-Treat Bag - In Cake Form

While trawling the internet for all things cake, I found two interesting techniques I wanted to try, and since I would be experimenting right before Halloween I decided to dress up my “experiments” to look like a Halloween Trick-or-Treat bag...


I think the bag came out cute despite the fact that my two experiments were a flop.<< sad face >>

The first experiment was the Slutty Brownie Cake. What's Cooking Gabby’s Slutty Brownie Cake is amazing – a truly drool worthy cake. The cake is three layers of goodness: one layer is Oreo Cookie Cake, one Chocolate Chip Cookie Cake, and the third is a Brownie. Gabby uses a white cake as the base, and then adds an ingredient to customize each layer.

In the end my Oreo layer was pretty good, but the brownie layer was dense, dry, and not sweet enough. The cookie layer was the worst of the trio – the chocolate chips all settled to the bottom (I should have dusted them with flour first), and it sort-of collapsed on me. Sad looking isn’t it?


The second experiment was building/stacking the cake layers and filling inside a 4” high pan, and then freezing. Once firm you can heat the sides of the pan, and in theory the cake should slide out of the pan with perfectly straight sides and top.


 Umm, No. Didn’t work for me. First off the cake would NOT come out of the pan!! I beat on the top and sides, and warmed the aluminum pan but the cake wouldn't slide out. In desperation I ran a butter knife between the cake and the side of the pan, and the cake finally slid out. And after all that angst I found that the top of the cake was very slanted.

I really don’t know how that happened??? It looked perfectly flat when it was inside the pan, but once it came out it looked like a ski slope. I had some trouble with the center, chocolate chip cookie layer compressing, so maybe that is what caused the slant.

At this point I was shooting 0 for 2. I really didn’t have a good feeling about the taste of my Slutty Brownie Cake, but I decided to decorate it anyway because I needed a centerpiece for the Halloween Party treat table. I didn’t have much time to decorate, so I needed something quick and easy. The day before I had gotten an email from Cake Central showing how to decorate a cutesy Frankenstein Trick-or-Treat bag. I liked the concept but didn’t want to do Frankenstein so I searched the web for other Trick-or-Treat bags and found a cute Mummy bag.

Yes! It was cute and decorating would be quick and easy. To make the bag I needed more height than my 3-layer Slutty Cake gave me, so I added a 4" cake dummy to the bottom of the stack. I rolled out 1 inch strips of fondant, scored the edge of the strips to give it a stitched look, dusted the edges with cocoa power to give it a dirty look, and finally started wrapping the cake. it was so easy. There were no worries about straight sides, flat tops, or bulging middles. Note: I tried dusting with different things (cinnamon, powdered ginger, etc) but the cocoa worked the best.


When I got to the top of the cake I extended the last strips about 1/2 inch above the cake. This accomplished two things 1) it kept the candy from sliding off the top of the cake, and 2) it made it look like the candy was sitting inside the bag.


Next I slapped on some eyes. I just cut out fondant circles and them stretched them into a more oval shape.


Then I added a few shorter strips of fondant to cover the tops of the eyes and make it look like they were peaking out from beneath the strips. I also added some strips to suggest a mouth, and I darkened the inside of the mouth with cocoa to make it stand out even more.  I should have added a nose too, but I didn't think of it till I was at the party.


Last step was the handle for the bag. I used some wire to give the fondant handle some support, and I just kept adding strips on top of the wire till the wire was deeply embedded inside the fondant. Dusted it with cocoa and stuck it through the cake and into the foam cake dummy at the bottom. I know you are not supposed to stick wire in cake (the wire is not food safe), but I figured the cake was not going to get eaten.


The final touch was adding the candy to the top of the Mummy Cake to make it actually look like a Trick-or-Treat Candy Bag, and Voila I had a decorated cake in less than two hours. Boom.


Best part is, a lot of people at the party didn't even realize it was a cake! They just thought it was a Trick-or-Treat bag full of candy. How cool it that!

Happy Decorating,

Carol