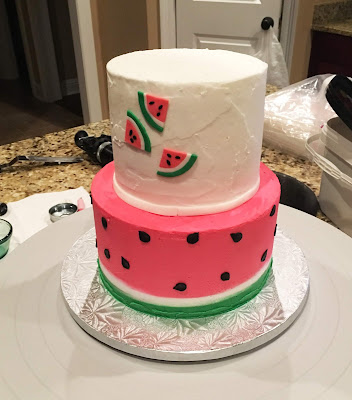
One In A Melon Cakes are a popular theme in 2019. Here is my attempt - with a Smash Cake too.
<< Disclosure: We are a participant in the Amazon Services LLC Associates Program, an affiliate advertising program designed to provide a means for us to ear fees by linking to Amazon.com and affiliated sites.>>
I started with the Smash Cake - I wanted to knock out the easy cake first. The smash is a 5", three layer cake. I like to use 5" for smash cakes because I think they look nice on the scalloped 8" cake boards. Once the 5" cake was stacked, I crumb coated the top 2/3 in watermelon pink (Wilton Rose mixed with Terra Cotta and a touch of Ivory), and I crumb coated the bottom with Wilton Leaf Green.
Next I just piped on some fat, chunky rosettes with a 1M Open Star tip.
For the watermelon seeds I used a five petal flower cutter and black Fondarific fondant. I sliced off each petal giving it a pointy tip. Doesn't it look exactly like a watermelon seed?
For the base of the main cake I used my acrylic cakes rounds which help me get the sides of the cake straight and the top flat. I piped the bottom fifth of the cake with the green, and the rest with the watermelon pink.
At first I was also going to pipe in a section for the white but I didn't want the white to smear into the pink and green while I smoothed the cake.
After the cake was smoothed, I marked a line about an inch from the bottom.
And then scraped out an area for the white icing.
I piped some white icing into the gap.
And then gave it a quick, final smoothing with a bench scraper. There is a little smearing of the white into the pink and green, but it is not too bad.
Now onto the little sliced watermelon decorations. It would have been easy to just cut out circles of pink, white, and green and stack them on top of each other, but I didn't want the watermelon slices to have a stacked look; I wanted all the colors to be flush and level with each other.
I used a set of nesting circle cutters, and cut out a pink circle from my fondant. Then using that same circle cutter, I cut out a circle from the white fondant. I dropped the pink circle into the hole in the white fondant. There was a little gap between the white opening and the pink circle, but I just gently worked them together till the gap was gone. Then I used the next larger circle cutter and cut a circle in the white.
Then I did the same thing with the green. I used the cutter that I used to cut out the white circle and put a hole in the green. I removed the green circle and replaced it with the white and pink circle. Again I gently eased the green into the white to remove the gap.
Then I used the next larger circle cutter and cut out the green.
I cut the circle into quarters using my Super Slicer.
And then place tiny pieces of oval shaped black fondant for the seeds. Don't they look cute.
I stacked my cakes, using Extra Wide Fat Bobo Straws for support. The straws work just as well as wooden dowels, and the straws are so much easier to cut. I placed some seeds on the bottom tier, and the watermelon quarters on the top tier. Sorry about the messy look of my top tier. I don't know why I couldn't get it smooth.
For the topper, I mixed some tylose power with the left over fondant and smashed the colors together. FYI: The tylose power turns the soft pliable fondant rock hard, and will allow the finished topper to stand up on its own.
I cut out the number 1 and added some seeds to it. I know I should have had less green at the bottom but the fondant had gotten so stiff I couldn't take it apart and do it over.
I made a base for the topper out of some extra green and glued the two pieces together with some green candy melts. Candy melts make great edible glue!
I made a little watermelon, some yellow flowers, and some green and brown vines to cover the base. Again -- too much green at the bottom of the number 1 but too late to do anything about it.
So here is the finished cake, and with all the watermelon slices on the top tier you can't even tell how sloppy the smoothing job was. LOL. And I don't know why I didn't cover the cake drum with white fondant. For some reason I thought the silver would look okay. I used the extra watermelon slices on the cake drum, so I guess the silver doesn't look too, too bad.
Happy Decorating,
Carol
Supply List:
14" Black Cake Drum
Scalloped 8" Cake Boards
Fat Daddio 5" Cake Pans
Wilton Rose Food Gel
Terra Cotta Food Gel
Ivory Food Gel
Wilton Leaf Green Food Gel
1M Open Star
Black Fondarific Fondant
Five Petal Flower Cutter
Acrylic Cakes Rounds
PME Bench Scraper
Wilton Line Marker
Nesting Circle Cutters
Super Slicer
Extra Wide Fat Bobo Straws
Tylose Power
Ann Clark Number 1 Cookie Cutter
Wilton Green Candy Melts


No comments:
Post a Comment