Showing posts with label Fondant. Show all posts

Wednesday, September 20, 2017

Minion Hawaiian Hula Skirt Cake

Don't you just love those Minion???  
So adorable, so amusing, 
and soooo tasty when they are in cake form.


Another of my cousins requested this cake for her daughter's second birthday.  The birthday girl is in love with Minions, and since I love Minions too, this was a very fun cake to make.

If you have read any of my other posts, you know that time management is my Achilles heal: things always take 3 times as long as I expect them to.  So to get ahead of the curve, I made a few of the cake decorations in advance.

<< Disclosure: We are a participant in the Amazon Services LLC Associates Program, an affiliate advertising program designed to provide a means for us to earn fees by linking to Amazon.com and affiliated sites.>>

For the coconut bathing suit top I just cut out a circle from brown gumpaste, and then scored and cut the top of the gumpaste to make it look fuzzy and hairy like a real coconut.  I kept it in the cookie cutter so it wouldn't pull out of shape while I slashed up the top. 


Then I put it on top of a light bulb while it dried so it would have a "C" cup instead of a barely "A" cup.


Next came the Minion goggles, again out of gumpaste.  Here is a view of the back side of the goggles.  I don't have a picture, but to make sure the goggles would wrap snugly around the finished cake I placed the piece on the curved side on an 8" cake dummy while the gumpaste dried. After it dried, I painted it with some edible silver luster dust that I mixed with vodka to form a thin paste.  The luster dust made the goggles really shiny and sparkly.


The flowers were also gumpaste.  I used the FMM Hawaiian flower cutter set and some Wilton stamens for the center.


The cake itself was a two tiered, double barrel, 8" tower of white almond goodness.  The bottom tier was three layers, and the top tier was 4 layers counting the carved layer that made the dome shaped head. 


For the base of the top tier I used a foam core board instead of a regular cardboard round.  The foam core is more expensive, but it is also much, much sturdier than cardboard (especially when the cardboard gets damp and soft and starts to bend).  In my mind the extra 2 bucks is worth the price. 


In total the cake was about 11" high.  


Next comes the fondant.  I used Mona Lisa Fondant for this cake and tinted it using Wilton's Golden Yellow.  This is a great fondant if you live in an area with high humidity.  It stays dry as a bone and doesn't get clammy or gooey even on the most humid days.


Okay, time to start decorating.  First I made some hands, feet, and spiky hair pieces.


Made the eyes too...


Then I started cutting leaves for the grass hula skirt.  I actually made three different shades of green, but I guess I didn't make the shades different enough cause once they were on the cake they all looked the same.  I used a generic Wilton leaf cutter, and then cut the edges to make it look more tropical.


Before placing the leaves on the cake I marked the cake itself using a Wilton Cake Marker tool.  I did this to make sure my line stayed straight and didn't meander up and down as I moved around the cake. 


Then I just started placing the leaves.  When all of the leaves were in position, I places a narrow length of fondant on top of the leaves to simulate the waist band of the hula skirt.


I worked from the base up.  The legs/feet first, hula skirt next, then the coconut bikini top.  On the back of the Minion I looped the fondant strings for the bikini top to make it look like the strings were tied together.


Next came the mouth.  Hummm.... I didn't like the first mouth I put on the Minion so I took it off and just left the space blank till I decided on a new style of mouth to use.  Eyes came next.  I actually placed the eye balls inside the goggles and then placed the goggles and eyes onto the cake.  Once the eyes were positioned I removed the goggles and put them in a safe place.  I was afraid the fragile goggles would fall off and break while I was working on the cake!  I am somewhat of a klutz.


Next I put on an improvised mouth.  I really wanted an open mouth on my Minion.  Something with a cheeky grin and shining white teeth, but I settled on just a rope of fondant.  I also put a green head band on my Minion.  My gumpaste hibiscus wouldn't stay in place, so I needed something to hold the flowers up.  In hind-sight I should have put the flowers on a toothpick so I could stick them directly into the cake, but DUH, I forgot.


In the end the head band held the flowers in place, so no biggie.


The arms went on last.  I thought I would have a problem keeping them in place, but surprisingly the top of the floppy arms stuck to the main cake with just a touch of water.  I just used a little bit of plastic wrap to keep them away from the body as they dried,

So here is the finished cake.  I pulled another all-nighter with this cake, but the birthday girl seemed happy.  (Even though the goggles were positioned a little crooked and one eye lid was a bit droopy.  How come I never see these things till I look at the pictures!!!)


Happy Decorating,

Carol

Sunday, August 27, 2017

Gunging 2 - Sugar Spackle For Your Less Than Perfect Fondant Cakes

For her 17th birthday my niece requested a 2 tier cake with turquoise and white roses.  Sadly her cake just wasn't meant to be.  I didn't finish the gumpaste roses, one of the cakes collapsed in the oven, and the new fondant I was trying out had some serious issues.  Everything went wrong with this cake, so my frustration level was off the chart.  In the last 30 minutes I threw this together.  Nothing Pin-worthy, but good enough for family.


Beyond the collapsing cake, the biggest issue with this week's attempt was the fondant.  It was just released in the USA, and I had serious problems with it right from the start.  I finally contacted the company, and they agreed that there was a problem and offered to send me a new bucket.

But silly me I went ahead and used the "messed up" fondant.  Big mistake, cause this is what I got!!  


But actually I didn't worry too much about the TEN gaping holes in the fondant, because I had a secret weapon.  A secret weapon called Gunge.  Gunge is essentially sugar spackle for your cake.  With it you can cover up any imperfection with a quick dab of your finger and a swipe of your wrist.

The first step in this magical fondant cure is mixing up a batch of gunge ...
(Note: recipe is at the bottom of the post.)


Fill the holes in your fondant with a big dollop of the sticky paste...


And then scrape it off...


Easy Peasy.  You may have to do this a few times, but when you are finished, the hole is completely gone.   Can you even see where the original crater was??


What a difference a little gunge makes...


Disclosure:We are a participant in the Amazon Services LLC Associates Program, an affiliate advertising program designed to provide a means for us to earn fees by linking to Amazon.com and affiliated sites.


Gunge (recipe from  Kaysie Lackey at Innovative Sugar Works)

Ingredients:
 
200 grams  Fondant
15 grams  Whole Milk  (Soy Milk works too)
15 grams  Vodka

Directions:
  • Start out mixing 100 grams of the fondant will all of the liquid.  I use an electric hand mixer fitted with a whisk.  Be patient, this takes a while.
  • When the original 100 g of fondant gets incorporated into the liquid, slowing start adding pieces of the remaining 100 grams of fondant until the mixture starts to look like stiff peak royal icing.  You don't need to add all the remaining fondant; just add enough till the consistency look right. 

Tools Used:
  • Sugar Smoother/Scraper by  Innovative Sugar Works - This tool is great for scraping the gunge from the cake.  It is light and thin, but super strong.  The scrapper has other uses, but it is the go-to tool for gunge repairs.  You can get Smoothers with a ruler inked on the side or Ink Free.
  • Sugar Shapers are another great tool to use with gunging.  If you have a gap between your stacked tiers, you can pip the gunge in the gap and smooth it out using the Sugar Shapers.
  • An the best tool of all the the TurnTable Expander.  When draping the fondant over the cake, my regular turntable is not large enough to hold all the extra fondant that pools at the base.   The TurnTable Expander gives you an extra 8 inches of working space. The Expander fits my Cake Boss Turntable perfectly, but Innovative Sugar Works now sells their own turntable.
  • And, No, I don't work-for or have any relationship with Innovative Sugar Works.  As a hobby baker I just love their products.

Note 1: You can also half or quarter this recipe.

Note 2: If you use just water or just vodka as the liquid, the gunge patch will have a shiny appearance and stand out from the fondant around it.  The milk is used because the fat in the milk gives the gunge patch a matte finish that will make the repaired area blend seamlessly into the surrounding fondant. I have also used Soy Milk and it works just as well as the whole milk.

Note 3: The vodka is used because it quickly evaporates when exposed to air so it helps the repaired area dry quickly and lose its stickiness.  If you use water, the gunge will stay sticky for a much longer period.

So when your fondant is less than perfect - just  GUNGE  IT and forget it!!


Happy Decorating,

Carol


Wednesday, July 5, 2017

Blue Morpho Butterfly in Gum Paste

Disclosure: We are a participant in the Amazon Services LLC Associates Program, an affiliate advertising program designed to provide a means for us to earn fees by linking to Amazon.com and affiliated sites.
 
It is the time of year for engagement parties.  Congrats to my nephew Bradley and his fiancee, Kristen.

Kristen is a fabulous artist and a lover of all creatures great and small.  Including BUGS and REPTILES.  Interesting girl.  For her last birthday I made her a cake in the shape of an angry Leaf Beetle, but for her engagement party she wanted a more traditional cake with roses and a large Blue Morpho Butterfly.

Honestly she is the artist and not me, so I tried to get her to make/paint the Morpho that would adorn the cake, but she didn't take the hint.  In the end I struggled and came up with something that was at least presentable.


I started out by cutting 4 individual gum paste wings using guides I made from wax paper.  I smoothed the edges of the gum paste, and then cut shallow lines to represent the markings on the Morpho's wings.  As a final step I inserted floral wire into the wings.


Here are the 4 wings waiting to be painted.


The Morpho butterfly is mostly blue with some iridescent teals and purples.  I started out paining the center section with some Wilton Teal food color gel.  I mixed a little bit of gel with some vodka and then just painted it on.


Next I added some AmeriColor Electric Blue


And finally I trimmed the edges in Wilton Black


Once the paint was dry, I used the embedded wires to twist the wings together.


And then I built a body on top of the wires.  I also added some sparkly gems to the edges to mimic the white spots on the Morpho's wings.


Then I painted the body black, and inserted some thin wire for the antenna.


Sadly, the twisted floral wires weren't strong enough to hold the butterfly wings together, so I had to use some hot glue to hold everything in place.  I also hot glued a wire loop on the back so I could hang the butterfly from the cake.

So here is the original sketch from the bride-to-be...


And here is the finished cake. She wanted the colors to be Coral and Turquoise.  In the beginning I thought it was a bold and inventive combination, but now I realize they are the trending colors.  <<I am so out of the loop.>>   I also added a few more flowers than her sketch showed.  I had some extra gum paste roses, and I felt bad about throwing them away and not using them on the cake.


So all in all it turned out well.   Congratulations Brad & Kristen. Ya'll make such a cute couple.


Happy Decorating,

Carol 


Sunday, June 18, 2017

Ombre Nautical Wave Cake with Sailboat - Happy 1st Birthday, Duke

Disclosure: We are a participant in the Amazon Services LLC Associates Program, an affiliate advertising program designed to provide a means for us to earn fees by linking to Amazon.com and affiliated sites.

My latest adventure in cake decorating was a nautical themed cake for my sister-in-law's sister's step-grandson.  Does that make sense?  The birthday boy's name is Duke and he was turning 1.  Happy Birthday Duke!!

Duke's mom gave me a picture from Pinterest and asked, "Can you make this for me."

I happily said, "I'll try..."


Duke's mom seemed happy with the finished cake, and  I was really impressed with her decorating abilities.  She went all out with the nautical theme, and everything looked amazing.


Now onto the construction of the cake - the fun part!!!

I baked the cakes a week prior and froze them.  The day before the party I made the icing and started stacking my frozen cakes.  On my last big party cake (a gold engagement cake) I had a problem with icing bulging from between the layer and pushing the fondant out like an inter-tube.  It was not an pretty sight!!  During the party I kept trying to smooch the fondant and push the bulge back into the cake, but sadly all my efforts were in vain. But happily the party was dark, so no one noticed my bulges.


After some research I figured that the reason for the bulge was that my "icing dam" was too skimpy.  The weight of the cake layers above squeezed the filling past the dam which in turn caused the bulge in the fondant.  Lesson Learned!

So on this cake I used some extra firm icing for the dam, and piped a barrier that was really wide and high. I also followed the directions from the Krazy Kool Cakes videos on YouTube and placed the dam a good 1/2 inch away from the edge of the cake.  At the time I didn't have a big enough piping tip so I just used a standard coupler (without a tip attached).  My hack worked fine, but I have since gotten a round Wilton Tip #2A to make the dam.


For this cake I also tried a different buttercream  recipe - one from Edna De La Cruze via Krazy Cool Cakes.   Edna has one recipe for a firm/crusting buttercream that is all shortening.  The firm buttercream is used for dams and to ice the outside of the cake.  The second icing is a softer, creamier version made with butter and shortening that is used as filling and for crumb coating.  I'm not a big fan of American buttercream (too sweet and greasy feeling), but I have to say I really liked Edna's version.  It is lighter, fluffier, and noticeably less sweet then others I have tried.  The recipe uses High Ratio Shortening, and I now realize it is important not to substitute this ingredient with regular vegetable shortening because the High Ratio Shortening makes a real difference in the taste and texture of American Buttercream.


After stacking comes the crumb coat: ice the top, fill in the 1/2 inch gap between the icing dam and the edge of the cake. and then a final crumb coat on the sides.  I made the final crumb coat with a light blue buttercream just in case any of the crumb coat peaked through the blue fondant waves that would cover the sides. 


Next comes the fondant.  I used Renshaw white fondant on this cake, and it took about 3 lbs of fondant to cover a double barrel 9" round cake that was about 8" tall, and a 7" round cake that was about 6" tall.

The original cake design called for the top of the top tier to be white.  I'm a little cheap and I didn't want to waste fondant on the sides, so I just covered the top and let the white fondant hang down the side about 1/2 inch.  Notice that I didn't spend any time smoothing the top and the sides.  The sides would be covered in fondant waves, and the top was supposed to be choppy water!  So no worries about the rough spots. 


The first row of waves at the top of the cake are white.  I cut the waves free hand.  Using an X-acto knife I cut the bottom edge straight, and then just cut a wave pattern in the upper part.  I also kept the length of the waves short: about 4-5 inches each.  At first I cut longer lengths, but this didn't work well.  The longer pieces were hard to position and they kept stretching and pulling out of shape.  And with the longer pieces I couldn't get the crests and troughs of the waves to line up correctly.  I kept getting crests on top of crests, which didn't look very good.  So in the end I just cut short pieces with 2-3 peaks on each length.  I also tapered each end so they came to a point.


After the first white row of waves, I mixed a little Wilton Teal food color gel into the white, and gradually made each successive row darker.  Towards the bottom of the top tier I started adding Wilton's Royal Blue.  Also notice the little balls of paper towels I used to prop up the tips of the waves sticking up over the top of the cake.  The "waves" kept flopping over so I did this just till the tips firmed up and could stand up without drooping.


Here is the top layer all finished.  I went a little overboard with the number of rows.  Some of the waves are just a little too close and cramped.  I probably could have used half as many rows and it still would have looked fine.


Next comes the second tier.  When I colored the fondant for the bottom row of waves on the top tier, I made enough to cover the top of the second tier in the same color.  Again I only covered the top and about 1/2 inch down the side. I also used the Wilton Cake Marking Tool to put guide lines around the cake.  These lines made sure that my waves stayed level and didn't start to angle down the cake.


Getting close to the bottom.


Toward the bottom of the cake I started to run out of Royal Blue food color, so I added Wilton's Violet to the mix.  The mix of Violet and Royal Blue really gave the bottom waves a rich, dark color.  In hindsight I should have started adding a touch of the Violet color midway down the bottom tier.

Then I stacked the cakes.  There are a few gaps between the top and bottom tier. :-(


Originally I planned on putting a ribbon around the base of both tiers, but the ribbon just didn't look right. The colors didn't match because the ribbon was a navy blue and the fondant was more teal and violet.  And stupid me, I didn't save any of the tinted fondant I used to make the last row of waves on each tier.  No way could I reproduce the color, so I just pushed and stretched the fondant to fill in the gaps.  I also think the top tier kind of sank into the bottom tier which also got rid of the gaps.  Oops.

Next I assembled my sailboat.  The boat, sails, and flag are made out of gum paste, and the "masts" are wooden BBQ skewers.  For the teal stripes on the smaller sail I first tried to paint them on.  It didn't look very good, so I used my extruder and created thin, flat strips of teal fondant that I wrapped around the sail. The "1" on the cake came from a Funky Alphabet Cutter Set.

Then I put a lump of gum paste inside the boat, trimmed the skewers masts to the correct length, and stuck them into the gum paste lump to create the holes.  I then removed the sails and let the gum paste harden before I reinserted the sails.  I also "glued" the skewers to the lump with a little melted white chocolate, and I also glued the two sails together using the same melted chocolate.


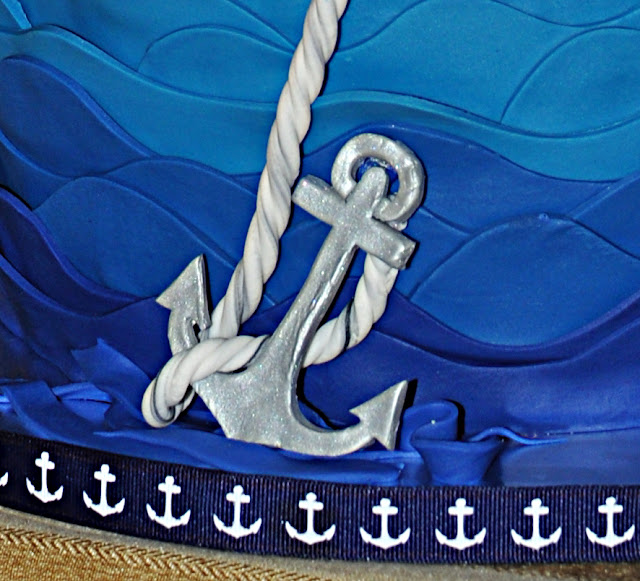
Then I placed my boat on top of the cake.  I cut out thin strips of teal and white fondant and surrounded the base of the boat.  I thought it kind of looked like splashing water.  Next I placed the anchor and draped a fondant "rope" from the anchor to the boat.  I used my extruder to make the rope, but the extruder couldn't make one piece of rope long enough to go from top to bottom so I just joined the two pieces and hid the join behind a "wave".


I also didn't like the blob of white gum paste that was holding the masts of the two sails, so I twined some "rope" around that area to hide it.Where the two sail meet at the top you can also see a bit of the white chocolate glue sticking out.  I should have cleaned it up, but I just said "Oh Well."  I also didn't like the gap between the white ball on top of the mast and the fluttering flag.  Too much of the wooden skewer was showing, but at this point I was afraid that cutting the wood would cause the whole thing to fall apart.


And strangely I think my favorite part of the cake is the rope.   I really like how it came out.  It is just white fondant that I dabbed with a little black food color and then pushed it thorough a clay extruder fitted with a 3 ringed, clover leaf looking blank.  After the rope came out of the extruder, I twisted and stretched it to make it look like rope.


I have read that a decorated cake drum really makes a cake stand out.  I was going to do something fancy with the silver cake drum under the cake (maybe add sand to look like the ocean bottom), but like always I ran out of time.  So instead I just wrapped a piece of ribbon around the drum.  I also put some strips of fondant under the anchor to help hold it in place.  The anchor is gum paste cut out that I sprayed with Wilton's Silver Color Mist.  I was going to put a fondant "rock" beside the anchor and make it look like the anchor was caught on the sea floor, but my rock look more like dog poo so I tossed it.

So in the end I was happy with the cake, and Duke's mom and step-grandmother looked pleased.


And the cake itself was a hit too. Yummy White Chocolate Almond Cake.  And notice that there is no fondant on the sides of the cake.  When I disassembled the cake I just cut the entire length of waves fondant and peeled it from around the cake in one big piece.  It is so much easier to slice the cake without the fondant!!


Happy Decorating,

Carol