Showing posts with label a_decorate. Show all posts

Saturday, December 2, 2017

Volleyball Court Cake

2017 was my niece's last year on her high school volleyball team.  Go Lady Panthers!  She was the Libero all four years, and was awarded Defensive Player of the Year in her final year!  Go, Amanda!!

For her last Volleyball Banquet I decided to make her a special cake.
 

<< Disclosure: We are a participant in the Amazon Services LLC Associates Program, an affiliate advertising program designed to provide a means for us to ear fees by linking to Amazon.com and affiliated sites.>>

The most involved part of the cake was the volleyball itself.  I used the Wilton 3D Cake Pan and the included pattern to make the volleyball markings.  I first covered the cake with black Fondarific fondant. (The Fondarific is very pliable and it stays soft for a long time so it worked well on this 3D shape).  Then I cut out the blue sections and placed them on the round cake.
 

Then I placed the white strips.  The flat pattern didn't exactly fit the 3D shape, so I had to do some trimming of the white pieces.  I also wanted gaps between the white and blue pieces so the black fondant underneath would show.


Next came the main cake.  I used the Wilton 1/2 sheet cake pan, and made one side yellow and the other side chocolate.


Turning a slab of cake into a volleyball court was the fun (and easy) part.  I started with yellow Mona Lisa fondant, added some dabs of brown, and then twisted it in one direction to give the fondant a streaked look.


Here is the streaked fondant all rolled out.  At this point it is really starting to look like wood.  I guess I could have used it just like this, but I wanted to try out my new wood grain impression mat.


Just press the silicone mat into the fondant...


And lift off the mat to get that wood grain pattern.  Pretty cool, huh?!


Next I cut the fondant into strips.  I decided to use strips instead of one big piece of fondant because it was easier.  I didn't want to struggle with a huge 22 x 28" piece of fondant so I just made small 1-1/2 x 9" strips.  Easy, easy, easy.


The strips of fondant were just positioned on the cake.  I was finished in just 30 minutes, and no stress, panic, or hair pulling from trying to place and smooth a monster piece of fondant.


I made markings to represent the lines of the volleyball court...


And then came the net.  This was the most frustrating part of the cake.  My fondant extruder broke, so I had to roll all the string by hand.  What a PITB.


For the lettering on the volleyball I used some FMM Funky Cutters in Uppercase and Lowercase.   I wanted to put the word "volleyball" on the ball itself, but it won't fit, so I put it on the top of the net.

For the final assembly I simply placed the volleyball on the main cake (secured with some wooden skewers), added two Lineman Flags for a pop of color, and Ta-Da, I was finished.


All-in-all it was a pretty easy cake to make. 

Happy Decorating,

Carol

Monday, November 6, 2017

Nothing but BARK - Woodland / Stump Cake

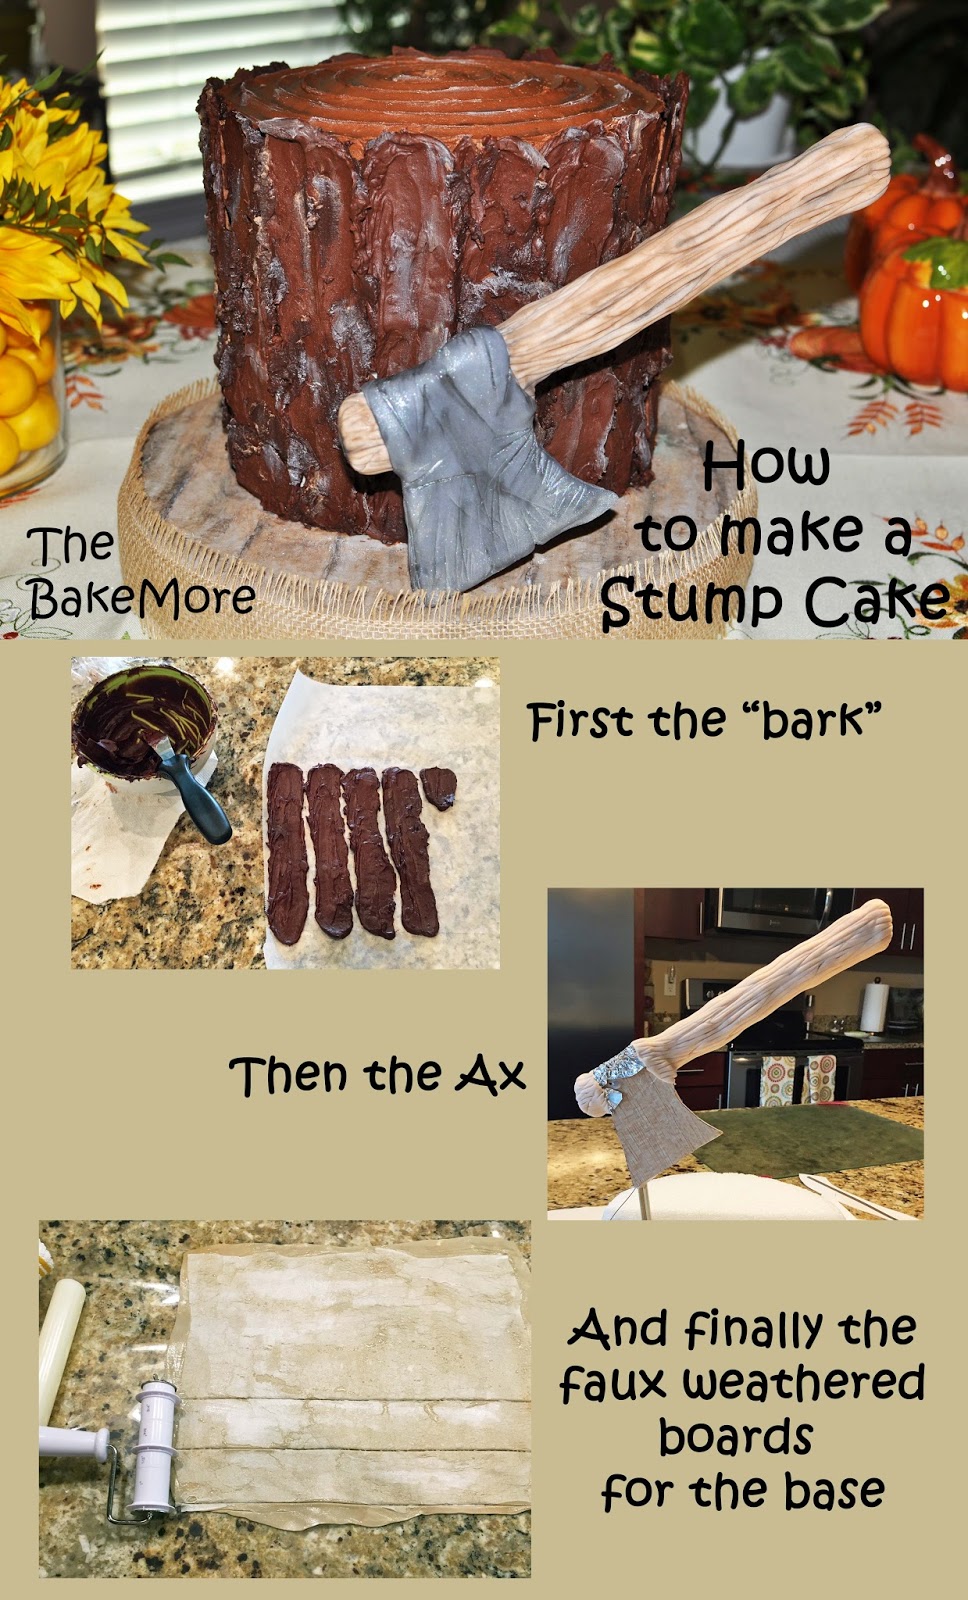
Stump Cakes are all the rage for "guy" parties.  Everything from Baby's First Birthday to Bro-Showers to Grand-Paw's 80th birthday are going with the Woodland theme. So when a friend request one I jumped on the chance to give it a try.  And despite my initial angst, the cake was surprisingly easy to make.


There were three parts to this cake: 1) the  Ax, 2) a cake board that looked like wood and was thick enough to hold up the Ax, and 3) the "bark" of the stump.  

To me the "bark" was the biggest unknown.  I researched a few different ways of making the bark (chocolate curls, fondant ropes, bark impression mats, etc), but decided on the easiest method I could find: melted chocolate.  

I just melt some chocolate (I actually used some ganache I had leftover from a previous cake), and using a offset spatula smeared lines of chocolate on some wax paper.  My cake was 7-1/2 inches tall so I marked off lines on the wax paper to make sure my chocolate lines were long enough.  I made the surface extra lumpy and uneven, because, hey, when have you ever seen a smooth piece of tree bark. And make sure you make them relatively thick - if the chocolate is too thin it will crumble when you peal them from the paper.


After the wax paper was filled with "bark", I popped it into the freezer till it harden.  Then carefully, cautiously I removed the harden strips of chocolate from the paper.  Once free from the wax paper, I stuck them to the side of the cake using chocolate buttercream as glue.


How easy is that?  And don't worry if the strips break into pieces.  Just slap the pieces anywhere you want.  The beauty of a stump cake is that you DON'T want it to look perfect.


And the gaps?  No worries there.  If you end up with large gaps between your chocolate strips...


Just use a paint brush and fill in the holes with a little bit of melted chocolate.  But what if your melted chocolate is a different color from your chocolate bark strips??  Well, that's all the better.  The various shades will make your Stump Cake look even more realistic.


<< Disclosure: We are a participant in the Amazon Services LLC Associates Program, an affiliate advertising program designed to provide a means for us to ear fees by linking to Amazon.com and affiliated sites.>>

Next to give the bark a little "life", I painted on some edible luster dust.  I used brown and black and some white. I tried green for a moss-like effect, but it didn't look very good.


I went a little overboard with the white, but after a night in the refrigerator the white dulled down a bit.

PS: Here is the top of the cake.  I just swirled the "tree rings" into the buttercream using a spoon.


The second challenge to this cake was the Ax.  I thought about using a real one, but they were too expensive (and not really food safe).  So I made my own!!    I built an armature out of balsa wood and aluminum foil, and then covered the handle section in tan fondant.  I scored the length of the handle to give it a wood-like look.


Next I used black fondant to make the ax blade.  I scored random lines and dings in the soft fondant to make the blade look old and used.


A little powder food color in black and brown to make the blade and wooden handle look more life-like...


And then a final touch of edible silver powder food color to give the blade a shiny look...


The final challenge of this Stump Cake was the board under the cake.  I wanted it to look like wooden planks, so I used a technique I found on YouTube called  Weathered Fondant Effect Using Wafer Paper by Kass. Again the technique is so easy and yet it gives amazing results.  The finished fondant board looks like real weathered wood.  Here is an example from the Bear Head Smash Cake that I also made for this Woodland Theme party. This board was made with gray fondant.


The first step to making the weathered board is to choose the fondant for the base color.  For the Stump Cake I wanted a brown toned board, so I gathered up a bunch of fondant scraps in all different colors and squished them together.  I know it looks like some strange sea creature, but it is fondant.


Roll out the fondant to fit the size of the edible wafer paper, and then trim the fondant to fit the paper.


Wet the wafer paper with water.


Use a small roller to roll the fondant and wafer paper together.   The fondant will stretch and thin as you roll it, but the wafer paper can't stretch so it will rip and tear instead.


The more you roll, the more the wafer paper will be shredded and the more the "wood" will look weathered.


When you get the look you want, use a strip cutter to cut the fondant into evenly sized "planks".


Then simply place the planks on your cake board.  I wasn't sure if I would have enough of my "sea creature" colored fondant, so I skimped and left the center of the cake board empty.


I let the board dry overnight, and then I added some additional color with the edible powder food colors in black and brown.


And below is the finished "weathered wood" fondant board.  A night in the refrigerator also increased the "weathered" look.  The cold air really dried out the wafer paper and made it curl up even more.  This technique is so neat.


So this ends my Stump Cake adventure.   Give it a try for your next Guy party, it really is a fun (and easy) cake to make. 


Happy Decorating,

Carol


Sunday, November 5, 2017

Cutest (and Easiest) Bear Head Cake

A friend asked me to make a Bear Head smash cake for her 1 year old's birthday, and I say so myself it turned out soooo cute.  Best part is - it was AMAZINGLY easy to make.


 << Disclosure: We are a participant in the Amazon Services LLC Associates Program, an affiliate advertising program designed to provide a means for us to ear fees by linking to Amazon.com and affiliated sites.>>


First I baked three 7" cakes.  (I like to use Fat Daddio's pans and bake even strips to make sure the cakes bake up flat and even. ) I stacked 2 layers for the head, and then cut out circles from the third layer for the snout and ears. (I had to test different sizes till I found the one that looked "right" next to the head.) I cut out little arcs from the ears to make them fit flush with the head.  Then I iced the main head in chocolate buttercream and then iced the snout and ears in a very light shade of brown buttercream.


I used the little arcs I cut from the ears as the eyebrow ridge.  In hindsight I should have cut the arcs in half so they weren't as tall.  After I iced the eyebrows, my bear ended up with a Neanderthal ridge. :-)

The eyes and nose I made from black fondant.  As a last step I painted the eyes and nose with corn syrup to make them shine and placed a little with ball of fondant on each eye to make them sparkle.


Next came the piping of the "fur".  I used a Wilton 233 grass tip, and a very soft chocolate buttercream icing.


It took about 90 minutes to pipe the fur, but I had to stop a couple of times to refrigerate the icing because it was getting too soft.  You know it is getting too soft if you get a mushy blob instead of individual points of fur.


I just kept piping and eventually finished the cake.   Too cute.  Many thanks to the different bear cakes on Pinterest for the inspiration.


And if you are wondering about the board -- well it is fondant and not real wood!!  You make it with fondant and rice/wafer paper and a little bit of powdered food color.

Here is a link to a quick YouTube video by Cakes by Kass showing the process. It really is super easy


Happy Decorating,

Carol