Tuesday, November 14, 2023

Sports Ball Cake

This Sports Ball Cake combines the biggies - Football, Baseball, Basketball, and Soccer.  Humm I guess I should have included a volleyball-forgot about that one.


The cakes are an 8" at the bottom, and 6" in the middle, and a 4" sphere on the top.

To make the curved marks on the baseball tier, I used a bowl that was the same height as my cake.  The marks are a guide to where the red stitch marks are going to be placed.


I then piped a thin line of brown icing into the marks and along the top and bottom edge of the cake.  This will form the seam below the red stitching.  It is okay to be sloppy with the piping.  I also tried to spray some brown petal dust along the seam to give it a "dirty" look.  I put the petal dust in a spray bottle but it didn't work like I wanted.  It ended up a little splotchy. 


<< Disclosure: We are a participant in the Amazon Services LLC Associates Program, an affiliate advertising program designed to provide a means for us to earn fees by linking to Amazon.com and affiliated sites.>>

Next I used a JEM #2 strip cutter to cut some Wilton Red fondant strips and then cut them about 1" long.  


I folded the 1" strip into a 90 degree angle and placed them along the seam line.  Notice the texture on the white cake below?  I always use a Viva paper towel to smooth the sides of my cake.  Normally  I use the smooth side of the paper towel, but this time I used the rough side to give the surface of the cake more texture.


For the football tier I used a Bounty paper towel to give it an even rougher texture than the baseball cake.


I made a cutter for the center section (sorry I don't know what it is called) using my 3D printer and the pattern below.  But if you don't have a 3D printer you can just use a paper template.  I used Wilton Brown, Black, and White fondant.  I again used the JEM #2 strip cutter to make the boarder around the base of the football cake.   For the white stitching I used the JEM #3 strip cutter.  You can cut the strips by hand rather than using the strip cutter, but I like the ease and precision of the strip cutter.


The basketball cake at the top was the hardest part of the entire cake.  I used two Fat Daddio 4" hemisphere pans to bake the cake.  


And then I frosted it in orange buttercream.  


I used a damp finger to smooth out the frosting, but to me it still looked a little messy.  And I used my trusty JEM #2 strip cutter to make the black lines on the basketball.


When the cake was finished I thought the sides of the baseball tier looked a little plain, so I added some "All Star" fondant lettering in red and blue.


Here is the pattern:


For the little sports balls I used a plastic mold and just pressed the fondant into the mold.  After removing the fondant, I just drew the black accent lines on the soccer and basketball with an edible black marker.  I used a marker with a wide tip to get the bold, black lines.  On the baseball I used a red marker, and the little football has white fondant accents.

So here is the finished cake.


And I made a few matching cookies too.


Happy Decorating,

Carol


Sunday, November 12, 2023

Mermaid Ombre Cake

The customer wanted a "simple" mermaid / Under The Sea cake, but like always things seem to get out of hand.  I tried to control myself, but if I see a blank spot, I need to put something in the void.  I'm sure I have some kind of OCD.


For reference, the cake on the bottom is an 8" and the cake on the top is a 6".  It serves about 36 (according to the Wilton serving chart.)  

<< Disclosure: We are a participant in the Amazon Services LLC Associates Program, an affiliate advertising program designed to provide a means for us to earn fees by linking to Amazon.com and affiliated sites.>>

The three ombre colors are:

  1. AmeriColor Soft Pink (with a touch of Regal Purple), 
  2. AmeriColor Regal Purple, and 
  3. AmeriColor Royal Blue (with a touch of Regal Purple)

To get the ombre look, I just stacked the three colors on the side of the cake and smeared them together using a bench scraper.  To get the "air-brushed" look, I lightly sprayed the center section of each tier with Wilton's Violet Color Mist Food Spray .  The color mist just softens the line between the different colors and gives it a wispy look.  Originally I planed on using Cocoa Butter Spray Velvet, but when I did a test, it didn't look very good.  The cocoa velvet was too dense and opaque, and had too much texture.  I liked the color mist a lot better.  So wispy.


For the decorations, I made everything using a
Cricut Cutter and regular card stock paper.  I found the free downloadable SVG patterns at The Pineapple Paper Company.   It saved a lot of time not having to design my own patterns.  But in hindsight I should have used some kind of vinyl or  greaseproof paper for the decorations.  Wherever the paper touched the icing, big grease spots formed on the card stock.  I had to back the paper with hot glue to prevent it from touching the cake.  But looking at the finished cake, the gap between the decorations and the cake gave it a nice look.


So all-in-all a pretty easy cake.  Wish there were all this stress free.


Happy Decorating,

Carol

Sunday, October 8, 2023

Toilet Paper Roll - Crap You're Old Cake

I made a few toilet paper cakes during the pandemic (it was a big joke), but now I'm making toilet paper cakes for the people turning 40 and 50 and 60!  Crap You're Old!


<< Disclosure: We are a participant in the Amazon Services LLC Associates Program, an affiliate advertising program designed to provide a means for us to earn fees by linking to Amazon.com and affiliated sites.>>

This was a really easy cake to make.  The cake itself is 10" (about 5-3/4" tall) and it is sitting on a 14" white cake drum.

As usual I forgot to take pictures as I was working so I just took some pictures of all my supplies.

First, I made the "Crap" sign.  I used Wilton White and Chocolate fondant mixed with some Gum Tex Powder.  The Gum Tex (also called CMC or Tylose) will make the fondant dry rock hard.  

First I made a few shades of brown and then mixed the powder into the different shades. Then I marbled/blended the shades together making sure not to mix them too much and lose the shading.  Then I rolled flat, textured with a wood grain impression mat and then cut into planks large enough to fit the size of the letters.  I cut a thick, narrow piece for the post and embedded a long, thick bamboo skewer into the fondant.  Once everything dried, I "glued" the post to the boards with some melted dark chocolate candy melts and let the candy melts harden.  After that I added the Art Deco style lettering in black fondant.  I also dusted the sign with some white, brown, and black petal dust to give it a little more color.


Next I prepared the cake drum with the black and white checker board pattern.  I rolled the fondant thin and then cut the squares using a multi-cutter square cutter.  Prior to placing the squares, I dabbed the board with a little piping gel to help the fondant stick to the drum.  But just use a very, very small amount of piping gel.  You don't want it oozing - that makes a huge mess.   With all the squares cut I just started placing them on the drum.  And I didn't cover the entire drum.  I only placed enough squares to cover about 2-1/2" around the outer edge of the drum.  No reason to decorate the part that would be covered by the cake.

After the drum was decorated, I placed the frosted cake on the drum and started decorating.  First step was the top.  I just rolled out white fondant and then used a 10" acrylic disk to cut a circle to exactly match the size of my cake.  (Note I also used the 10" acrylic disk to frost the cake.) Then I just used regular circle cutters to make the smaller circular impression in the fondant.  When I needed circles larger than the cutters, I used my trusty acrylic disks.  I have these things in all sizes from 5" to 12".  I just placed the disk on top of the fondant and used a scoring tool to make the lines.  In some of the areas I didn't have a guide, so I just hand drew them in.  Here is a closeup of the top.  It doesn't matter if it looks a little messy, it is just toilet paper.  LOL.  I also cut out the white center area with a cookie cutter and filled it with a piece of brown fondant cut to the same size.


Next I covered the side.  My cake was about 5-3/4" tall so I rolled out piece of fondant about 6" wide and as long as I could make it.  I rolled the fondant out on a large silicone mat that had markings every inch.  I used a fancy designed impression mat to press the pattern into the fondant, and then used a long ruler and the markings on the silicone mat to cut the strip of fondant to the exact height I needed.  After the fondant strip was the correct height, I used a ruler and a "stitching tool" to mark the "sheet" of toilet paper.  Don't cut through the fondant with the stitching tool, you just want enough pressure to mark the line.  Once on the cake, you can go back over the line to deepen it.  To get the long strip onto the side of the cake, I rolled the fondant onto a small rolling pin.  I dusted the fondant with corn starch to keep it from sticking together. 


Then I just unrolled the fondant onto the side of the cake.  I had to make two panels of fondant to cover the entire cake.  I just joined the piece together at a "sheet" of toilet paper.  Once the side was covered, I used the stitching tool to deepen the lines.  I also dusted the seam with a very, very light dusting of brown petal dust.  But do this with extreme care because too much brown dust will make your toilet paper look dirty. 


For the front  I just folded the edge to look like draping toilet paper, and then inserted my sign into the center.  I added a black ribbon to the edge of the drum, and it was finished.  See how easy that was!


Happy Decorating,

Carol

Saturday, June 3, 2023

Cars Inspired Cake and Cookies

Disney Car themed parties are always a request from my young cousins.  Here is one with a mash up of Mater Tow and Lightening McQueen. 


And Cookies too...


For the cookies, I made some cutters using my trusty 3D printer.  I love my printer.  If you want to read more about 3D printers and how you can make your own cookie and fondant cutters, click HERE.

Below are the line drawings that I used to make the cutters: face, lightning bolt, and Route 66 sign.  I used the "face" cutter for both the cookie dough and the fondant cutouts on the cake.


<< Disclosure: We are a participant in the Amazon Services LLC Associates Program, an affiliate advertising program designed to provide a means for us to earn fees by linking to Amazon.com and affiliated sites.>>


The cake is made with an 8" bottom tier and a 5" top tier.  They are both frosted in American Buttercream with fondant accents.  For the top I used Wilton's No-Taste Red food gel, and for the bottom I used Wilton Chocolate Brown food gel.  For the fondant I used Wilton's Red, White, Blue, and Chocolate.   I was amazed at how closely the Wilton Chocolate food gel and fondant matched in color.  When I put the brown fondant on the brown buttercream, I could hardy tell where one stopped and the other started.  

For Mater Tow's mouth I just picked an image of a mouth I found on google and sized it to match the cake.  I used the paper templet to cut out the fondant pieces.  For the teeth, I mixed Gum Tex/Tylose Powder with the fondant so the teeth would harden and protrude from the mouth.  The tow hook is made from Silver Shimmer fondant, and the lettering is made using FMM Tappits Funky Alphabet Cutter upper case.  

For the stars I just used a star cutter, attached them to thin 1/16" acrylic rods, and wrote the words using an edible marker

All-in-all an easy cake to make.

Happy Decorating,

Carol


Thursday, May 18, 2023

Confetti Cake with Flowers and Candy

Nothing says Happy Retirement/Birthday/Graduation like confetti!!  I just love confetti sprinkles.  They make everything just a little bit brighter and happier.


This is a 9" cake frosted in American Buttercream with confetti sprinkles scattered around the base and top along with flowers and lots of chocolate candy.  

<< Disclosure: We are a participant in the Amazon Services LLC Associates Program, an affiliate advertising program designed to provide a means for us to earn fees by linking to Amazon.com and affiliated sites.>>

This was an easy cake that I threw together at the last minute.  The flowers were left over from previous cakes, and the candy was all store bought.  The smaller pink daisies were made using a silicone mold, and I made the larger yellow daisies using a daisy plunger cutter.  

I made the topper using my Cricut Explorer.  I just use the Cricut to make simple things, but it is still a handy piece of equipment for a cake decorator.  I've also used it to make stencils for cake and cookie decorating.  

And those Confetti Sprinkles, I use them by the handfuls.  


Happy Decorating,

Carol

Berry 1st Birthday

 Here are some simple to make Berry 1st Birthday themed cakes.


The tier cake is an 8" bottom tier and a 6" top tier.  They are frosted in a pale pink American Buttercream and decorated with fondant strawberries.  I used this line drawing to create fondant cutters with my 3D printer.  I made two sizes: 1-3/4" and 1-1/2".  If you would like to read more about making your own 3D printed cutters, click HERE.


<< Disclosure: We are a participant in the Amazon Services LLC Associates Program, an affiliate advertising program designed to provide a means for us to earn fees by linking to Amazon.com and affiliated sites.>>

The strawberry is a cutter and embosser combined so I cut out the strawberry shape from red fondant and then embossed the little divots for the seeds. I tried painting the divots with white and yellow food gel, but that didn't look very good, so I just cut out tiny yellow circles and used those for the seeds.  It was very time consuming because I had 25 strawberries to decorate.  


I used a rose calyx shaped cutter to make the green calyx part of the strawberry, and added a little texture to the sepals using a veiner tool.   For the lettering I used FMM's Funky Tappits 3cm upper and lower case.

For the smash cake I baked two 8" round cakes, and carved them into the shape of a strawberry.  I frosted with a thick coating of white buttercream, and then added a thin coating of red buttercream on top of that.  I wanted to limit the amount of red buttercream because I didn't want the poor baby's face and hands to get too stained up with red food dye.


Normally I would have made the strawberry seeds out of fondant, but I was afraid the tiny fondant pieces would be a choking hazard so I made them out of buttercream.  I smeared a thin coat of buttercream on some parchment paper and froze the buttercream for 10 minutes.  Then I used a tiny heart shaped plunger cutter to cut out little seeds and placed them on the cake.  I should have used an oval cutter instead, but I couldn't find them in my bins of supplies.  Guess I need to buy more.


The buttercream defrosted and softened very quickly so I had to keep popping the buttercream strip in the freezer so it could harden up again. 

For the greenery on the strawberry I went ahead and used fondant.  The pieces were large enough that the baby could pick them up and gnaw on them if she wanted.  I just cut the pieces by hand and then used a random silicone veiner to give it some texture. 

So in the end this was a pretty easy cake to put together.  The hardest part was placing all the seeds/pits on the strawberries.  Next time I will just leave the little holes unfilled.


Happy Decorating,

Carol


Sunday, March 5, 2023

Pool Table Cake

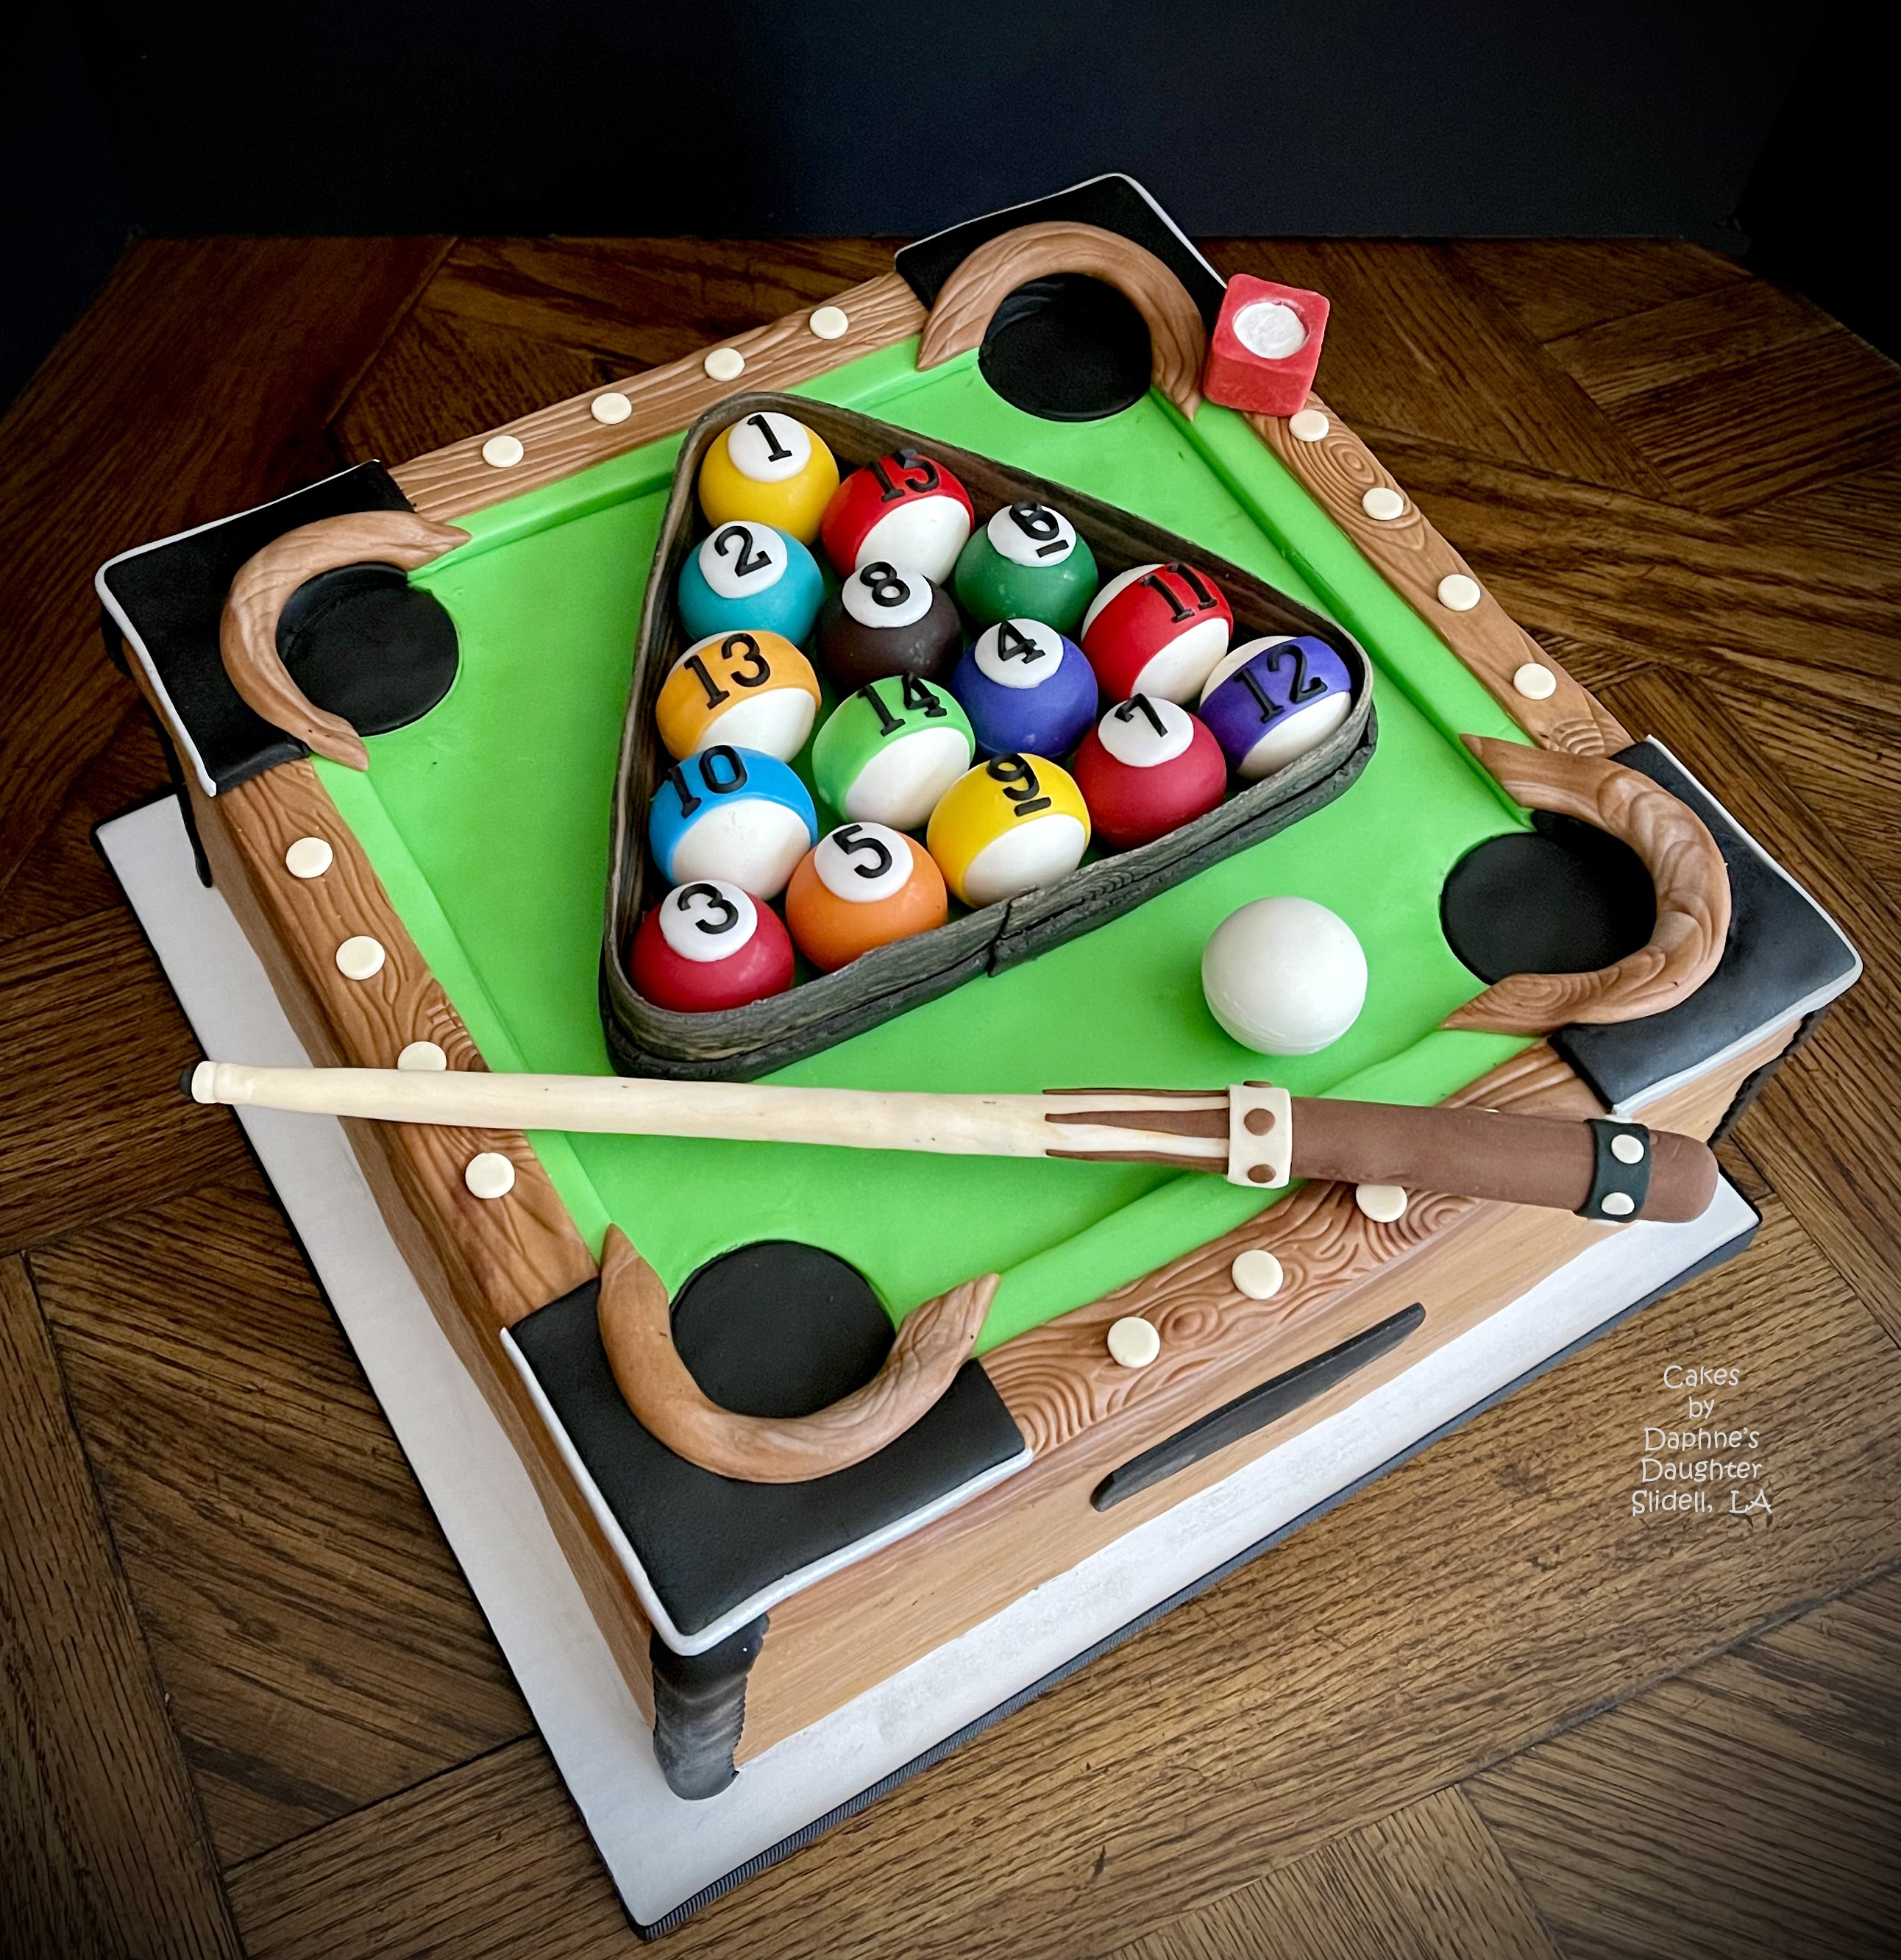
Would you call this a Pool Table or a Billiards Table?  When I googled the terms it sounded like "Pool" was the correct term so that is what I'm going with.  And I know the dimensions aren't correct.  And I know I should have 6 pockets instead of 4.  And I know the balls are too big for the size of the table.  But remember it is just a cake so I took some liberties!  At least I racked the balls up correctly.   


<< Disclosure: We are a participant in the Amazon Services LLC Associates Program, an affiliate advertising program designed to provide a means for us to earn fees by linking to Amazon.com and affiliated sites.>>

This cake is a 12"x12" square and about 5" tall which will serve 72 (according to the Wilton cake cutting charts).  I filled and stacked the cake and then coated with a thin layer of ganache.  I typically use acrylic disks to give my cakes perfectly straight sides, flat tops and sharp edges, but I didn't have 12x12 acrylic disks so I improvised and used cardboard. I covered the cardboard with Glad Press N Seal to make it easier to remove the board.  If you want to see how to use acrylic disks, you can click here.


Here is the cake with the fake acrylic disk removed and the Glad Press and Seal still in place. 


And here is the cake with everything cleaned up - look at those edges.  So if you don't want to invest in acrylic disks, just use cardboard cake rounds/squares instead.   After the ganache set, I transferred the cake to a 14" cake drum.   Note: For fondant covered cakes I use ganache instead of buttercream because the ganache sets up firmer and gives a better base for the fondant to stick to.  The ganache also doesn't transfer moisture to the fondant.  Fondant and moisture don't play well together.  If fondant gets damp it will become soft, oozy, and gummy.  When the fondant is in that state, it is almost impossible to cut.  


For the Pool Balls, I used a 1-1/2" sphere mold.  I used candy melts and then stuffed the inside with Vegan Salted Chocolate Chip cookies (so the Vegan family members could share in the goodies).


Here are the two sides stuck together.


For the stiped pool balls I used Bright White candy melts and then wrapped the sphere in a strip of colored fondant.  For the numbers I used FMM 1.5 cm Upper Case Alphabet and Number Tappit Set.   For the solid balls, I used different colored candy melts (yellow, blue, dark chocolate, green, red, and orange).  The circle is white fondant and I used the same number cutter.


And once again I forgot to take pictures as I decorated the cake.  I'm going to have to use a timer to remind myself to take picture.

Here is a side view of the cake...


And a closer look at the corner.  I wasn't too happy with the brown bumper guard.  It needed to be shaped differently so it didn't have that dip when it went from the black section to the green.  I should have fixed that.  Sigh.


In summary here are the steps I took to complete the cake -

  1. Covered the sides in brown marbled fondant.  I used a large woodgrain impression mat to give the fondant some texture.
  2. Covered the top in Leaf Green tinted fondant.
  3. Used a circle cutter to cut away the green fondant in the 4 corners and replace it with black fondant circles.
  4. Then I just started slapping decorations on the corners.  I had several examples of real pool tables and that caused me some confusion because I didn't really know what I wanted to do.  I had no set plan so I just stumbled around trying different things.  I spent WAY too much time decorating this cake.  LOL.
  5. After the cake was finished I made a (lumpy looking) pool cue.  Inside the cue is a long bamboo skewer that helps the cue hold its shape. 
  6. To make the rack, I placed the candy pool balls into position and then wrapped a 1-1/2" inch strip around the balls.  I lumped all the leftover brown, black, etc fondant together and mixed it with a ton of Tylose Power/ Gm-Tex so the fondant would dry rock hard.  Then I rolled the fondant flat, textured it with the impression mat, and then used a strip cutter to cut the 1-1/2" strip.  It needed to be about 25" long to wrap around all the "racked" pool balls.
  7. I also made a little cue chalk thingy just to add a splash of color on the brown table.
So not a hard cake to make, but strangely it was very time-consuming.  I guess that's what happens when I don't plan things out ahead of time.

Happy Decorating,

Carol


Tuesday, February 28, 2023

Spidey and His Amazing Friends Cake

I like it when a cake look complicated but is actually easy to make.  Take this cake inspired by the Spidey and His Amazing Friends cartoon.  It is a three tiered 10", 8" and 6" cake which would serve about 74.


<< Disclosure: We are a participant in the Amazon Services LLC Associates Program, an affiliate advertising program designed to provide a means for us to earn fees by linking to Amazon.com and affiliated sites.>>

The best (and easiest) part of the cake are the plastic Spidey and His Amazing Friends figures.  It is so much easier just to plop some plastic toys on the cake rather than trying to make them out of fondant.  I'm not a very good artist, so my 3D sculptures look sad and pathetic. 

For the bottom tier I cut the building shapes out of Wilton's white fondant mixed with Gum-Tex/Tylose Powder. The powder stiffens the fondant and makes it dry to a rock-hard consistency.  The more powder you add the quicker it will dry and the harder it will become.  I don't measure the Gem-Tex, I just dip a piece of fondant into the container of Gum-Tex so it coats the fondant surface, then I kneed the powder into the fondant.  I do this until the fondant is no longer sticky.  If a piece will be free-standing, I add more Gum-Tex, but if the piece just needs to be a little firm, I add less Gum-Tex.  

I made 3D cutters for the building shapes.  I love my Ender 3D printer.  If you want to read more about 3D printers you can check out this post.  

Below are the outlines I used for the buildings.  My bottom tier was about 4-1/2" tall, so I scaled the buildings so the largest was about 1/2 taller than the bottom tier.  If you don't have a 3D printer, you  can just cut the buildings out by hand using a Sculpey straight blade.  I mixed the white fondant with the Gum-Tex, rolled out the fondant, cut the shapes, and allowed them to dry flat.  I then used an edible black marker to outline the shapes and add the windows.  At first I tried drawing everything freehand, but my lines were so wobbly I had to use a ruler to make the lines straight. 


For the spider web I used the image below and just created the cutter from the outer edge.  The web lines were drawn using a finer tipped side of the black edible marker.


For the center tier, I tinted the buttercream using Wilton's No-Taste Red food gel, and used the pattern below for the eyes. The outer area was cut with Wilton's black fondant, and the center section with white fondant.  For the black ropes that make up the "web" on the center tier, I use an A.C.E. food safe extruder to get the ropes nice and even.  I'm not sure if the food-safe version is still sold (it had different nut/bolts than the clay extruder), but you can get the polymer clay version here.  You can also use just a regular (cheap-o) clay extruder, but they tend to break after just a few uses.  Amazon also sell the sturdier gun style clay extruder, but I'm not sure how well they work.  I've been using my ACE extruder for years without any problems, so I know that one work.


For the top tier I tinted white frosting a soft stone-gray color, and then made fondant shaped bricks out of a slightly darker gray.  I put the structure on top of the tier to help hold Spiderman as he swings on his web.  The web is just embroidery floss.

The cake sit atop a 14" cake drum, and the lettering is FMM Funky Alphabet in Upper and Lower case.

So all-in-all this was a pretty easy cake to construct.


Happy Decorating,

Carol