Monday, April 6, 2020

Star Wars Cakesicles

Why, oh, why do I let friends talk me into making Cakesicles!?#%!  They are a PITB to make.

For a friend's daughter's birthday party  I made Baby Yoda, Rey Skywalker with her blue lightsaber, R2D2, Darth Vader, and a Stormtrooper.  I must be crazy!  The birthday girl only wanted Rey, but I wanted the kids to have a choice so I went a little overboard.


<< Disclosure: We are a participant in the Amazon Services LLC Associates Program, an affiliate advertising program designed to provide a means for us to ear fees by linking to Amazon.com and affiliated sites.>>

To make the cakesicles I use a mini popsicle mold, and coat the cavity with melted Ghirardelli White Melting Candy Wafers.  Once the chocolate hardened, I filled the cavity with a brownie/chocolate chip cookie combo and seal the back with more melted white chocolate.


Once the chocolate coating on the cakesicles was set, I started decorating them.  I started with Baby Yoda because, Baby Yoda is just the cutest thing ever...

First up I made some Baby Yoda shaped ears out of Wilton gum paste and allowed them to dry.  I dusted the inside of the ear with a little pink petal dust just to give them a little dimension.


Baby Yoda's robe came next.  I cut a rectangle out of Deep Brown Covering Chocolate that long enough to wrap around the cakesicle, and scored some random lines in it.   I mixed a little of the Deep Brown covering Chocolate with some White Covering Chocolate to get the tan color for the fur trim of Baby Yoda's robe.  I pressed a balled up piece of aluminum foil into the tan trim to give it some texture.  Note: I like using covering chocolate on cakesicles because it taste better than fondant, and the covering chocolate has a firmer texture that holds its shape better than fondant.  Side note here - The covering chocolate was previous made by a company named Choco-Pan, but Satin Ice recently bought them out.


Here I am wrapping the robe around the cakesicle.  The coating on the cakesicle is made from Ghirardelli White Melting Candy Wafers colored with Electric Green food gel.


I glued the ears to the body using more of the green tinted white chocolate, added black circles for the eyes, a tiny ball for the nose, and some tiny eyebrows.


I also added a tiny white dot to the eyes, and some tiny green dots at the bottom of his robe to represent Baby Yoda's toes peaking out from under the robe.  At the last minute I realized Yoda's eyes were too close together so I moved them further apart.  I couldn't get the eyebrows off without breaking them so I just left them there.


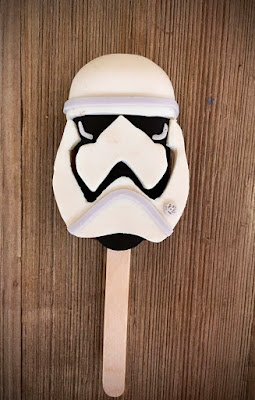
The Stormtropper came next.  This one was pretty easy to make. I just used a paper pattern to cut out the shapes from White and Black Covering Chocolate.  (The paper patterns are in the upper left of the picture.)


And then attached the cut pieces of covering chocolate to the cakesicle.


Then I added some accent pieces in white covering chocolate tinted in a pale gray.


Darth Vader was easy too.  Again I used a paper pattern to cut out the black and white pieces of covering chocolate.  I trimmed the edge of the helmet in some white just so it would show up better.  Without the white strip the helmet just blended into the face mask.


To make the eye are I first put down a piece of white covering chocolate, and then covered it with the black piece.  This way it looks like the white eyes are behind the face mask.


Then I placed the white triangle and the helmet.


And as a final touch I added some white accent pieces.


R2D2 was by far the easiest.

I dipped the white cakesicle into some gray tinted white chocolate to form the top of R2D2's body/head.


Then I just added a bunch of circles, squares, and rectangles cut from red, black, blue and gray covering chocolate.


Easy Peasy.

Making Rey was by far the most difficult.  I started by adding gray stripes to represent the top of her outfit.  I tinted the white covering chocolate with a little Flesh colored gel, and cut out the shape of her face using a paper pattern.  I also marked where the eyes would go on the face.


The eyes are made by cutting tiny circles from white, tan, and black covering chocolate, and layering them on top of each other.  Make sure the covering chocolate is rolled very thin so the eyes don't look too thick and bulging.


Rey's hair came next.  I cut it from the Deep Brown Covering chocolate, and scored some lines in the chocolate to represent the strands of hair.  I made a "hair" bun from the same deep brown, and I also stuck on some blobs of flesh colored covering chocolate to represent her ears.


Here is the hair in place.


The final touch was the light saber.  I took a thin piece of pasta, coated it in melted white chocolate and then rolled it in blue sanding sugar.


I then cut some various sized circles from black covering chocolate and strung them onto the pasta. The exposed end of the pasta was broken off leaving the blue light saber.


For the final touches I added, eyebrows, a nose, mouth, and a hand to hold the light saber.


So I've said it before (and I'm sure I will say it again) - I'm never making cakesicles AGAIN.  They take way too much time.


Happy Decorating,

Carol

Saturday, March 28, 2020

GOT - Game of Thrones Cake

Any fans of GOT out there?  Honestly I've never seen an episode (sorry), so when a friend asked for a cake with the Iron Throne sitting on top I had to do some research.


The only time consuming and difficult part of the cake was making the throne itself.  I should have just bought a plastic throne, but I like to punish/challenge myself.

<< Disclosure: We are a participant in the Amazon Services LLC Associates Program, an affiliate advertising program designed to provide a means for us to ear fees by linking to Amazon.com and affiliated sites.>>

I started out with a rough chair made from Wilton gum paste.  I tinted the gum paste in a color named Stone gray.  I tried using black, but it gave my gum paste a purplish tint.   The made the back of the chair first and set it on the side to dry.  Once the back piece was hard, I cut a rough square of styrofoam for the bottom part of the chair, glued the back piece to the sytrofoam, and then covered the exposed styrofoam with more gum paste.


Next I made a pedestal for the bottom of the throne...


And then I rolled out some tube shaped gum paste for the arm rests and the sloped sides of the chair.


The most difficult part of the chair's construction was attaching the sword shaped pieces that stuck up above the back of the chair.  I made these ahead of time and allowed them to dry before placing them on the chair.  I should have made these sword shapes thicker because the little buggers kept breaking.  I attached the swords to the back using melted chocolate.  I wasn't too concerned with neatness because I knew all the chocolate would be covered later with other swords.


Once the first row of swords were in place, I just started layering on more and more swords.   On the chair back I used the remainder of my dried swords, but for the rest of them I used fresh gum paste that was still soft and pliable.


Layering swords on the side.  I just attached the soft gum paste swords with a touch of water.


Here is a view of the back.  It looks really mess I know.  I had all the swords layered nice and neat, but then the back of the chair started to bend backwards and crack.  I attached a clear plastic lollipop stick using melted chocolate, and then layered more swords on top of the stick to hide it.  If I ever do another one of these I would make the back part of the chair thicker, and put the lollipop stick on before layering the swords.


Next I made the fancy swords with pommel, grip and guard.  I cut the circles for the pommels using my tiny circle cutters, and the rest of the parts I just formed by hand.  I use a piece of dry thin spaghetti  to stabilized the sword parts that stick up above the sides of the chair.  I just pushed the spaghetti up through the three parts (pommel, grip, and guard), and then put the sword/blade part on top of the exposed bit of spaghetti.


Last step on the chair was dusting it with black, silver, and gold edible luster dust.


For the cake I covered it with Renshaw fondant colored with the same Stone Gray gel color.


After the cake and board were covered in fondant, I scored the pie-shaped lines into the cake.  I then used crumpled aluminum foil to push a texture into the soft fondant.  I also used a various tools to cut random lines and groves into the fondant.  All this texturing is what gives the cake its concrete-like texture.


To darken the surface of the cake and give it a more stone-like look, I mixed the Stone Gray gel with a lot of Everclear grain alcohol.  I then brushed this thin liquid mixture over the cake.  The tinted alcohol sinks into the textures made by the crumpled aluminium foil and other tools, and once the Everclear evaporates you are left with just the color.  I prefer using Everclear to Vodka because the Everclear is 95% alcohol and the Vodka is only about 40% alcohol.  The 60% water in Vodka will leave the surface of the fondant wet and sticky. Here is a section of the cake just painted.  Instead of white-washing I was gray-washing.


After the wash of gray color is dry, I brushed the cake with the same silver, gold, and black luster dusts that I used on the throne.  At the last minute I also covered a cardboard cake board in fondant and placed it on top of the cake.  I wanted something sturdy for the Iron Throne to sit on.  I didn't want it to sink into the cake!.


Here is a close up of the finished texture.  For this cake I didn't have to worry about rips, tear, or imperfections in the surface of the fondant.


And here is a closeup of the finished throne.


For the banners on the side of the cake I just rolled out gum paste very thin, and used the tip of a  little rolling pin to pull at the edges and give it a ripped look.  For the text, I found a GOT font on the web and projected the words onto the gum paste using my handy-dandy mini projector.  This projector isn't the easiest thing to use, but once it is setup, it makes writing special text a breeze.  I used an edible black pen to write the text on the gum paste, and dusted the edges of the white gum paste with brown petal dust to give it the aged look.  I attached the banner to the side of the cake using melted white chocolate.


The letters on the top of the cake was hand cut from black Fondarific fondant.


So another interesting cake.  I learned a lot of new techniques that I hope I can use on future cakes.


Happy Decorating,

Carol

Friday, January 31, 2020

XBox Controller Cake - Step by Step Instructions

This was my first Xbox Controller Cake.  Happy Birthday Ashton (my former next door neighbor).


This cake was being picked up on a Thursday, and I hate those requests because I work full time and I have to rush through the decorating after I get home from work.  But thankfully this cake wasn't that difficult to put together.

<< Disclosure: We are a participant in the Amazon Services LLC Associates Program, an affiliate advertising program designed to provide a means for us to ear fees by linking to Amazon.com and affiliated sites.>>

I made all the knobs and buttons ahead of time.  I used black Fondarific fondant mixed with some Tylose power (the tylose stiffens the fondant), and just cut out circles and squares.  To get the domed shape on the buttons, I covered the fondant with cling wrap before I cut them out with the circular cookie cutters. The fondant was rolled to about 1/4" thick.


The I used my uppercase Block alphabet cutouts to make the letters on top of the buttons.  The fancy edges of the letters didn't match the real XBox controller so I just trimmed off the extra parts.


I made the black button for the XBox logo, and then using a paper templete, I cut out the "X" from white gum paste. I cut the tips a little longer than the templete so they would hang down the side on my fondant button.


For the Direction Pad I cut out a square from black tylose/fondant using a cookie cutter and then used the same square to cut out the side parts.  I then let the piece dry in a flower shaping mold which gave the Direction Pad its cupped shaped


For the Left and Right Stick, I cut out three different size circles from black tylose/fondant, and stacked them together.  The center piece is about 1/2" in height which makes the Stick, stick up higher than the rest of the cake.  For the top circle I pushed the handles of two different tools into the circle with gave it a cone-like shape.  Then I used a narrow, pointy tool to push all three circles together.


I made Xbox game boxes by printing out the image of the games, then using a glue dot runner I stuck the paper image onto a flat pieces of gum paste.  I trimmed the edges of the gum paste and then allowed it to dry.  You need the gum paste behind the paper image to keep it from absorbing moisture and falling apart.


Now onto the cake itself.  I baked a chocolate cake in a Wilton 12 x18" pan, cut the cake in half to give me two 12 x 9" cakes.  I cut the cake to the XBox shape using a paper templete.


I stacked the cake and then did a little bit of carving.  I rounded the top edge of the cake and cut a little shelf at the back of the cake.  I then crumb coated the cake in the chocolate icing.


A layer of  white chocolate ganache came next.  I used white ganache because I didn't want the chocolate buttercream to show through the white fondant.  The ganache also give a much firmer base to apply the fondant.


After applying the ganache, I let it harden in the refrigerator for 15 minutes or so.   Next I smoothed the surface of the ganache using a hot spatula.  I dipped the spatula in hot water, wiped it dry, and then smoothed it over and rough spots on the cake.  Back in the frig at this point to harden the ganache.


I again used a paper templete (a new, clean one), and sketched out where all the buttons would go.


Then I cut circles through the ganache to the frosted cake below.  These are the hollows where the buttons would be placed.  For the Left and Right sticks, I added a circular strip of fondant to make it match the real controller.  I should have tapered the outside edge a bit so it wasn't so sharp looking - but I didn't think of it at the time.  I also placed this cake on a 16" silver cake drum.  I had a 12" square black cake drum that I wanted to use on this cake, but it ended up a little too small.  I don't like using silver cake drums (too shiny), and I was going to cover it in black fondant, but I didn't have enough black fondant to cover the whole thing. Oh well.


Next the cake was covered in fondant.  I used Renshaw white fondant for this cake.


I added a piece of black fondant to the back.  After the cake was finished I didn't think the black piece was sticking up enough, so I added an additional strip of fondant around the outside edge.


Then all my pre-made button were placed into the waiting hollows.


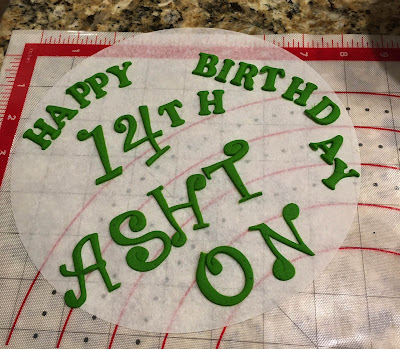
And I cut out the letters for Happy 14th Birthday Ashton using my trusty Tappit cutters.  I used the FMM Art Decp Alphabet and the Uppercase Funky Alphabet.


So here again is the finished product.  I was surprised at how easily this cake came together. PS: for the little View and Menu button I drew the lines and shapes using an edible food decorating pen.


Happy Decorating,

Carol


Supply List: 

Black Fondarific Fondant
Tylose Power
Cake Boss Circular Cookie Cutters
Flower Cupped Shaping Mold
Wilton Gum Paste
Wilton 12 x18" pan
Americolor Food Decorating Pens
Renshaw white fondant
16" - 1/4" thick Silver Cake Drum
FMM Block Alphabet Tappits
FMM Uppercase Funky Alphabet Tappits

Tuesday, January 21, 2020

Combo of Cake Decorating Styles: Drip, Fault Line, Stripes

I made a cake that combined the 3 most popular cake decorating trends of 2019: the Drip, the Fault Line, and the Stripe.  I was happy with the results, but I didn't get much of a reaction from my social media peeps.  Crickets.  Crickets are never a good sign, but my great aunt Goldie loved it and in the end that is all that really matters.


<< Disclosure: We are a participant in the Amazon Services LLC Associates Program, an affiliate advertising program designed to provide a means for us to ear fees by linking to Amazon.com and affiliated sites.>>

I made the stripes using my PME Cake Comb, but in hindsight I should have used my Wilton Cake Comb because the teeth are a little closer together on the Wilton.  The closer teeth would have given me more stripes which I think would have looked more interesting.

Here is the cake with the stripes cut out...


And here is the cake  where I've filled the voids with pink buttercream and started to scraping off the excess.  I didn't bother filling the top most void because I knew it would be covered with the "Fault Line" portion of the design.


After the stripes were on, I added the buttercream for the fault line section and scraped it off to make it smooth.


For the drip I used a recipe that combines Pink Wilton Candy melts (250g), white chocolate callets (60 g), and heavy whipping cream (1/3 cup).  I like this recipe better than others I have tried because it gives a better texture and it is easier to control the drips.

To highlight the edge of the "Fault Line", I painted it with a mixture of edible gold luster dust mixed with vodka.

For the topper I used my Cricut Explorer Air 2 and glitter cardstock paper to cut out the text.  To attach the topper to the cake I hot glued clear plastic rods to the back.  The rods are really thin, but they are strong enough to hold up the paper topper, and they are not as obvious as wooden skewers.  I also cut out the "Happy Birthday" using the Cricut.


So, again, nothing noteworthy about the cake, but my great aunt like it.

Happy Decorating,

Carol


Supply List: 

PME Cake Comb
Wilton Cake Comb
14" Cake Drum
Pink Wilton Candy Melts
white chocolate callets
Roxy & Rich edible gold luster dust 
Cricut Explorer Air 2
Clear plastic rods