Sunday, September 13, 2009

Hot Fudge Brownie Cake

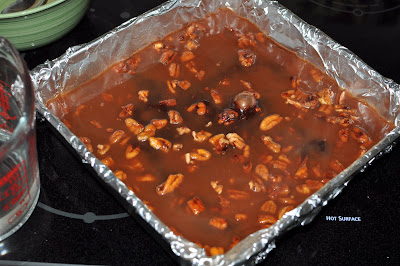
The weather was horrible this past weekend, so I decided I needed chocolate to lift my spirits. I combed through my file of "to-do" recipes and found one I had clipped from Southern Living's January 2009 magazine: Hot Fudge Brownie Cake.

Warm, gooey and chocolaty. The perfect recipe for a dreary Sunday afternoon.


You start with a basic batter that is spread into a greased pan. (Grease the pan really, really well. This stuff is stick-kkkyyyyy.)

Then a simple topping made of sugar and cocoa is sprinkled on top of the batter. I added pecans to my topping, to give it a little crunch.


Next comes the interesting part. You carefully spoon a cup and a half of boiling water over the batter and topping. (It is the water that creates the pudding layer while the cake bakes.) I was a little hesitant about pouring the whole 1-1/2 cups of water. My pecans started floating and it just seemed like an awful lot of liquid to pour on the cake. At the last minute I chickened out and just used 1 cup. But I was sorry in the end because my cake didn't have quite enough fudge goodness. It was fudgy, but not FUDGY.

Note to self: next time use all 1-1/2 cups of boiling water and may be even up it to 1 -3/4 cups!


Bake for 45 minutes at 350 degrees and then cool for 25 minutes before serving.


Yummm.... Hot Fudge Brownie Cake

Tuesday, September 8, 2009

Maple Pecan Tarts


Pecan pie is one of the easiest desserts you can bake. Just whisk together all the ingredients, pour into purchased shells and bake. No fuss, no mess, no complicated instructions or time consuming prep. This is my kind of pie. And as an added bonus, it tastes divine.

Yield: 8 mini pies

Ingredients

1 package of 8 frozen mini pie shells
1/3 cup brown sugar
1/3 cup maple syrup
1/2 cup light corn syrup
2 large eggs, lightly whisked
2 tablespoons granulated white sugar
2 tablespoons butter, melted
1 teaspoon vanilla
1 cup pecans, coarsely chopped, plus 8 perfect pecan halves for garnish.

Preparation

Preheat oven to 325 degrees F.
Remove frozen/unbaked mini pie shells from wrapping and place on a foil lines cookie sheet.
Distribute the chopped pecans between the 8 pie shells.
Whisk together remaining ingredients.
Pour filling into shells and over nuts. Reserve about 2 tablespoons of filling mix.
Place a pecan half in the center of each pie and drizzle the reserved filling over the pecan half.
Bake for 40-45 minutes until the tops are puffy and the crust is golden brown.


Heaven in a butter shell.


Peanut Butter Cookies - Low Carb

For our Labor Day barbecue I baked a lot of family favorites, but I have a nephew who is on a low carb diet so I whipped up some low carb peanut butter cookies just for him.


The cookies were tasty, but I found them very dry and crumbly (although by the second day the cookies were much moister so bake them a day ahead of time). If I make these cookies again I would definitely fiddle with the recipe some: add another egg and possibly some heavy cream or butter to add moisture to the cookies and help hold everything together.

But in the words of dieting my nephew, "I you are low carbing it, dry cookies are a small price to pay for the pure joy of sinking your teeth into a sweet confection that is actually BAKED!"

Click HERE for the recipe I tried.

Saturday, September 5, 2009

Beachy Cupcakes

My niece was having a luau theme for her 9th birthday party so I decide to make some beachy cupcakes. I had grand visions of surf boards, tiki huts, volcanoes, and big toothy sharks adorning the tops of my cupcakes, but reality and my lack of time management skills did me in once again. By party time I had only managed to make a few malformed flip flops, a single lei, and some lame beach towels.


Oh well, at least my water and sand looked good (this time).


A few months back I made a Hawaiian themed bridal shower cake and I did learn a few things from that experience.


Lesson #1 - For the mock “sand” it is better to use crushed cookies and not raw sugar. I used sugar the first time and made a huge mess. The grains just wouldn’t stick to the butter cream icing and kept falling off in damp hunks.

Lesson #2 - Dye the icing that goes under the sand a light brown in color. If you leave it white, it shows through the “sand”. I know you think I’m one dumb decorator (cake wrecks here I come), but honestly I didn’t think to dye the icing the first time around. I thought the “sand” would be thick enough to cover all the white icing.


Lesson #3 - Press the crumbled cookies into the icing as soon as you spread it. If you wait too long the buttercream starts to crust and the “sand” won’t stick.

Lesson #4 - When dyeing the water, don’t mix it too much. Stir the icing until it is a swirl of blue and white. This way when you spread the “water” on the cupcakes, you have built in, natural looking white caps.


Happy Birthday, Amanda! I hope you like your cupcakes.

Thursday, August 27, 2009

Daring Bakers' August Challenge - Dobos Tarte

The August 2009 Daring Bakers' challenge was hosted by Angela of A Spoonful
of Sugar and Lorraine of Not Quite Nigella. They chose the spectacular Dobos
Torte based on a recipe from Rick Rodgers' cookbook Kaffeehaus: Exquisite
Desserts from the Classic Caffés of Vienna, Budapest, and Prague.

Here is my version...


I used pecans instead of hazelnuts, and I a boiled fudge frosting for the filling (instead of the listed butter cream). I also had a "slight" problem with the caramel wedges that were supposed to adorn the top of the cake, so I threw on some Pepperidge Farm Geneva cookies just to give it the finished look.

I also took some liberties with the baking directions and just used pans instead of the complicated process of spreading the batter free form into a circular shape and then trimming the edges once it was bake. Say What?? I took convenience to another level and used disposal pans....

And pre-cut 8" parchment rounds. The rounds were just a little too big for my 8" pans, but it didn't seem to cause any problems.


My lazy short-cutting came into play again during the batter mixing. I just dumped the whole eggs into batter and didn't bother with whipping the egg whites separate. I'm such a lazy slug. May be I should change the name of my blog. "The Lazy Baker," I wonder if that name is taken?


Here are the pans waiting to go into the oven...

And the cakes just out of the oven...


Next variation (have you noticed a pattern here) was the frosting. I'm not a big fan of butter cream, so I whipped up a boil fudge icing to use as the filling. You can scrape the butter cream off the sides and top of a cake, but it is kinda hard getting it out from between those little layers.

Here is the fudge at the rapid boil stage...

And the first layer of cake getting a coating of warm fudge filling. Just pour it on and let it do its thing. Yummm...


Here are a few layers in place with some of the filling oozing out. Oh la la.


I put a layer of butter cream over the whole cake and then pressed the chopped pecans into the sides.

Next came the fiasco with the caramel wedges. I had a little stove top fire, so instead of nice wedges of amber caramel, my guests got crispy, chocolaty Geneva cookies.


update: I checked and both "LazyBaker" and "TheLazyBaker" blog names are taken. Bummer.

Tuesday, August 25, 2009

I Heart Faces - Week 33 - Nostalgia

The theme for this week’s photo challenge at I Heart Faces is “Nostalgia”.


Amanda was always fascinated with our back door and the wild and glorious world she could see through the glass. She loved the flowers, the birds and especially the squirrels that came to eat peanuts I had left on the sill.

This photo's exposure is not the best, but I still love how the afternoon sun bathes her face in a warm glow. And if you look close you can see two different reflections of her face. The obvious one is on the back door, but look above her head and to the right you can see another reflection in the glass door of the curio cabinet.

The picture is nostalgic because on August 29, 2005 the door, garden, animals and even the house were all casualties of Hurricane Katrina. I get a little sentimental every time I look at these old pictures and wistfully wish I could turn back time.

Monday, August 24, 2009

Ginger Blueberry Scones

I had a grueling baking schedule planned for this past weekend but the glorious weather lured me away from my kitchen. Early Sunday morning the temperature was 61 degrees and 50% humidity. In New Orleans! In the middle of August! Crazy, freaky weather.

I did manage to keep myself inside long enough to bake one item: Ginger Blueberry Scones. They just took a few minutes to mix and bake, and then I sat on my patio (with a blanket) and had breakfast Tea & Scones.


Ingredients

* 2 cups all-purpose sifted flour
* 1/4 cup sugar, plus more for sprinkling tops
* 1 tablespoon baking powder
* 1/2 teaspoon salt
* 1/2 teaspoon ginger powder
* 6 tablespoons unsalted butter, cold and cut into pieces
* 1-1/2 cups fresh blueberries
* 1 teaspoon lemon zest
* 1/3 cup heavy cream, plus more for brushing tops
* 2 large eggs

Directions

1) Preheat oven to 400 degrees.

2) In a large bowl, whisk together flour, 1/4 cup sugar, baking powder, ginger, and salt. Note: if you like a sweeter scone (like me), use 1/3 cup of sugar instead of the listed 1/4 cup, if you like really sweet scones, use 1/2 cup of sugar. If you want coffee cake instead of scones, use 3/4 cups of sugar. If you want... well you get the idea.

3) Add the cold butter to the flour mixture and using a fork, your fingers or a pastry blender, cut the butter until the largest pieces are the size of small peas.

4) Stir in blueberries and zest.


5) In a small bowl, whisk together the cream and eggs.

6) Make a well in the center of the dry ingredients and pour in the cream/egg mixture.


7) Stir lightly with a fork just until the dough comes together.


8) Turn dough out onto a lightly floured surface and knead 3 or 4 times. Don't over mix or the scones will be tough.

9) Place the mound of dough on a baking stone and pat into an 8" round about 1-1/4 inch thick.

10) Brush the top with cream and sprinkle with sugar.

11) Using a floured knife, score the top of the dough into 8 wedges. Only cut half way through the thickness of the dough, don't cut all the way through.


12) Bake at 400 degrees for 25 minutes, or until golden brown. I like mine extra golden brown so I baked it another 5 minutes.


13) Remove baking stone from oven and using the score lines previously made in dough, cut the scones apart.

14) Transfer the scones to a wire rake to cool. Or just eat them hot like me.

Tuesday, August 18, 2009

TWD - Applesauce Spice Bars

This week's TDW (Tuesday with Dorie) challenge was Applesauce Spice Bars on pages 117 and 118 from Baking From My Home To Yours by Dorie Greenspan.


Individually I like all the ingredients in this recipe, but I wasn't wowed by the finished product. I found it too moist and wet, especially after the second day. I loved the glaze (it tasted just like pralines), but I think a maple cream cheese frosting (pictured above) would have been a better match with the spices.

Do I sound negative?

I don't mean to be discouraging, a lot of people love these bars, but I just like 'cakier' baked goods. If I tried it again, I would add more flour to the batter, include a crisp shortbread crust, and pair it with a maple cream cheese frosting. I guess I would also have to come up with a new name, because if I made all those changes they wouldn't be Dorie's Applesauce Spice Bars anymore. :)


Here are the apples, raisins and pecans waiting patiently for their dip in the batter.


The dry stuff...


Everything all mixed together...


Just out of the oven. I cut the recipe in half, and baked it in a 8" x 8" pan.


Cooking the glaze.

On the TWD website a lot of people mentioned that there was not enough glaze so I cooked twice as much (yum). They also mentioned that the glaze was thin and runny, so I cooked the syrup an extra 2 minutes. I may have gone overboard the cooking, because my glaze was a little brittle after it cooled.

The finished Applesauce Spice Bars with Brown Sugar Glzae.

Tuesday, August 11, 2009

TWD - Brownie Bites

This is my first Tuesday's with Dorie baking challenge, and what a yummy challenge it was. Brownies are my favorite food, and little brownie bites are my favorite form of brownie. No mess, no crumbs, just pop the whole thing in your mouth and enjoy. Pure chocolate bliss, want one?


The Brownie Bites were also a breeze to prepare. Melt the chocolate, butter and sugar over a low fire.


After the chocolate mixture cools, add the egg and vanilla.


Blend the chocolate-egg mixture with the flour. I added nuts too.


Bake in a mini muffin pan for 14 minutes, carefully remove the BB's from pan and allow to cool on wire rack.


Dip the tops of the BBs in melted white chocolate. This was the only part of the recipe that I had problems with. I used white chocolate chips and they would never melt to a "dipping" consistency. I finally just spread the white chocolate on top. Not perfect looking, but still very tasty.


Side note: While roaming around my backyard snapping pictures of my BB's, I noticed something in my viewfinder…


Did you see him? Upper right corner of the picture. A beautifully butterfly sipping nectar from a bougainvillea. I think it is a Swallowtail, but I'm not positive. Here is a close-up. Isn't he/she beautiful?