Sunday, May 7, 2017

Renshaw Fondant Review


I know you guys are getting tired of my never ending  parade of fondant reviews, but I've tried a new one that gets pretty high marks.  Not perfect mind you, but good enough to "maybe" become my goto fondant. 

If you haven't been following my Never Ending Fondant Comparison let me summarize.  Over the last 5 years I have tried about 12 different fondant.  Some were good, some where okay, and some were downright bad.  One  I considered a 5 stars fondant (Via Roma) till I got a few bad batches.  Sad, Sad Days.  If you want to read the other reviews you can find them here:  The original  7 fondant comparison, the Via Roma review, the Cake Craft review, the Carma Massa review, the Dream review,  the Fat Daddio review, and the Fantasia review.

So back to the current review.  The fondant being reviewed has a lot of Pros and only one Con that I can name.  The fondant is soft yet firm, stretchy yet strong, it colors well, and has a nice finish with no bubbles or elephant skin.  So what, you may ask, is the name of this standout fondant - well it is called  Renshaw

Disclosure: We are a participant in the Amazon Services LLC Associates Program, an affiliate advertising program designed to provide a means for us to earn fees by linking to Amazon.com and affiliated sites.

Renshaw?  Rennnnshawww?  You've never heard of Renshaw?  Well neither had I till someone mentioned it on another of my fondant reviews.  It comes from the UK and the company has been around since 1898.  Wow.  Anyway, onto the review...


Renshaw Fondant


In my non-expert analysis of these various fondants, I use ten different criteria: Taste, Texture, Rolling, Coverage, Draping/Smoothing, Cutting/Trimming, Drying Time, Tinting, The Final Look, and a recently added criteria: Humidity/Refrigeration/Moisture test.


Taste - The taste of this Renshaw white fondant is what I would call understated.  It has a mild sugary taste with no other noticeable flavors.  The list of ingredients on the package has "Natural Flavoring" as the last item.  This "Natural Flavor" doesn't taste like vanilla or almond or even white chocolate.  It just tastes mildly sugary, like a not-to-sweet buttercream.

Actually the taste is a little nondescript, but in a good way.  I have come to the conclusion that a fondant with a lot of flavor distracts from the taste of the cake.  And hey - who are we kidding -- no one actually eats the fondant.  Everyone I've watched eating a fondant covered cake just peals it off and pushes it aside.

The mouth-feel of the Renshaw is soft and velvety.  It has a melt-in-your mouth quality that I like.  When eaten with the frosting and cake the Renshaw fondant just kind of melts away and is indistinguishable from the frosting.  It doesn't have any bold flavor of its own so all you taste (and feel in your mouth) is the cake and frosting.  This is a fondant that people may actually eat! 


Texture – Out of the box and foil wrapper this fondant is very soft and squishy. You can pinch off pieces with no effort. When you first take the fondant out of the package it is a little sticky and damp, but after working it for a few minutes it loses the tackiness and becomes dry and silky.  It feels like soft bread dough.


The fondant is very easy to knead, roll, and shape; and like the Fat Daddio and Dream fondant I reviewed a few weeks ago, it easily picks up textures from leaf veiners, impression mats, or even paper towels.


The Renshaw fondant is also very elastic and stretchy.  It almost acts like taffy.  I like stretchy fondants because they doesn't rip as easily when covering the cake.  Another curious thing about this taffy oops I mean fondant is that it doesn't seems to gouge as much as other super soft brands.  The Via Roma fondant has this same non-gouging quality.  Maybe it is the stretchiness of the fondant that keep the marks from showing??  Maybe when you dent the fondant with a fingernail it just melds itself back together??  I don't know what makes this fondant resistant to gouging, but I like it!


Rolling – Because the Renshaw fondant is so soft it is very, very easy to roll.  I would call it a breeze.  You definitely won't get a workout rolling out this fondant.  The Renshaw also didn't produce any air bubbles when rolling.  <<Happy, Happy Dance >>   Not a single air bubble appeared in the fondant as I rolled it out. Some fondants are so frustrating to roll because huge bubbles form when the fondant is kneaded and conditioned.  The professionals say you can pop the bubbles and they disappear, but I've never had much luck doing that.  The outline of the bubbles always seem to show.

Another plus with the Renshaw is that its elasticity keeps the edges soft and smooth as it is rolled bigger and bigger.  No split, cracks, or ragged edges with this fondant.  Everything stays smooth and even.


And the Renshaw didn't stick to the plastic mat that I use to roll out the fondant.  It pulled off without any problems. The instructions on the Renshaw package says to lightly dust the rolling surface with cornstarch or powdered sugar to keep the fondant from sticking, but I didn't dust and I didn't have any problems with it coming off.


Coverage – In all the fondant tests I've conducted, I use 5 ounces of fondant and roll to 1/8” thick.  For the Renshaw I was able to roll the 5 oz to a little less than 10 inches round.  In comparison to other fondants this is a little on the low side.


I also noticed that at 1/8" thickness, the fondant was too thin.  I could actually see through it.  It looked almost translucent.   When placed on my dummy testing "cake" (which is actually a tiny metal tube pan) you could actually see the gray color of the metal through the fondant.  The fondant also pulled a little out of shape as it was hanging on the rolling pin.  Again, it doesn't do that if you roll it thicker.


So 1/8" is definitely too thin for this fondant.  The instructions on the packaging also back this up.  The package doesn't give a recommended rolling thickness, but it does say that the 1.5 pound package will cover an 8" round cake.


Draping/Smoothing - When placed on the cake dummy, the fondant seemed to float above the top of the cake.  The fondant settled nicely along the top edge and draped into a few loose folds around the sides.  I think the elasticity of the fondant keeps it from settling into more folds and drapes. 


The Renshaw was also very easy to smooth.  A few fluffs of the drapes and everything smoothed out nicely.  The fondant doesn't seem to stick to itself, so the folds and drapes were easy to pull apart and realign.  And even though the fondant was rolled too thin, I didn't get any rips or tears or the dreaded crepey elephant skin. 


Cutting/Trimming – The fondant cuts easily with no major edge problems.  Even with my dull pizza cutter it slices nice and clean.  But the Renshaw does get a little sticky when you add gel food coloring to it, so the tinted fondant doesn't cut as cleanly.


Drying Time – One of the best things about this fondant is the way it dries - or doesn't dry.  It is very unique.  As you roll and work with the fondant, the surface seems to dry and gets firm to the touch.  Fondant cutouts hold their shape without drooping and sagging.  Below is a rectangle piece of fondant that is 1/4" thick.  It is freshly rolled and cut, yet it still holds it shape and doesn't sag too bad when suspended over the side of the box.


After allowing the rectangle to rest and harden for 30 minutes, I got even less slumping.


But the strange and exciting thing about this fondant is that even though the outside skin of the fondant dries and allows it to hold its shape, the INSIDE of the fondant DOESN'T DRY OUT!!  How cool is that???

I had a small 1/2" ball of Renshaw fondant sitting on the counter for 4 days.  The outside of the fondant was dry and firm to the touch, but when I squished it between my fingers it became soft and pliable again.  I was actually able to roll it into a thin disk.  That is pretty amazing.  Most fondants (except maybe Fondarific) would dry rock solid after sitting that long.   The fact that the outside dries enough to hold a shape while the inside stays soft and squishy is truly unique.  And because it stays soft even when exposed to air means you don't have to rush to roll and place the fondant, and if you make a mistake you can pull it off and re-roll without having to worry about the fondant drying out and cracking (or getting elephant skin).  <<shiver>>


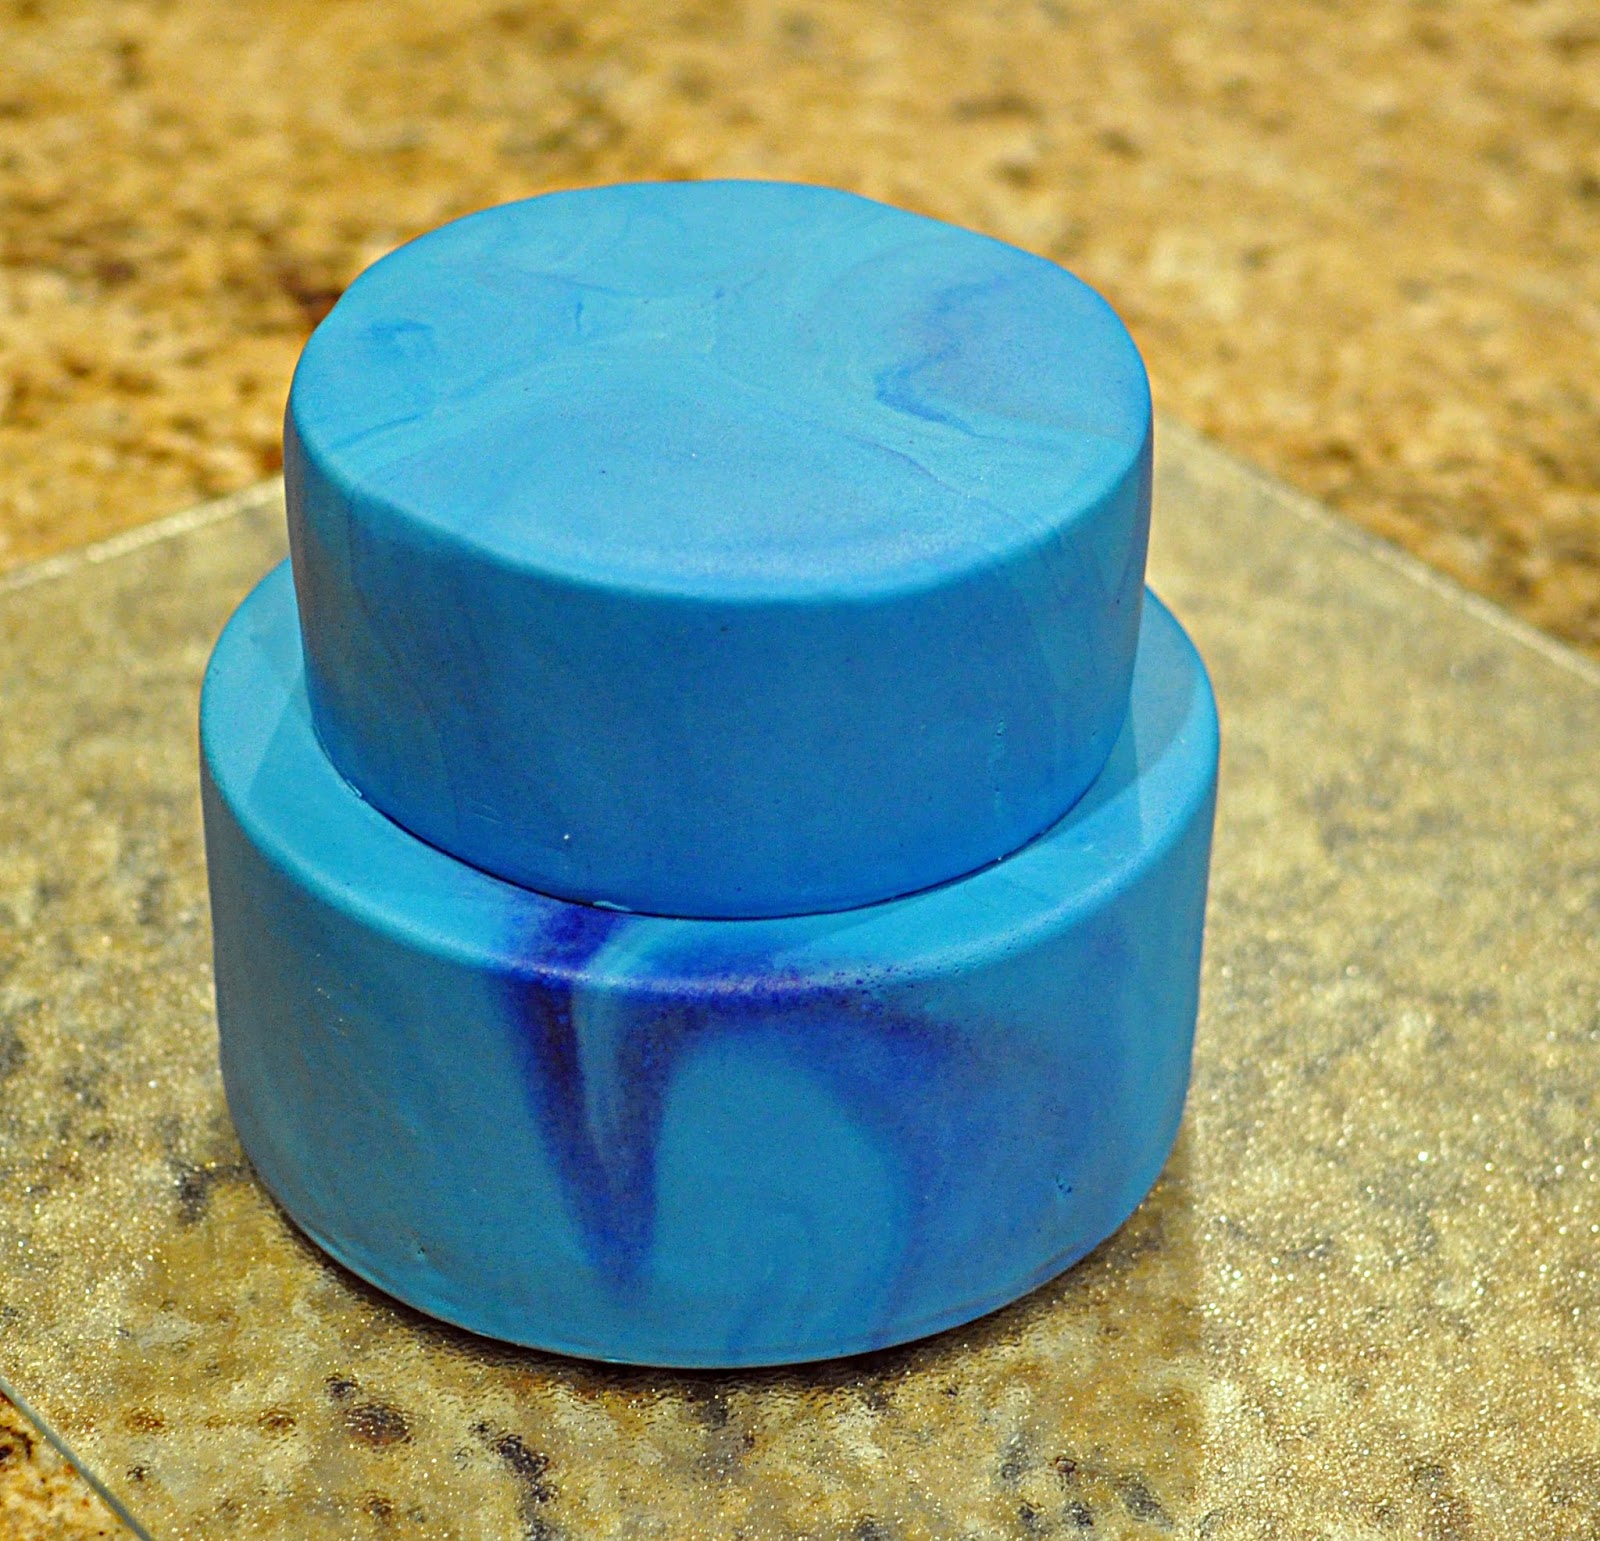
Tinting – No major problems with tinting.  The Renshaw took both Wilton food color gels, and Americolor well.  All the colors I tested looked fine, and the shades seemed true to the color indicator on the bottle.  But I did encounter a few other tinting issues: 1) the fondant does get a little sticky when you add gel food coloring to it.  I was trying to tint to a very dark blue and the fondant was as sticky as cookie dough, but it did settled down after a few minutes of kneading. 2) the fondant seems to bleed color onto the underlying buttercream more than other fondants I've tried.


Final Look – Overall the finished look of the Renshaw fondant was very nice.  It dried to a soft matte finish that hid most of the blemishes.  (Note: fondants that keep a glossy finish show more blemishes and problem areas than fondants that dry to a matte finish.)


A few hours after covering the dummy I did noticed that the 1/8" thick fondant had sunk into the nooks and crannies on the top of my metal cake dummy (see picture above), but when I re-rolled and covered the dummy with a thicker round of fondant, there was no sinking.  1/8" is just too thin for this fondant.


Humidity/Refrigeration/Moisture Test

Humidity and Heat is a big problem in my neck of the woods so I wanted to document how the fondant react to refrigeration and humidity.  The moisture test is actually to test how the fondant reacts to the underlying frosting be it buttercream or ganache.

This is a test cake covered in Renshaw fondant after it was refrigerated overnight and then taken out and set on the counter.  The temperature of the room is about 72 and the humidity is like 100%.  Hey it is New Orleans in the summer!!!  The fondant did fine in the refrigerator.  When removed and set on the counter, the fondant was a little damp and clammy, but it soon dried off.


Next I took the cake outside to see how it would react to an hour in the 90 degree heat.  --It was not a pretty sight.  The Renshaw fondant almost melted under the extreme conditions.  The cake itself didn't fair much better.  The top tier has ganache under the fondant and it held up okay, but the bottom tier, which is American Buttercream, started to collapse.  Good this this was just a test cake.  (PS: I also shook the cake quite a bit.  I wanted to simulate a bumpy ride in a hot car.)


Once back inside the cool house, the Renshaw fondant on the ganache covered tier dried out and cut cleanly and smoothly...


But the Renshaw fondant on top of the buttercream stayed wet and gooey.  The fondant seemed to pick up the moisture from the underlying buttercream, and even after sitting for hours at room temperature, the fondant never dried out. It was very difficult to cleanly slice a piece of cake.


So Renshaw can be refrigerated, but when exposed to heat and humidity it works better with a base of ganache than a base of high-moisture frosting like buttercream.


Summary

Some of the big pluses with this fondant include: 1) it was super easy to work with, 2) it didn't rip or tear as I worked with it on the cake, 3) it didn’t form any “elephant skin” as it dried, 3) it didn't show many marks or gouges from my fingernails, and even when I did accidentally mark the fondant, the marks were easy to smooth out because the fondant is so elastic and stretchy, 4) the ability of this fondant to dry on the outside but not on the inside is really helpful, and 5) the taste was pretty good.

The only minor nits I have with the fondant is 1) its sickness when gel color is added, and 2) the coverage.  It needs to be rolled thicker than other fondants, and the same volume of Renshaw doesn't cover as large and area as other fondants.  

So Renshaw, in my un-professional opinion, is one of the better fondants I've tried.  I'm going to test it out on my next few cakes and see if I can crown it my "Goto fondant".  

Happy Baking (and Decorating),

Carol


Saturday, May 6, 2017

(Part 2) 1001 Tips for Making Your Own Wedding/Celebration Cake -- The Science of Ingredients

Disclosure: We are a participant in the Amazon Services LLC Associates Program, an affiliate advertising program designed to provide a means for us to earn fees by linking to Amazon.com and affiliated sites.


1001 Tips for Making Your Own Wedding or Celebration Cake 

Part 2 – The Science of Ingredients


This is Part 2 of my attempt at providing 1001 Tips for Making Your Own Wedding or Celebration Cake.

Part 1 dealt with the Design & Planning stage, and this part deals with… drum roll please….

Ingredients


Have you ever wondered why some recipes call for All Purpose Flour and some want Cake Flour?
Have you ever wondered why you cream together the butter and sugar? 
Have you ever wondered why, Why, WHY did the center of my cake collapse!!

If you have those kinds of questions then keep reading.  This post tries to explain the chemical reactions that take place between the ingredients, and hopefully my rambling might explain the when, where, and why things can go wrong.   So hang onto your hat and start channeling your inner Alton Brown, this post is about to get a little science-y. 


The Chemistry of Cakes – it is all about the Gluten


Big Tip #1 - Don’t try and tweak a cake recipe too much

A cake recipe is a precise chemical formula. It is a choreographed dance between flour, sugar, eggs, liquid, and fat. Tweaking or changing an ingredient in a cake recipe can produce a tasty surprise or a stunning flop. If you are going to bake from scratch you should know a little about the dancers that are performing your mixing bowl:
  • Structure Builders / ToughenersFlour (gluten & starch), Eggs, and Cocoa Powder - These are the structure builders in cakes. Think of them as a skeleton. They give a cake both structure and strength, which in turn allows the cake to hold the new, larger shape produced as gases inside the batter expand during baking.
    • Too little in the way of structure and the cake will collapse as it cools.
    • Too much structure and the cake will be tough and unpleasant to chew.
    • In today’s world everyone knows about gluten, but did you know that dry flour doesn’t contain gluten? Flour has two proteins (glutenin & gliadin) that join together to form gluten only when the flour is hydrated (ie exposed to water).  Water turns the flour proteins into a flexible web of interlocking gluten fibers.  The more water you add, the more structure will form, and consequently the tougher the cake will become.
    • Physically stirring the batter accelerates the formation of the gluten web, so the more you mix the batter, the stronger the gluten web becomes which again toughens the cake. This is why that box cake mix tells you to only mix for 2 minutes, and the brownie mix says to stir for 50 strokes.  They don't want you to overdevelop the gluten and end up with a tough brownie or cake.
    • The starches in flour also form structure when exposed to water, and
    • Egg proteins coagulate and form structure when exposed to heat. 

  • TenderizersSugar, Fats (butter, shortening, lard), Oil, Baking Powder – Tenderizers are ingredients in the cake that interfere with the structure builders (aka gluten, starch, and egg proteins).
    • Fats and oil surround the flour proteins which prevent them from absorbing water and turning into gluten.  In essence the fats waterproof the flour proteins.  If gluten and structure can't form, the cake will be tender.  Thus the fat tenderizes the cake by limiting the size of the gluten web that forms.
    • Sugar is highly hygroscopic which means it absorbs water like a dry sponge.  If the sugar traps some of the water then there isn't as much around to convert flour proteins to gluten.  So like the fat, the sugar tenderizes the cake by limiting the amount of water available for gluten formation.  
    • But like any good thing, tenderizing can be taken too far.  If the fat and sugar stops all gluten formation, then the cake will collapse under its own weight.  The ratio of structure builders to tenderizers is a delicate balance. You want enough tenderizers so the cake is soft and easy to chew, but not too much or the cake will collapse due to lack of structure.

  • MoistenersWater, Milk (and milk products), Egg, Butter, Oil – All of these ingredients (except the oil) add moisture to the cake through water, and water has an extremely critical role in the cake making process.
    • Water dissolves and hydrates many of the other ingredients in the batter.
    • Do you know that whole milk is 88% water, eggs are 75% water, and sour cream is 71% water?
    • Water sticks to and dissolves the sugar, 
    • Water activates the baking powder, 
    • Water hydrates the gluten in flour and allows it to form structures.
    • Too much water will encourage excess gluten development which will toughen the cake.
    • Too little water will keep the flour from hydrating and also keep the sugar from dissolving.  Both of these conditions will cause the cake to sink when removed from the oven.
    • Any sugar crystals left undissolved by water will also form a sugary crust and excess browning on a cake.  This is fine, and even encouraged, in pound cakes, but not something you want in a white wedding cake.
    • Oil is the only moistener that contains no water.  Instead oil moistens because the fat is a liquid at room temperature. 
    • Oil is a superior moistener than water because any water not tightly bound to sugar, gluten and starch is turned into steam and escapes during baking.  

  • DriersFlour, Corn Starch, Sugar, Cocoa Powder – These ingredients absorb moisture and pull it out of the cake. Flour needs to absorb moisture to generate gluten strands and structure, and sugar needs moisture to dissolve. If the recipe has too much in the way of “Driers” and not enough “Moisteners”, the cake will be dry, sunken, with sugary, brown crust.

  • Leavening AgentsBaking Powder, Baking Soda, Whipped Egg Whites – These ingredients help the cake to rise. As heat and chemical reactions cause the gasses to expand, they lift and lighten the cake.

  • Notice that some ingredients are in two categories. Flour is both a structure builder and a drier. Oil is both a tenderizer and a moistener. Egg White is both a structure builder and a leavening agent. It is this complex relationship of ingredients that makes scratch cake baking and recipe development both troublesome and rewarding.


More About Flour

  • Un-sifted flour can destroy your scratch cake – no really, it can!!!  Do you get inconsistent results when you bake from scratch? The culprit may be the flour and how you are measuring it.
    • Home cooks in the US use volumetric measurement; we use measuring cups and spoons for both liquid and dry ingredients. This is a problem when measuring flour because flour settles; it becomes denser and more compact over time. Think of flour like a balloon. When the balloon is full of air it is plump and round and probably as big as your head, but without the air it is as flat as a pancake. The balloon itself weighs the same regardless of its fullness or size. Same with flour. As the milling air originally trapped between the particles of flour escapes, the volume of flour gets smaller and smaller. If you fill a cup with sifted flour and let it sit for a month, you may find that you only have 7/8; after 3 months you might have 3/4s of a cup!
    • If your scratch cake flopped, it may be because you unknowingly added too much flour.
    • Ideally you should weigh your flour.  Weight is a better way of getting consistent results cake after cake.
    • But most recipes don’t give you the weight of the flour, and even if they did it wouldn't be completely accurate because different flours have different densities and weights. For example, for Swans Down Cake Flour one cup of sifted flour weighs 120 grams, but one cup of sifted Martha White Bleached flour weighs 140 grams.
    • So what is a home baker to do? Well the only way to insure you are using the appropriate amount of flour is to SIFT THE FLOUR BEFORE YOU MEASURE. When you sift, you reintroduce air into the flour and this will give you a more reproducible measurement.
    • If you don’t sift, you don’t know how much the flour has compacted and how much flour you are actually putting in your cake batter.
    • One trick I have started using is when I open a new bag of flour I sift and weigh one cup of flour.  I then write this number on the packaging. From then on I can just weigh out the amount of flour I need without bothering to sift before I measure.  Of course I still need to whisk and sift the flour when I add the baking powder and salt, but this trick eliminates one step!
  • The wrong flour can destroy your cake - Okay, that may be an exaggeration, but the wrong flour can really change the taste and texture of your cake.  The two main types of flour used in cake baking are Cake Flour and All Purpose Flour.
  • What in the heck is Cake Flour?
    • Cake Flour is milled from soft red winter wheat or soft white wheat.  It uses the absolute heart of the endosperm (essentially free of bran and germ) which give the flour a finer grain, whiter color, lower protein content (6-8%), and slightly higher starch content.
    • Protein is used in gluten formation.  So the lower protein content in Cake Flour means less gluten development, and less gluten development results in a tender cake with a higher volume.
    • Cake Flour is bleached with both chlorine gas and benzoyl peroxide.
    • The chlorine treatment does a lot:
      • The chlorine treatment weakens the gluten structure, and makes it easier to break under the pressure of expanding leavening gasses.
      • The chlorine treatment alters the starch molecules in the flour which allows the starch to absorb more water. With less free water in the batter, the batter thickens and can trap more tiny air bubbles during mixing. The bubbles are important because they defines the "crumb" of the cake.  Air bubbles also provides the cavities where all the powerful leavening gases accumulate before they start to lift the cake. 
      • The chlorine treatment also lowers the pH of the flour which reduces browning of the cake.
    • The benzoyl peroxide treatment makes the flour a bright white color.
    • The chlorine and benzoyl peroxide treatments alter the taste of the flour too.
    • Because of the unique properties of Cake Flour, it is typically used in High-Ratio cakes. A High-Ratio Cake has a high ratio of liquid and sugar to flour (it has more tenderizers than structure builders). Without Cake Flour, a High-Ratio Cake would likely rise and then collapse during baking and cooling.
    • Some say you can "make" cake flour by adding corn starch to flour, but that doesn't really work. The added corn starch may dilute the overall protein content and increase the amount of starch, but it doesn't add any of the chlorine gas effects.
    • Interesting note: flour bleaching agents are banned in EU and UK so no Cake Flour for them.
  • All Purpose Flours - How many brands of All Purpose (AP) flour can you name? 5? 10? 15?
    • Do you know that each brand of flour has a different protein content (usually in the range of 9-12%)? 
    • Some brands are a mixture of soft and hard wheat, some are just soft wheat, and some are just hard. Generally the harder the wheat, the higher the protein content.
    • The brand of flour you select will alter the taste, texture and crumb of the cake depending on how much protein that particular flour contains. For example, White Lily AP is made from soft winter wheat and has a protein content of 9%. Martha White also has approximately 9%. Gold Medal and Pillsbury have 9-10%. King Arthur Unbleached AP has 11.7%.
    • So if your cake recipe calls for All Purpose flour, try to use a flour with the lowest protein content you can find. The flour you use WILL impact the texture of the final cake.


Sugar, Sugar, Sugar


The main purpose of sugar in cakes is for sweetness, but sugar also has other important functions:
  • Sugar is highly hygroscopic meaning that it attracts and binds to water. If the water binds to the sugar there is less water available to convert the flour proteins to gluten.
  • Sugar is considered a tenderizer because it inhibits the formation of structure building gluten. The more sugar added, the more tender the cake.  But too much sugar will stop all gluten development which will ultimately cause the cake to collapse.
  • Sugar contributes to browning through the process of caramelization and Maillard browning. Caramelization is the simple browning of sugar,  but the Maillard browning reaction requires the presence of both sugar and milk proteins. 
  • Because of Maillard browning, cakes with milk (vs water) are more prone to browning. A nice sugary brown crust is treasured in pound cakes, but not good for a white wedding cakes.
  • To reduce browning an acid can be added to lower the pH of the batter.  Common cake acids include Cream of Tarter, vinegar, buttermilk, lemon juice, etc.
  • To increase browning (for pound cakes) raise the pH by adding an alkali like baking soda.
  • Sugar acts as a leavening agent because air gets trapped around the irregularly shaped sugar crystals. The process of creaming fats with sugar also introduces air into the mixture. (see more on leavening below)
  • Sugar stabilizes whipped egg whites. The sugar keeps the egg whites from collapsing and losing the air that was carefully whipped into the whites. Sugar also stabilizes beaten whole egg that are used in chiffon cakes, and egg yolks that are used in custards.
  • Sugar increases the temperature at which eggs whites coagulate or set which allows more time for the cake to rise.  Once the eggs whites coagulate, the cake can no longer rise. 
  • When used in small amounts, sugar promotes microbial growth, but when used in high enough quantities it inhibits microbial growth. This is why high sugar frostings and icings that contain dairy products (milk, cream, cream cheese) don't require refrigeration. (Note: different States have different rules on refrigeration requirements of cream cheese frosting.  Check with your State to be sure.)


Types of Sweeteners:
  • Granulated sugar is the most common sugar used in baking.  It is made from either sugar cane or sugar beet.
  • Powdered sugar is pulverized granulated sugar with about 3% added cornstarch that keeps it from clumping. (Remember that sugar is hygroscopic and will even absorb moisture from the air.  The corn starch stops this absorption.)  Powdered sugar is about 10 times as fine as granulated sugar. It is commonly called 10X sugar.  Powdered sugar is typically used in frosting rather than cake batters.  
  • Fondant sugar is an extremely fine powdered sugar. Fondant sugar is 100 times finer than powdered sugar and contains no corn starch. As the name implies it is used to make fondant.
  • Brown sugar is granulated sugar with about 10% added molasses.
  • Simple Syrups are made by mixing equal parts liquid and granulated sugar and then heating till the sugar is dissolved and the liquid is reduced.
  • Glucose Corn Syrup is a clear syrup produced from the breakdown of starch molecules. Corn Syrup isn't as sweet as granulated sugar, but it does act like sugar (tenderizes, moistens, browns). Corn Syrup is used to thicken products and prevent the recrystallization of granulated sugar. Corn Syrup can also be added to cake batters to tenderize (inhibit gluten production) without making the cake as sweet as granulated sugar. Corn Syrup is added to glazes and icings to make them flow better, add a glossy sheen, and add bulk without making them overly sweet.


Got Milk? 

If a recipe calls for whole milk, can you substitute 2%, skim, or even water? If a recipe calls for water, can you substitute milk? Well, the answer is yes and no. Whole milk is 88% water so the substitution probably won’t drastically impact the overall structure of the cake, but it might affect the look and taste. In addition to water, whole milk contains about 5.0% Lactose, 3.5% Milk Fat, and 3.5% Protein. The 12% of milk that is not water is know as the Dry Milk Solids (DMS).

The primary purpose of the milk (and milk products like sour cream, buttermilk, etc) is to add moisture (water) and moistness (a liquid sensation in the mouth)  to the cake. Remember that moisture (water) is necessary for the formation of gluten and for the hydration of starch and sugar.  But the milk solids in milk products serve other purposes as well:
  • The solids in milk causes browning of a cake. The combination of milk protein and sugar are the basis for the Maillard reaction which gives baked items their golden brown crust. To reduce the amount of browning on a cake you can lower the baking temperature or add an acid like Cream of Tarter, vinegar, or lemon juice.
  • Milk products delays staling in baked goods.
  • Milk gives a richness of flavor and helps blend flavors.
  • Milk firms up the cake crumb making it more resilient and easier to handle.
  • Milk products also strengthens the cell structure of egg whites keeping them from stretching and breaking during baking.
  • Powdered whole milk added during the creaming of fats and sugar will helps trap more air into the mixture. Trapping more air will produce a finer cake crumb.
  • Milk solids also stabilize the creamed mixture of fat and sugar. The milk solids include emulsifiers that keep the fats and water bound together. Without the emulsifiers the fats and water may "break" or separate.


What’s your favorite FAT?


Cakes can be made with different fats including butter, margarine, lard, shortening, and oil.  Each will give their own unique texture and flavor to the cake, but all are used to tenderize a cake.

So is one fat better than the other? Some people think that cakes made with butter are the best, but does the science backup that thinking?
  • Butter
    • Butter is by far is the best tasting of the fats.  Nothing is better for flavor and mouthfeel, but butter is expensive.
    • Butter is not very healthy because it is high in saturated fat (more than lard) and cholesterol, 
    • And because of its low melting point, butter it is not the best option for getting fluffy cakes with a lot of volume and a fine crumb.
    • Butter is more suited for dense cakes rather than light, fluffy cake.
    • If a recipe doesn't indicate which type, then always use unsalted butter. Different brands of butter will have different amounts of salt, so if you use salted butter you are never sure how much salt you are actually putting in the cake.
    • Don't use salted butter in buttercream, it is just too much salt for frosting.
    • In the US butter has a minimum of 80% butterfat. The rest is typically water (16%) and milk solids (4%). 
    • To make a moist cake you need a lot of liquid.  You also need this liquid to stay in the cake during baking and not turn to steam and escape.  Shortening does a better job of trapping moisture and air than butter, so a cake made with butter will be drier than the same cake made with shortening.
  • Lard is another fat, but because of its crystalline structure it is not suited for fine-crumbed cakes. Lard is used mostly for pie crusts.
  • Margarine is imitation butter. It has a similar composition of butter (80% fat and 16% water), and is healthier and cheaper. But margarine doesn’t have the same pleasant mouthfeel as butter and tends to leave an oily or greasy feel to the mouth.
  • Shortening
    • Shortening is the same as margarine minus the water. 
    • Because shortening can trap and retain more air and liquid, a cake made with shortening will be moister than the same cake made with butter. 
    • Common grocery store brands are considered "All Purpose Shortening". They can be used in everything from cakes to a deep fryer.
    • You can also buy High-Ratio shortening that has added emulsifiers which helps the shortening trap and holds more air and liquid. This makes it well suited for both cakes and frostings. The High-Ratio shortening makes frostings creamier and fluffier, and makes cakes that are moister and more tender. Opt for the High-Ratio shortening if you can find it. 


Eggs

Eggs, like flour, are structure builders. Eggs are actually just as important as gluten for building a well structured cake.
  • Heat from baking interacts with the protein in eggs and cause them to coagulate and form a network of interconnected strands of protein.
  • Without eggs, most cakes would collapse.
  • Use fresh eggs - Fresh eggs will whip up lighter and fuller than older eggs. Fresh eggs are also slightly acidic which helps stabilize the egg proteins which part of the cake's structure builders. As an egg ages it slowly becomes more alkaline which make the protein strands less stable.
  • Whipped egg whites are excellent at trapping air because egg whites can expand up to 8 times their volume during whipping. Air bubbles in the batter are essential part of leavening. (see section on leavening below.)
  • But make sure you don’t over whip your egg whites.  Over whipping will stretch and thin the cell wall of the proteins, and during baking these thin cell walls will break and collapse.
  • Sugar helps to stabilize whipped egg whites and keeps them from collapsing or weeping.
  • Egg yolks contain a natural emulsifier that helps keep fat and water from separating. Because of this emulsifier, eggs are often added to creamed butter or shortening to keep the mixture stable. The emulsifiers in egg yolks help bind together ingredients (water and fat) that would normally repel each other.
  • But make sure you follow the recipe directions and only add one egg at a time!!! And make sure you fully incorporate each individual egg into the fat before adding the next egg!!!  And don't use cold eggs.  Adding cold eggs or adding the eggs too fast will cause the emulsion to “break”. When the emulsion breaks, the water in the egg will separate from the fats and they can never be rejoined. 
  • When the emulsion "breaks", the mixture will look curdled.
  • Once the emulsion “breaks”, it is broken for good. Adding additional ingredients like flour may make it look like the water and fats are once again bound, but they are not. A poorly emulsified cake will not rise properly and will have a coarse, hole-ridden crumb.
  • Despite the fact that eggs are 75% water, too many eggs will make a cake dry. Remember that the protein in eggs builds structure, and the additional structure will dry out the cake. The water in the eggs will convert to steam and escape during baking. This steam will lift the cake and cause it to rise, but it will also dry out the cake. This is why adding an extra egg to a brownie mix will change them from dense, moist and fudgy to lighter, cake-like, and drier.
  • Over whipping egg whites will also dry out a cake. If the recipe calls for egg whites whipped to soft peaks, stop at soft peaks and don’t over whip to stiff peaks.


How to get your cake HIGH...

Cakes are light and porous because gases trapped inside the batter expand (due to heat and chemical reaction) and stretch the flexible cell walls of the gluten, starches, and egg proteins. This process of gas expansion is called leavening. Leavening is what gets your cake high.


There are three types of leavening gases in cakes: steam, air, and carbon dioxide.

  • Steam is created when the water in the batter is heated beyond the boiling point. Water expands to over 1600 times its volume when it goes from a liquid to a solid state, so water and the resulting steam is a major leavening gas in cakes.
  • Carbon dioxide is created when Baking Soda comes in contact with an acid like vinegar, lemon juice, buttermilk, etc.
    • Baking Powder is a mixture of Baking Soda and a dried acid like Cream of Tarter. When the baking powder comes in contact with water the water hydrates the dried acid which in turn reacts with the baking soda in the baking powder mix to produce carbon dioxide.
    • Most baking powders are Double Acting, so carbon dioxide is first activated when the baking powder come in contact with water and then again when it is heated. 
    • Check the date on your baking powder – make sure it isn’t expired or close to it. 
      • Once a container is open, high humidity can also weaken the baking power. 
      • To test the effectiveness of the baking powder, place 1/2 teaspoon of baking powder in bowl and pour 1/4 cup of boiling water over it. If it starts to bubble violently then it is still good. If it just bubble little, get a new can. 
      • You don’t want to ruin your cake because of an old baking powder.
  • Air is the third leavening agent. 
    • Air is introduced into the cake batter through physical processes.
    • When flour is sifted, air is trapped between the particles and the flour fluffs up. This is another reason to SIFT your flour!
    • When sugar is creamed with fat, air gets trapped between the grains of sugar and smears of fat forming tiny air bubbles or pockets.
    • When egg whites are mixed, huge amounts of air is introduced which expanding the egg whites 3,4 or 5 times their original volume.
    • Even the act of stirring the batter or folding other ingredients into the batter traps air inside the mix.
    • Air bubbles / air pockets are very important to the final density, height, and crumb of the cake. The more air pockets trapped in the batter, the finer the texture or crumb of the cake.
    • Air pockets are ONLY formed during the mixing process.  Once mixing stops, no more air pockets are created. 
    • Once in the oven, heat causes the air sitting inside the pockets to expands a tiny bit, but the trapped air is not the real magic of the air pockets.
    • Instead the real purpose of these air pockets is to give the other gasses a place to collect. As the steam and carbon dioxide form, the gases will collect in all available air pockets.  Once inside the air pockets, the steam and carbon dioxide gases start expanding, and expanding, and expanding.
    • The expanding gas pushing on the walls of the air pockets, enlarging the size of the bubble and forcing the cake to rise.
    • The number and size of the air pockets is very important because they determine the "crumb" of the cake.  A large number of small air bubbles will give you a fine crumb, a smaller number of large air bubbles will give you a coarse crumb.
    • Without air pockets the gasses have no place to collect.  Eventually the gasses will form massive bubbles and tunnel their way to the surface of the cake.  Once at the surface they explode like lava erupting from a volcano.   If you find worm-like tunnels in your cake it means you didn't mix the batter enough, and not enough air bubbles were formed.

Whoa my fingers are tired, if you made it this far I guess your eyes are tired too.  Who knew there was so much chemistry and physics involved in combining Flour, Fat, Sugar, Liquid, and Eggs.   

But don't take your Alton Brown hat off just yet -- you will need it for the equally scientific process of Mixing the Batter.


Next up is Part 3 - Oven, Pans, and Pan Prep

PS:  If you want to read more about the science of cooking and baking.  Try How Baking Works,  The Science of Good Cooking, The Baking Bible, or any of the Alton Brown Good Eats books.


Happy Baking,
Carol

Monday, April 24, 2017

(Part 1) - 1001 Tips for Making Your Own Wedding/Celebration Cake - Part 1 - The Design & Planning Phase

Disclosure: We are a participant in the Amazon Services LLC Associates Program, an affiliate advertising program designed to provide a means for us to earn fees by linking to Amazon.com and affiliated sites.

Does the price of a fancy wedding or party cake give you sticker shock?

Do you think, "What!!! It is just eggs, sugar, and flour! I can make it myself for a fraction of the cost?"

Well cake may indeed be just eggs, sugar, and flour, but the price of raw ingredients is nothing compared to the labor costs, the skill of the decorator, and the experience your professional bakery has dealing with all the potential cake related disasters.

But if you are on a tight budget and you willing to settle for something less than a Hollywood showstopper, making your own wedding or celebration cake is doable. It IS doable, but realize that there are HUNDREDS of things that CAN AND WILL go wrong during the process.

Below is a list of Tips, Tricks, and Lessons I've learned over my decades as a hobby/wanna-be cake decorator. It saddens me to admit that even after 40 years of practice, something still goes wrong every time I make a cake.

Hopefully after reading these tips you can:
1) avoid some of my disasters,
2) dodge some of my missteps, and
3) never experience my constant fear of getting featured on Cake Wrecks.

1001 Tips for Making Your Own 
Wedding or Celebration Cake

To keep this post from getting too long <bwahahahah>, I have broken it into 9 parts.


Part 1 - The Design & Planning Phase (you are here)
Part 2 - The Science of Ingredients
Part 3 - The Oven, Pans, & Pan Prep
Part 4 - The Mixing Phase - coming soon
Part 5 - The Baking Phase - coming soon
Part 6 - Filling, Crumb Coating, and Covering the Tiers -  coming soon
Part 7 - The Stacking & Support Phase - coming soon
Part 8 - The Decorating Phase - coming soon
Part 9 - Transport, Delivery, Placement & Repair - coming soon


 Part 1 - Design & Planning Phase 


  • KEEP IT SIMPLE
  1. I know it sounds trite, but pick a simple design. The more elements on the cake, the more things can go wrong. 
  2. Ignore the siren call of Pinterest masterpieces and settle for something like a simple stacked cake with a bouquet of flowers on the top or flowers cascading down the side. 
  3. Go with a round cake.  Round cakes are so much easier to work with than square cakes, especially if you are going to cover them in fondant.  Getting fondant to fit around the sharp side edges of a square cake is hard.
  4. And skip the fancy shapes.  No hearts, hexagon, or paisleys pans.  For one your will never use the pans again, and two the weird angles are a pain to work with.
  5. Avoid designs that include piping or string work on the sides of the cake.  Believe me this is a skill that takes a lot of time, patience, and practice.  Nothing is worse than half your piping falling off the cake before it even gets to the party.  There are special tilting turntables that will help with the job, but they are expensive if you are only going to use it once.
  6. Ditto with the piped shell borders at the base of the cake.  Sure it is easy to pipe the first one, but getting the other 100 to look even, uniform, and identical is a bear.  And nothing screams "look at me" like a border with miss matched shells.
  7. Instead of a piped border, attach a pretty ribbon at the base of each tier.  This is an easy way to add elegance to a cake and hide a bunch or stacking flaws.  There are always gaps between the stacked cakes, and you need to use some technique to hide them.  A ribbon is the perfect camouflage.
  8. - but make sure to cover the back of satin ribbons with Glad Press & Seal wrap.  You don't want the dye from the ribbon leaching onto the cake, and chances are the ribbon is not food safe. The Press and Seal has a sticky side, so just cut the wrap to size and stick it on the back of your ribbon.  Easy Peasy.
  9. You can also use sugar pearls or candy sixlets to hide the gap.  Just line the little candy ball along the gap and secure them with melted white chocolate.  You can also make strands of beads out of fondant using a silicone bead mold.  But whatever you do, don't use Mardi Gras Beads!  Sure it is super quick and easy to drape a strand of beads around base of the tier, but you don't know where those beads have been! 
  10. And this point brings up the Cardinal Rule of Cake Decorating - You only want FOOD SAFE stuff attached to or touching your cake.  You don't want to inadvertently poison Aunt Betty.
  11. In recent years I have seen a shift from ultra elaborate wedding cakes to some more understated.  (Maybe because all of the Cake Shows have disappeared from The Food Network?)  One of the new trends in wedding cakes is the simple "buttercream spoon technique". This method is easy to do and it looks great. It also hides all kinds of flaws in the cake because it is supposed to look rustic rather than sleek and perfectly smooth.  
  12. And those pretty Naked Cakes that have been all the rage?  You might want to skip them.  I thought - "Hey, no frosting on the side, this will be easy!"  Sadly, the "Naked Look" takes a little more effort than one might expect.
So in summary, my first tip on making your own wedding cake... Keep the Design Simple.


  • FLOWERS
What would a wedding cake be without flowers?  I love flowers: peony, iris, calla lily...  Any type of flower looks beautiful, but what kind to use on your cake? And by "kind" I mean kind of material.  The choices are Gum Paste / Fondant, Silk, or Fresh.   Each has pluses and minuses.

  1. Gum Paste flowers can look amazingly realistic (not mine of course), but they take a lot of skill and time to create. If you have the talent and the hours to play, they are the best option because they are (for the most part) FOOD SAFE.   
    • But gum paste flowers can get expensive to make because of all the equipment involved.  You need the gum paste of course, but you also need cutters for each flower and leaf type being used, small rolling pin to roll out the gum paste, veiners to put patterns in the soft gumpaste which make them look realistic, tools and foam pads to shape the petals, food safe wire and floral tape (wire from the hardware store shouldn't be used on cake), and some way to color the flowers - either gels or powders.  There are lots of other tools and gadgets you can buy to make the job easier, but the items listed above are the basics. 
    • If you want the food safety of gum paste without making them yourself, you can buy ready-made gumpaste flower and bouquets
    • And the best part of making gum paste flowers is that you get a lasting memory of your accomplishment.  When I use silk flowers on a cake they always get thrown away after the event, but gum paste flower are always kept and saved by the bride-to-be or the birthday girl.  Long after the cake itself is gone, the gum paste flowers will live on.  
  2. Good quality Silk Flowers sometimes look more real than real flowers.  Silks flowers are an easy and attractive option for someone making their own wedding cake.
    • But please, please, please, don't place silk flowers directly on the cake!  Unlike gum paste they are NOT food safe. 
    •  Silk flowers are made all over the world, and you as a cake decorator don't know the cleanliness standards of the factory where they were made. 
    • You don't know about the dyes, or the plastics, or the wires used. Is there lead in the dye? Hazardous chemicals in the plastics? 
    • What about bugs and rodents crawling across the material as they are assembled and shipped? How many dirty hands touched them before you brought them to your kitchen? 
    •  It doesn't take a lot to make some people sick, so do take precautions if you are going to use silk flowers. 
    • Big WARNING - Don't just stick silk flowers into your cake or lay them on top. Put a barrier (a plate or cling wrap) between the flowers and the cake
    • or coat any part of the silk flower that touches the cake with melted white chocolate or Candy Melts. The chocolate barrier serves two purposes: it keeps the silk flowers from directly touching the cake, and when the melted white chocolate dries it acts like a glue and secures the flowers to the cake. Win, win. 
  3. So what about Fresh Flowers on the cake? Well this is even trickier. 
    • First you need to figure out if the flower itself is poisonous.  Do you know that common flowers like azalea, calla lily, hyacinths, hydrangeas, lily of the valley, oleander, rhododendron, sweet pea, and wisteria are poisonous? You don't want to show up with deadly flowers on your cake, and accidentally have someone eat it.
    • Another issue is finding flowers that are ORGANICALLY grown, meaning they were grown without chemical herbicides or residual pesticides. This also means that the grower can't have used any systemic toxins or weed-and-feed fertilizers. Hey would you want to eat a cake that is covered in roses that were just sprayed with pesticide like Sevin? So if you don't know if your flowers are organic, place a barrier between the flowers (also stems and leaves) and the cake. 
    • Also, if using fresh flower be sure to remove the stamen and anther.  You don't want pollen falling off the flower and covering your cake with yellow dust.  

  • Cake Flavor/Recipe
  1. During the planning stage you must decide on the CAKE FLAVOR/RECIPE to use.  
  2. Another decision is BOX MIX or SCRATCH. 
  3. When selecting a particular cake recipe, keep in mind that the finished cake (especially the bottom tier) needs to be sturdy enough to stand up to all the poking, prodding, and abuse that goes on during the decorating and transport of your cake. Think Pound Cake.
  4. Scratch cakes are typically denser than a box mix cake, but a scratch cake is more prone to error and therefore more stressful. 
  5. A box mix on the other hand has been perfected over decades to bake up perfectly every time.  A box mix has also been formulated to bake up light a fluffy, which is actually a VERY BAD thing when making a stacked wedding cake. 
  6. A regular box mix produces a cake that is just too delicate to handle the weight of fondant, gum paste decorations, rods, dowels, and multi-tired stacks. But if you want to use a box mix don't despair, using a box is still an option as long as you "Enhance It". The enhancing (adding extra things like sour cream, extra eggs, etc) makes the finished box mix cake denser, sturdier, and less prone to collapse. 
  7.  One of the most popular enhanced recipes is the White Almond Sour Cream Cake (WASC). It has been used for years by countless bakers. I like using Duncan Hines mix in my WASC because I think it is a little sturdy than the Betty Crocker and Pillsbury. 
  8. Also be aware that a few years ago the volume of mix in the box was reduced by almost 3 ounces. All the major brands quietly went from 18 oz to either 15+ oz or 16+ oz without saying a word. Sneaky. THE WASC recipes were designed with 18oz boxes in mind, so to compensate for this short-sheeting of the box mix I just add 2 additional ounces of flour to get the proportions back in sink. 
  9. You can find variations of the WASC recipe all over the web, but my favorite link is on Food.com because it gives you tons of variations. You can make Chocolate WASC, or lemon, or coconut cream, or even Orange Popsicle.

  • Number of Servings
  1. Decide on the number of SERVINGS needed (how many people will be eating cake).  A good estimate is that 70% of invited guest will actually show up at the party, so take the invite number * 70% and that is how many servings of cake you will need.
  2. But what is a "serving"?  Well there are two standards.  You can have a "wedding" serving which is a piece of cake that is  1" wide x 2" long x 4" high, or a "party" serving which is 1.5" x 2" x 4". 
  3. Once you know how many servings, you can calculate which size pans you need to get the servings you want.  
  4. There is a whole science to cutting the cake to get the correct number of serving and hundreds of website to show you how to do it, but according to Wilton's charts, a 6" round cake is 12 wedding servings, an 8" round cake is 24 servings, a 9" is 32, a 10" is 38, a 12" is 56, and 14" round cake is 78 servings. 
  5. So if you have 150 invited guest, multiple that by 0.7 to get 105 people eating cake.  A 3 tier round cake of 8-10-12 will give you 118 servings which is just enough cake. 
  6. But if you have a family like mine that simply LOVES cake and wants to take 2 or 3 pieces home to eat for breakfast the next day, double the number of servings or you will have a riot on your hands.

  • Simple Syrup 
  1. Do you want to soak the cake layers in SIMPLE SYRUP? 
  2. A simple syrup is a mixture of water, sugar, and flavoring that is brushed on each cake layer before filling and stacking. 
  3. The syrup is used to add moisture and flavor complexity to the cake. 
  4. I love using chocolate syrup on chocolate cakes, but I have mixed results on white cakes. If too much syrup is used it can make the cake gummy.

  • Filling
  1. Decide on the FILLING. 
  2. Do you want a fruit filling between the layers or just buttercream? 
  3.  Fruit fillings may taste better and add flavor complexity, but they make the cake less stable. 
  4.  If the fruit filling is not "dammed" properly (see Part III on Filling, Crumb Coating & Covering the Tiers) it can cause bulges, blowouts, oozing, or in the most serious disaster: slippage & collapse. 
  5. Fruit filling are especially troublesome during the hot summer months.
  6. Other options for filling include Curd, Custard Buttercream (which is a pastry cream with added butter and powdered sugar), and Whipped Cream Frosting (which is whipped cream with added marshmallow cream, butter or gelatin).
  7. Another big issue with filling is the red flag of perishability.  Is it safe to have your chosen filling sitting for hours at room temperature?   Be aware that some fillings require refrigeration.

  • Frosting
  1. Decide on the FROSTING for your cake. Some options include:
    • American Buttercream (made with powdered sugar and butter), 
    • Crusting American Buttercream (portions or all of butter substituted for solid vegetable shortening), 
    • French Buttercream (hot sugar syrup added to pasteurized egg yolk), 
    • Italian Meringue Frosting (hot sugar syrup added to whipped egg whites and butter), 
    • 7-Minute Frosting (like Italian Meringue, but egg whites are cooked with sugar and water), 
    • Swiss Meringue Frosting (Cold Italian Meringue Frosting with butter added), 
    • Ermine Frosting (Cooked Flour Frosting), 
    • Cream Cheese Frosting (cream cheese with butter and/or shortening), 
    • Ganache (white or dark chocolate with cream). 
  2. When selecting which frosting to use, taste is not the only thing to consider. Air temperature during transport and at the event is a big consideration. 
  3. If the cake is going to be outside in the heat, you need to use a heat stable frosting like Crusting American Buttercream made from 100% shortening (no butter). It may get soft, but it won't melt.
  4. Rule of thumb is the more butter in the frosting, the quicker it will soften, lose its shape, and in the worst case fall off the side of your cake. 
  5. The most heat tolerant frostings are Ermine, American Buttercream, and Cream Cheese. 
  6. If you are going to cover your cake in fondant, there are several things to consider when making your frosting selection:
    1. Some frostings like Italian Meringue are just too light and fluffy to be used under fondant. Soft frostings won't hold their shape as you drape, smooth, and manipulate the fondant. 
    2. Frostings with a high moisture content will actually begin to melt your fondant if they sit in contact long enough. And what makes deciding on a frosting really difficult is that different frostings will react differently to different brands of fondant. So before making your final decision on frosting do a test: put some of you frosting in a little bowl-shaped ball of fondant. Let the frosted fondant bowl sit for a few days and see what happens. First let the fondant bowl sit in the refrigerator and then at room temperature. Examine the fondant at different intervals and see if it is melting. If the frosting is melting the fondant you will see a puddle of liquid forming under the frosting. 
    3. Heat is the enemy of frosting, and the cause of many collapsing cakes. If your cake is going to be outside in the heat you don't want to use a pure butter based frosting under the fondant, but if the cake will be in an air conditioned room, a butter based frosting under the fondant works great.
    4. How sharp you want the edges of your cake will determine which frosting to use. If you want a razor sharp edge (see Part III - Covering the Tiers) you need something that will set almost rock hard when chilled. Something like Ganache or a frosting rich in butter. 
  7. Another frosting consideration is the frostings perishability.  Some States consider Cream Cheese frosting to be perishable and require it to be refrigerated.  Other States consider it stable as long as it has at least 16 oz of sugar to every 8 oz of cream cheese.    And as a final gotcha some State consider Ganache perishable because it has cream in it. WHAT??  So check the rule in your location, and when in doubt use Crusting American Buttercream made with shortening.
  8. If you want to see a truly amazing video on frosting check out Ann Readon's 7 Frosting Comparison

  • Cake Drum / Cake Bases
  1. Think about the CAKE DRUM (Wilton calls them CAKE BASES) that forms the base or foundation of your cake.  A cake drum is a big, thick, rigid piece of  foam that sits under the bottom tier of your cake.  Your cake will be anchored to this board, and your will build the cake up from this foundation.  Without a strong foundation, the cake WILL collapse.  
  2. The cake drum allows you to safely move the cake from place to place.
  3. Even if you want to use a fancy pedestal cake stand or a rustic tree stump to showcase your masterpiece, you still need a cake drum. Your cake will grow out of and be anchored to the cake drum.  Cake supports can also be driven through all the tiers of the cake and into the cake drum for add security and support.
  4. The drum "should" be at least 1 inch larger than the bottom cake tier and at least 1/2 inch thick. 
  5. You "can" use a drum that is exactly the same size as your cake, but this gets tricky because it is hard getting a cake covered in buttercream, ganache, and fondant to exactly match the size of your drum. (See me trying to cope with that situation here.  This cake also has a problem with filling bulging out the side, and VERY large gaps between the stacked tiers.) 
  6. Also, don't forget that you need to finish or decorate the cake drum in a way that complements your cake. 
  7. You can buy drums already covered in white, silver, or gold foil. These covered drums look okay in a pinch, but if you want your drum to seamlessly blend into the cake it should be covered in the same fondant as the cake. 
  8. You can also opt for a larger cake drum and decorate it (usually in fondant) in a way that adds to the theme of the cake. If your cake drum is large enough it can also double as your presentation board.

  • Cake Stand
  1. Are you going to use a PEDESTAL CAKE STAND or a PLATEAU
  2.  If your cake is not very tall one way to make it look more dramatic is to set it on top of a pedestal cake stand or a fancy silver plateau
  3. If you want a pedestal stand, be aware that they come in all shapes, sizes, and colors.  Choose the one you like, but make sure that whatever you select is sturdy enough to hold the cake. A three tired cake can weigh as much as 50 pounds, so select your pedestal stand with care. You don't want to place your finished cake on a delicate, airy pedestal stand and watch in horror as it collapses and dumps your cake on the floor (been there done that).
  4.  Also, when selecting a cake stand make sure the top is completely flat. You don't want and waves or ripples that might cause your cake to warp and possibly fall. 
  5. If your cake drum is larger than your cake, remember to buy the stand to fit the drum and not the bottom tier of the cake (been there done that too). 
  6. And what ever you do, don't try to transport your cake on the pedestal or plateau. Even having another person hold the pedestal while you drive is not a wise decision.

  • Practice
  1. Once you have settled on your design, you need to start PRACTICING . 
  2. You need to bake your chosen cake in your kitchen and figure out the best baking times for your oven and size of pan. 
  3. Make a batch of your frosting and see how it tastes with the cake. 
  4. Buy some foam CAKE DUMMIES in the same size as your tiers and stack them to see how they look. 
  5. If you are going to cover your cake in fondant you can practice on the dummies. Smear vegetable shortening on the dummies and practice your fondant covering skills. You can remove the fondant, re-roll it, and try again and again till you get comfortable with the process. (Throw away the used fondant after you are finished playing with it.) 
  6. If you are putting flowers on your cake you can test your arranging skill on the dummies. Do the flowers look better on top or on the side? Use this practice time to work out all the kinks in your design. You don't want to leave all these decisions till the day you are assembling the cake! 
  7. You can also include cake dummies in your finished cake.  If you don't need a lot of servings, but still want a tall and impressive cake, swap out cake dummies for actual cake tiers.  In the "Mummy" cake below you can see that I used a cake dummy for the bottom tier.
    When everything is covered, you can't tell that the bottom is not cake.
  8. You can even make the entire cake out of dummies, and make sheet cakes to actually serve to your guest.  The dummy cake can be made well in advance, but not too far in advance because over time the decorations will start to yellow and accumulate dust.

  •  Timing / To-Do List
  1. The final tip in the portion is about TIMING. 
  2. When it comes time to actually make the cake - DON'T TRY TO DO EVERYTHING IN ONE DAY! You can spread the tasks out over days and even weeks. 
  3. Make a To-Do list of every step/item needed and start checking them off.
  4. Bake your cakes days/weeks ahead of time and freeze them. Yes, freeze them. Freezing the cakes will make them taste better! (See Part II on Baking tips for more info about freezing.) 
  5. The frosting can also be made a few days ahead of time, 
  6. And if you want to make your own flowers (as opposed to fresh or silk) they must be made well in advance to allow time for the gum paste to dry. 
  7. Assemble and decorate the cake over a two day period, and aim to have the cake completely finished one day in advance. (See Parts III, IV, and V) There is a bakery in my area that has been around for 100+ years (no really), and I was told that once their cake is encased in frosting and sealed up in a cardboard box, it will stay fresh for five days. 
  8. Also check with venue and see if you can deliver the cake the day before the event. 
  9. Remember, don't try and do everything on the day before your wedding. If you break up the task and spread them over weeks and day, you won't end up pulling out your hair in a last minute panic.

So this concludes Part 1 - Design and Planning Phase. If you have any more tips or suggestions for this section, just drop me a comment and I will add it to the list.  If I got something wrong, also let me know so I can fix it.

Next up is Part 2 - The Science of Ingredients


Happy Decorating,
Carol

Sunday, April 9, 2017

Fat Daddio's Pro Series Fondant Review

Disclosure: We are a participant in the Amazon Services LLC Associates Program, an affiliate advertising program designed to provide a means for us to earn fees by linking to Amazon.com and affiliated sites.
 
For years I have been searching in vain for that perfect fondant. I don't want much (LOL), just something that tastes good, is easy to work with, doesn’t tear or develop elephant skin, takes color well, doesn’t form bubbles, and hides the imperfections in the cake below. I think I have tried about 11 different bands, and while each fondant does well in one or two categories, none of the fondants have gotten high marks in all the categories.

(If you want to read about other fondants I've tested you can checkout the 7 fondant comparison, the Via Roma, the Cake Craft, the Carma Massa,  the Dream, the Renshaw, and the Fantasia comparison.)

So my never ending search for the perfect fondant continues. The 12th fondant that I'm testing is:


Fat Daddio’s Pro Series Fondant


In my non-expert analysis of these fondants, I use nine different criteria: Taste, Texture, Rolling, Coverage, Draping/Smoothing, Cutting/Trimming, Drying Time, Tinting, and The Final Look.


Taste - This Fat Daddio’s Pro Series Vanilla actually taste pretty good. Nothing fabulous, but nothing objectionable either. It has a noticeable vanilla flavor, and the mouth-feel is very soft. It melts in the mouth and is neither chewy nor gummy. Rolled buttercream comes to mind when I eat the Fat D fondant.


Texture – Out of the pail this fondant is very soft and squishy. You can pinch off pieces with no effort. The fondant is very easy to knead, roll and shape; and like the Dream fondant I reviewed a few weeks ago, it easily picks up textures from leaf veiners, impression mats, or even paper towels. One negative about the Fat Daddio’s texture is that it has no elasticity. When pulled, the fondant breaks apart rather than stretching. Another negative is the soft texture of the fondant makes it extremely easy to gouge. This is not a fondant for someone with long fingernails.


Just sitting the fondant on a paper towel leaves marks. 


Rolling – Because the Fat Daddio fondant is so soft it is very easy to roll, and best of all --- no air bubbles. Not a single air bubble appeared in the fondant as I rolled it. Some fondants are so frustrating to use because huge bubbles form when the fondant is kneaded and conditioned.  The professionals say you can pop the bubbles and they disappear, but I've never had much luck doing that.  The outline of the bubbles always seem to show.  But even though the Fat D is easy to roll and leaves no bubbles, the rolling test uncovered one minor negative: split, cracked and ragged edges. Because the Fat Daddio fondant is not very stretchy or elastic, the edges start to split and crack as the fondant is rolled larger and larger.


Coverage – When rolling 5ozs of the fondant to 1/8” thick, I managed to get a 11” circle. This is about middle of the pack as far as coverage. But I should note that I found the Fat Daddio’s fondant a little difficult to work with at 1/8” thick. At this thickness the fondant was a little fragile and had a tendency to rip. It would probably work better at 3/16” or even 1/4".


Draping/Smoothing - When placed on the cake dummy, the fondant immediately started settling and fitting itself to the top of the dummy. Lots of folds were created, and they draped soft and loose around the cake.


But I found the smoothing of the Fat Daddio’s fondant was little more difficult than other brands. The fondant ripped and tore in places instead of stretching, and the weight of the excess fondant around the base of the cake also seemed to pull  the fondant down. My first attempt covering the dummy cake looked so bad that I pulled it off and started again. On the second attempt I removed the extra fondant pooling at the base, and this helped a lot. I'm guessing the rips were caused by the thinness of the fondant and its lack of stretch. If I had rolled the fondant a little thicker, it probably would have been fine.


Cutting/Trimming – The fondant cuts easily but tends to stick to the cutter and pull up a little. Edges get a little ragged.


Drying Time – Average drying time: not too fast, and not too slow.  


Tinting – No major problems with tinting using Wilton food color gels, but some of the Americolor tints looked off. Americolor Mauve looked a little brown, the Americolor burgundy looked a little purple, and the Americolor Dusty Rose looked a little orange. So test on a small sample before tinting a large batch.


Final Look – Overall the finished look of the Fat Daddio’s Pro Series fondant was pretty good. The fondant floats above the surface so you don’t see a lot of the imperfections in the underlying cake. The fondant didn’t form any “elephant skin”, but it does have a tendency to rip if you roll it too thin and have too much excess fondant pulling it down. The fondant doesn’t have much elasticity so it is going to rip rather than stretch when you pull it. It also gouges easily so watch out for your fingernails.


So Fat Daddio’s Pro Series Fondant is a solid contender. It is not the “best” in any of the categories, but it is not the worst either. It does well in all the categories so it is a good all-purpose fondant.

Happy Baking (and Decorating),

Carol


Saturday, April 1, 2017

Cadbury Cream Eggs reimagined as COOKIES

Disclosure: We are a participant in the Amazon Services LLC Associates Program, an affiliate advertising program designed to provide a means for us to earn fees by linking to Amazon.com and affiliated sites.
 
I recently saw a Pin for homemade Cadbury Cream Eggs that had me tempted to give it a try. The photo looked so cute; the process looked so interesting. The only thing that stopped me cold was the fact that I HATE gooey cream candies.  I don’t like the texture; I don’t like the way it oozes around my mouth. Yes, I know I’m weird, but the aversion has something to do with a childhood incident where my older brother convinced me that my half eaten box of chocolate covered cherries actually contained chocolate covered tadpoles. Gotta love those older brothers…

So instead of homemade Cadbury Cream Eggs, I wondered if I could make the eggs out of cookies??? I could make a yellow “yolk” cookie center, a white cookie layer, and a chocolate shell. Sounds good to me. Here is the end result. I call them: Mock Cadbury Cream Egg Cookies…


Be honest, how do they look?  Would you have thought, "that looks like an egg" if I hadn't put the suggestion in your head?

The first step on this cookie adventure was deciding what kind of cookie recipe to use: sugar cookie, spritz cookie, sand tarts, sandies? I needed a cookie that would hold it shape during baking; something that wouldn’t spread. I finally decided on a Mexican Wedding Cookie recipe (aka Sand Tarts) minus the chopped pecans.

I quickly mixed up a batch of the dough, but it looked a little strange without the pecans to help bind the mix.  It came out pretty sticky - almost paste-like, but I just added a little more flour and kept on going. Next I tinted about 1/3+ cup of the dough using Wilton’s Buttercup Yellow food gel, and I got this bright, almost neon concoctions.  Looks like baby food doesn't it?


The rest of the dough didn’t looked “white” enough to represent the white of the egg, so I tried using some of Americolor’s Bright White gel. I used about 25 drops and while the dough looked a little paler, it wasn’t really white.


Next I made little balls from the yellow dough (about 3/4 teaspoon each) and froze them. Freezing the yellow balls keeps them from getting smooched out of shape as you pack the white dough around it.


I flattened about 1 Tablespoon of the white dough into an oval shape, and then wrapped it around a frozen ball of yellow dough.


Make sure to squish the white dough firmly against the frozen yellow ball to remove any air pockets. All the air pockets must be removed or the surface of the cookie will collapse during baking.


As a final step, mold the white dough into an egg shape where one end is rounder and fatter than the other end.  Now the baking. Because I used a Mexican Wedding Cookie recipe, I baked the cookies slow and low. 45 minutes at 270 degrees F.    Here they are just out of the oven, and notice that on some (most) of the cookies I didn't get all the air pockets out, so the white part of the cookie kind of collapsed around the yellow part.  Bummer.

After they are completely cool, I dipped them in chocolate ganache. (My ganache was a little too thick, so I did more “frosting” then “dipping”.)


And finally, a little bit of piped on decorations.


So how do you thing they turn out?  I think they kind-of, sort-of look like a cookie version of a Cadbury Cream Egg, but what do you think?


Happy Baking,
Carol


Mock Cadbury Cream Egg Cookies 
(yield 15 cookies)

Ingredients:

1 cup (2 sticks) unsalted butter, softened
1/2 cup Powdered Sugar
1 teaspoon Vanilla Extract
2-1/3 cups All Purpose Flour

Dark Chocolate Ganache

Directions:
  1. Cream the butter and powdered sugar together, add the vanilla and mix until incorporated.
  2. Slowly add the flour to the butter mixture and mix until incorporated.
  3. Remove about 1/3 cup of the dough and tint a bright yellow color.  Using about 1 teaspoon of dough form 15 small yellow balls.  Place in freezer until they are firm to the touch.
  4. With the remaining dough, flatten about 1 tablespoon of dough into a flat disk shape.
  5. Place one frozen ball of yellow dough in the center of the disk, and then fold the white dough up and around the yellow ball.  Squeeze and roll the white dough firmly around the frozen yellow ball to make sure there are no air pockets.  Mold the dough into a egg shape.  
  6. Place the formed cookies on an un-greased, parchment lined cookie sheet.
  7. Bake in a preheated oven for 45 minutes at 270 degrees F until the bottom are just turning brown.
  8. Allow the cookies to cool completely before dipping them in chocolate ganache.
  9. Decorate as desired.