Thursday, June 13, 2019

PJ Mask Cake

There must be something like a million bigillion cartoon shows for kids.  A family member asked me to make a PJ Mask Cake for her son's 3rd birthday and I just thought PJ WHAT??  Here is yet another cartoon show I know nothing about.

But a quick google search turned up silhouettes strutting around a cityscape bathed in a yellow glow of a rising moon.  I didn't know kid's cartoons could be so poetic, but then I realized the silhouettes had names like Catboy...


Gekko...

And Owlette!


LOL, so much for poetry.


<< Disclosure: We are a participant in the Amazon Services LLC Associates Program, an affiliate advertising program designed to provide a means for us to ear fees by linking to Amazon.com and affiliated sites.>>

Anyway... the first step in this cake construction was to make the night time cityscape and the 3 character silhouettes.  I used Fondarific Black Fondant mixed with a little Wilton Tylose Powder.  The tylose power makes the fondant sturdier and able to stand up straight without any additional support.  It is a cheap-man's gumpaste.  I cut out the cityscape using a long razor slicer, and then I added some windows using yellow tinted fondant (Buttercup Yellow).  Next I made the big yellow moon that would hang behind the city.  Once both the moon and the cityscape were dry, I glued them together with some yellow candy melts and then glued bamboo skewers to the back with more candy melts.


Next I cut out the "Masks" from tinted fondant.  I found an image of the characters and printed the masks so they would fit the side of my cake (4" tall).  Here are all the templets I used.


I cut the printed mask images into the individual components and then used the paper cutouts as a guide to cut out the fondant.  For Catboy I used Wilton Royal Blue and Sky Blue food gels.


For Gekko I used Leaf Green and Electric Green gel food colors.  For Owlette I used Red Fondarific Fondant. (I hate, hate, hate tinting fondant a deep red so I just buy the ready made stuff.)  I also textured Gekko and Owlette with some cheese cloth.


For the "ribbon" around the base of the cake I used my trusty ACE Food Safe Extruder.  I love this thing.  It is one of my favorite (and most used) cake decorating tools.


For the lettering I used a font called Heros and Legends from the DAFonts.com website.   I typed Duke's name into the site's font viewer, printed the results, and then used the paper templet to cut out the fondant.  Funny almost accident here...  I cut out my paper "2" but then realized Duke was actually turning 3.  Glad I didn't deliver the cake with a 2 on it - that would have been embarrassing.


So here is the finished cake.  Happy 3rd Birthday, Duke.


Happy Decorating,

Carol


Supply List: 

Mona Lisa Fondant
Wilton Tylose Powder
14" Cake Drum
Royal Blue Gel Color
Sky Blue Gel Color
Electric Green Gel Food Color
Fondarific Black Fondant
Fondarific Red Fondant
Wilton's Yellow Candy Melts
Wilton's Buttercup Yellow Gel Color
Leaf Green Gel Colors
Cake Boss Decorating Tools
Razor Slicer
ACE Food Safe Extruder

Sunday, June 2, 2019

Beach Theme Cakesicles

I saw the cutest new thing the other day -

Cakesicles!  

Well it was new to me.  I had never seen it before, and true to form - I HAD TO TRY IT.   A friend at work was having a beach themed wedding, so I justified my new purchases by telling myself it was part of her wedding gift.


<< Disclosure: We are a participant in the Amazon Services LLC Associates Program, an affiliate advertising program designed to provide a means for us to ear fees by linking to Amazon.com and affiliated sites.>>

So what do you think?  I thought they were kind of cute, and actually I didn't buy much stuff to make them.  I bought a mini silicone seashell mold and two sizes of popsicle molds (one mini size and one small size).  I wasn't sure which size mold would work the best so I bought one of each to try them out. 


Here are the two molds being filled with my Slutty Brownies.  The red mold holds about 9 tablespoons of batter and the white one holds about 3 tablespoons.  Here are the brownies being layered together: brownie mix on the bottom, chopped up Twix Bars in the middle, and chocolate chip cookie dough on the top. 


And here they are just out of the oven.  I guess I overfilled the cavities because the brownies puffed up above the edge of the cavity.  But no worries, while the brownies were still hot I just squished everything back into the cavity.  Nothing better than dense, moist brownies with extra chocolate and caramel.


Here they are removed from the mini white one.  They were the perfect shape, and the brownie had no trouble staying on the stick even when I lifted it up.


However, the cakesicles from the red mold fell off the stick when I removed them from the mold.  I guess they were just too heavy for the size of the stick.  But I just took hunks of the brownie mixture and stuffed it into the white mold and made more of the mini cakesicles.

To complete the Beachy Cakesicles I dipped them in Wilton's blue Candy Melts, sprinkled some pulverized graham crackers on one side, and then decorated with sea shells made from white fondant.  But I have to say the Wilton Candy Melts didn't work very well.  Even though I thinned the melted candy with some vegetable oil it was still too thick.  I thought about starting over with a different type of chocolate, but then I decided the bumpy texture was okay because it was supposed to be water swirling around a sandy beach.


So in the end I was happy with my first attempt at cakesicles.  Now I just have to work on getting my chocolate coating all smooth and silky and luscious looking.

Happy Decorating,

Carol


Supply List: 

Mona Lisa Fondant
Wilton Blue Candy Melts
Graham Crackers
Mini white popsicle silicon mold
Full size red popsicle mold
Silicone seashell mold

Sunday, May 26, 2019

LSU Tiger Groom's Cake

Hello all you LSU fans!!  Go Tigers!


This is an LSU Tiger cake I made for a friend's wedding.  The groom (and the bride) were recent graduates from LSU.  Him as a doctor and her as a nurse.

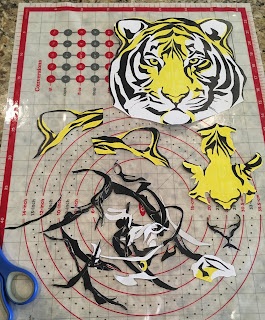
For the cake I started with a black and white tiger image and colored in sections with a yellow marker to make it match the gold markings on "Mike the Tiger". 


Then I carefully cut out all the shapes.  I envisioned this cake coming together like a giant jigsaw puzzle.


<< Disclosure: We are a participant in the Amazon Services LLC Associates Program, an affiliate advertising program designed to provide a means for us to ear fees by linking to Amazon.com and affiliated sites.>>

Once I had the paper pieces, I placed them on top of my fondant and started to cut.  I began with the largest pieces of white and gold fondant (Wilton's Buttercup yellow with a touch of Brown) and then moved onto the smaller pieces.  Here is an ear being cut.  I put the white inner ear inside the gold before I tried to move it to the cake.  More stable that way.


Then I placed them on top of my cake.  See how it all fits together like puzzle pieces. 

And I kind of miss calculated the size of the image I needed.   Duh.   See how the tips of the ears and the chin hairs protrude off the edge of the cake?  That wasn't my plan! I wanted the tiger's face to fit completed inside the cake, but I printed my image too big.  By the time I realized my mistake I had already cut out all the pieces from the paper pattern.  Oops.  Instead of re-cutting everything, I just let the ears hang off top.  I did have to prop them up with little pieces of cardboard to keep them from drooping.


After the base layers of white and gold where in place, I started with the purple stripes.  I use Mona Lisa fondant for my cakes, but Mona Lisa doesn't work well with dyes that are tinted purple (something to do with the pH and the red dyes).  I tried tinting my Mona Lisa with some Americolor Electric Purple, but it just looked like lavender mud.  So I used some pre-colored Sweetshop fondant I picked up a Michael's.  It was an exact match for LSU purple.


Placing all the purple stripes wasn't difficult, but it was a little time consuming.  And some of the stripes were too hard to cut, or too small, or just wouldn't fit correctly, so I rearranged the stripes as needed.  

Next came the LSU letters on the side of the cake.  It was super easy to cut using a Razor Slicer.  This long slicer is an amazingly versatile tool.  I use it on every cake.  It is great for trimming the excess fondant from my big cake drums.


Final step was putting a border around the base of the cake.  I used my ACE Food Safe Extruder to pump out some perfectly sized gold and purple fondant ribbon.


I also used the extruder to pump out some "tube" shaped rope that I used for the stethoscope. I used black Fondarific fondant for this.  And see the little heart I put in the stethoscope?  It was actually an accident.  I was trying to curl the stethoscope around the board and it just landed that way.  When I realized it looked like a heart I like I just left it that way.


For the silver sections of the stethoscope I made them with gray colored gumpaste that I painted with edible silver luster dust.


So the bride and groom where happy with their cake.  Congrats Brittney and Will.


Happy Decorating,

Carol


Supply List: 

Mona Lisa Fondant
Black Fondarific Fondant
Satin Ice Gumpaste
14" Cake Drum
Electric Purple Gel Color
Wilton's Buttercup Yellow Gel Color
ACE Food Safe Extruder
Cake Boss Decorating Tools
Razor Slicer

Sunday, April 14, 2019

Princess Tiana's Dress - In Cake Form

I've been a bad blogger lately.  I've been making lots and lots of cakes, but just haven't had time to post any pictures.  Hopefully I can get back into the groove.

This is a cake I made for my 1st cousin's little girl, Piper.  The party had a Princess and the Frog theme, so we decided to make a replica of Princess Tiana's Water Lily Dress and Crown.


<< Disclosure: We are a participant in the Amazon Services LLC Associates Program, an affiliate advertising program designed to provide a means for us to ear fees by linking to Amazon.com and affiliated sites.>>

What do you think?  Despite all the froufrou, it was actually a pretty easy cake to put together.

I started with a 14" cake drum that I covered in Electric Purple tinted fondant.  The purple is supposed to represent the water of the bayou.  Not very realistic I know, but  I think the color makes a bold contrast to the yellow and green of the dress.  Also a word of caution about the Electric Purple gel color...  The pH of some fondants cause a chemical reaction that mutes any red tones in the food gel coloring.  Instead of getting Electric Purple I got muddy violet.   Adding baking soda to the fondant brings the pH back in line and allows the reds to become visible again.  The baking soda gives the fondant a nasty taste so you don't want to put baking soda laced fondant on a cake, but it's fine for using on the cake drum. 

This two tiered cake is made of a 10" Oreo cake with cookies and cream frosting, and a 7" chocolate cake with chocolate cream cheese frosting.  After frosting the 10" bottom tier with American Buttercream tinted with Wilton's Buttercup Yellow gel color I placed it on the prepared cake drum.

For the petals I colored my fondant with a mixture of Avocado and Leaf Green gel colors.  It was probably about a 3:1 ratio of Avocado to Leaf Green.  The Avocado green looked a little dull, so I added the bright Leaf Green to brighten it up a bit.  For the first layer of petals I mix just a bit of my prepared Avocado/Leaf Green fondant with a lot of pure white fondant.  I rolled the fondant out and then cut 1-1/2" strips using my Wilton Ribbon Cutter.


I then use a paper templet to cut out the individual petals.  Next I used a scoring tool to press a line down the center of each petal.


Then onto the cake the greenish-white petals went.  I let the petals overlap the cake drum which adds a little motion to the cake.  I wanted it to look like the dress was swishing around on the purple "bayou water".


After stacking the top tier onto the cake, I added the Water Lily petals to form the bodice of the dress.  I also made this same petal pattern at the back of the dress.


Next I started on the green leaves.  Again I used a hand drawn paper templet to cut out the leaves.


I dusted the edges of the leaves with some green edible petal dust.  This dusting gives the leaves some depth, and it keeps the leaves from looking like a green glob of nothing once they are placed on the cake.


Then onto the cake went the green leaves.  I started at the section where the Water Lily flower would go.  I positioned the leaves so the curved tips pointed towards each other.  I also put a wedge of green fondant around the base of the top tier.  I did this so the tops of the leaves would slope down and away from the "waist-line" of the dress.


Then I just kept adding green leaves.


I didn't press the leaves down because I was going for the swishing motion look.  Think Tiana dancing around the bayou with her frog prince.


After the bottom tier was covered in green leaves, I added some slightly smaller leaves around the petals of the bodice.  Original I didn't plan on making the leaves droop at the tips but the fondant had started to dry a bit and when I placed the leaf on the cake the tip wouldn't stick.  The tip just kept curling and dropping over onto itself.  I was about to wet the tip and stick it in place, but then I decided I liked the droopy look.  (Note, this is the back of the cake.)


After the petals and leaves were on the cake I made the flower for the side of Tiana's dress.  I didn't have a water lily fondant cutter, so I just used a Daisy Plunger Cutter.  I also embedded some Wilton Flower Stamens into the yellow center of the flower to make it match the original dress.


I also made some extra flower to go on the water lily pads floating in the water.  I didn't have a water lily pad cutter, but I did have a Sweet Pea Cutter.  It sort-of looked like a lily pad, so I used that.


Sorry I forgot to take picture of the Water Lily Crown as I was making it, but I used the same fondant with a lot of Tylose Powder added to it.  I cut out the petals and let them dry curled around a 5" cake dummy.  For the stamens in the crown I used some Wilton Gum Paste Floral Wire with a little blob of yellow gum paste stuck on the tip.

As a last touch I made a little Happy Birthday plaque out of gum paste.  It turned out a little sloppy because I had to make it in about 5 minutes.  When I was taking pictures of the finished cake I noticed a "blank" spot to the left of the green vine that screamed to be filled.  I cut out some gum paste using a plaque cutter, drew on Happy Birthday with an edible pen, and stuck on some tiny purple flower.  Done!


So despite how it looks, this was actually a easy cake to make.  Nothing too complicated or involved.


And in case you were wondering, this is what the back of the cake looks like.  On the rear of the crown you can see where I hid the thin wooden skewers I used to support the crown.  This cake had to travel almost 100 miles to the party, so I wanted to make sure the crown didn't fall off.


Happy Decorating,

Carol


Supply List: 

Mona Lisa Fondant
Wilton Tylose Powder
14" Cake Drum
Electric Purple Gel Color
Wilton's Buttercup Yellow Gel Color
Avocado and Leaf Green Gel Colors
Wilton Ribbon Cutter
Green & yYellow Edible Petal Dust
Daisy Plunger Cutter
Wilton Flower Stamens 
Sweet Pea Cutter
Wilton Gum Paste Floral Wire
Plaque Cutter
Edible Pen,
Cake Boss Decorating Tools
Razor Slicer


Saturday, February 23, 2019

Spoon Technique on Cakes

I'm not sure what this technique is called, but I call it the spoon technique.  It is really popular for bridal shower and wedding cakes and it is super easy to do.


You just put a thick coating of buttercream on the cake, and then drag the back of a spoon through the frosting as you spin the cake on a turntable.


Easy, peasy.  The only trick is getting the consistency of the buttercream right.  If the buttercream is too thick and has too many air bubbles, the finished surface looks a little chunky.


Not a huge problem, but to me smoother is better.  Like everything in life it is a delicate balancing act - getting the buttercream soft enough that it is smooth and silky but not too soft that it starts to droop and slide off the cake (been there done that).


But I have found that if you put enough pretty gum paste flower on the cake, no one notices that the buttercream is not quite right.


Happy Decorating,

Carol

Friday, February 22, 2019

Easy Puppy Dog Face Cake

My niece is always asking for cakes for her coworkers, and I'm happy to oblige because I get to try  something from my list of "Want-To-Make" cake designs.  This particular coworker liked dogs so I decided to make her a cute little puppy dog cake.  It was supposed to be a pit bull puppy, but it ended up looking more like a mutt.


<< Disclosure: We are a participant in the Amazon Services LLC Associates Program, an affiliate advertising program designed to provide a means for us to ear fees by linking to Amazon.com and affiliated sites.>>

The first components I made for this cake were the floppy puppy dog ears, the tail, and the paws.  I made these a day in advance so they would have time to dry and harden.  First came the ears.  I sketched a rough pattern and cut out some fondant mixed with Tylose powder.  While still soft, I stuck two long toothpicks into the base, folded the fondant into the floppy ear shape, and then propped the folds with some wadded up plastic wrap so they would keep their shape as they dried.  (Sorry I thought I had a picture, but I can't find it.)


I also made the paws and the tail out of the fondant/Tylose mixture and gave them a day to dry and harden.

On cake construction day I stacked and iced the cake with buttercream, and then started on the collar.  I wasn't sure if the birthday girl's pit bull was a girl or a boy, so I made the collar red.  Plus I had some red Fondarific Fondant so I didn't have to tint anything.  I cut out a 1/2" strip using a Wilton Ribbon/Strip Cutter, and then put a stitch-like pattern on the outer edge of the collar.


Below is the cake with the collar attached.  Sorry for the lumpy looking finish to the cake, but I accidentally added too much milk to my buttercream so it was super, super soft.  I didn't have time to fix the buttercream (add more powder sugar) because I only had about 2 hours to throw this cake together.


For the metal looking pieces for the collar I cut square shapes from white fondant and painted them with edible silver luster dust mixed with vodka.  I was going to write Happy Birthday on the tag, but it didn't dry in time for me to write on it.  Guess I should have done that part the day before to give it time to set.

After the collar I made the puppy's nose.  I used black Fondarific Fondant and modeled it from a sketch of a pit bull.


Next came the jowls and mouth.  I cut out two white fondant circles for the jowls, a smaller circle out of black for the mouth, and an oval out of pink for the tongue.


The eyes were next.  Just circles cut out from fondant.  For the smallest circles I used Wilton icing tips.  I tried making the eyes more oval shape to match the look of a pit bull, but it didn't look very good so I just stuck with the circles.


But before the eyes went on the cake, I rolled out some bluish gray fondant for the puppy's spots.


After the spots were in place, I positioned the eyes.


Next I carefully placed the ears, paws, and tail.  I wan't too pleased with the placement of the paws-- they really are too far apart.  I wanted them positioned closer to the mouth, but I accidentally put the buckle for the collar in the wrong place.  The buckle should have been a little more towards the left ear, and that would have given me more room to tuck the paws on either side of the mouth.  But live and learn.  Not too bad for a quickie, and with all the decorations you can't even see the terrible job I did with smoothing the sides of the cake.


Happy Decorating,

Carol


Supply List: 

Mona Lisa Fondant
Wilton's Sky Blue and Black gel food color
Wilton Tylose Powder
Cake Boss Decorating Tools
Razor Slicer
Square Cookie Cutter Set
Cake Boss Round Cookie Cutter Set
Fondarific Black Fondant
Fondarific Red Fondant
Wilton Ribbon/Strip Cutter