Saturday, November 5, 2016

Mummy Trick-or-Treat Bag - In Cake Form

While trawling the internet for all things cake, I found two interesting techniques I wanted to try, and since I would be experimenting right before Halloween I decided to dress up my “experiments” to look like a Halloween Trick-or-Treat bag...


I think the bag came out cute despite the fact that my two experiments were a flop.<< sad face >>

The first experiment was the Slutty Brownie Cake. What's Cooking Gabby’s Slutty Brownie Cake is amazing – a truly drool worthy cake. The cake is three layers of goodness: one layer is Oreo Cookie Cake, one Chocolate Chip Cookie Cake, and the third is a Brownie. Gabby uses a white cake as the base, and then adds an ingredient to customize each layer.

In the end my Oreo layer was pretty good, but the brownie layer was dense, dry, and not sweet enough. The cookie layer was the worst of the trio – the chocolate chips all settled to the bottom (I should have dusted them with flour first), and it sort-of collapsed on me. Sad looking isn’t it?


The second experiment was building/stacking the cake layers and filling inside a 4” high pan, and then freezing. Once firm you can heat the sides of the pan, and in theory the cake should slide out of the pan with perfectly straight sides and top.


 Umm, No. Didn’t work for me. First off the cake would NOT come out of the pan!! I beat on the top and sides, and warmed the aluminum pan but the cake wouldn't slide out. In desperation I ran a butter knife between the cake and the side of the pan, and the cake finally slid out. And after all that angst I found that the top of the cake was very slanted.

I really don’t know how that happened??? It looked perfectly flat when it was inside the pan, but once it came out it looked like a ski slope. I had some trouble with the center, chocolate chip cookie layer compressing, so maybe that is what caused the slant.

At this point I was shooting 0 for 2. I really didn’t have a good feeling about the taste of my Slutty Brownie Cake, but I decided to decorate it anyway because I needed a centerpiece for the Halloween Party treat table. I didn’t have much time to decorate, so I needed something quick and easy. The day before I had gotten an email from Cake Central showing how to decorate a cutesy Frankenstein Trick-or-Treat bag. I liked the concept but didn’t want to do Frankenstein so I searched the web for other Trick-or-Treat bags and found a cute Mummy bag.

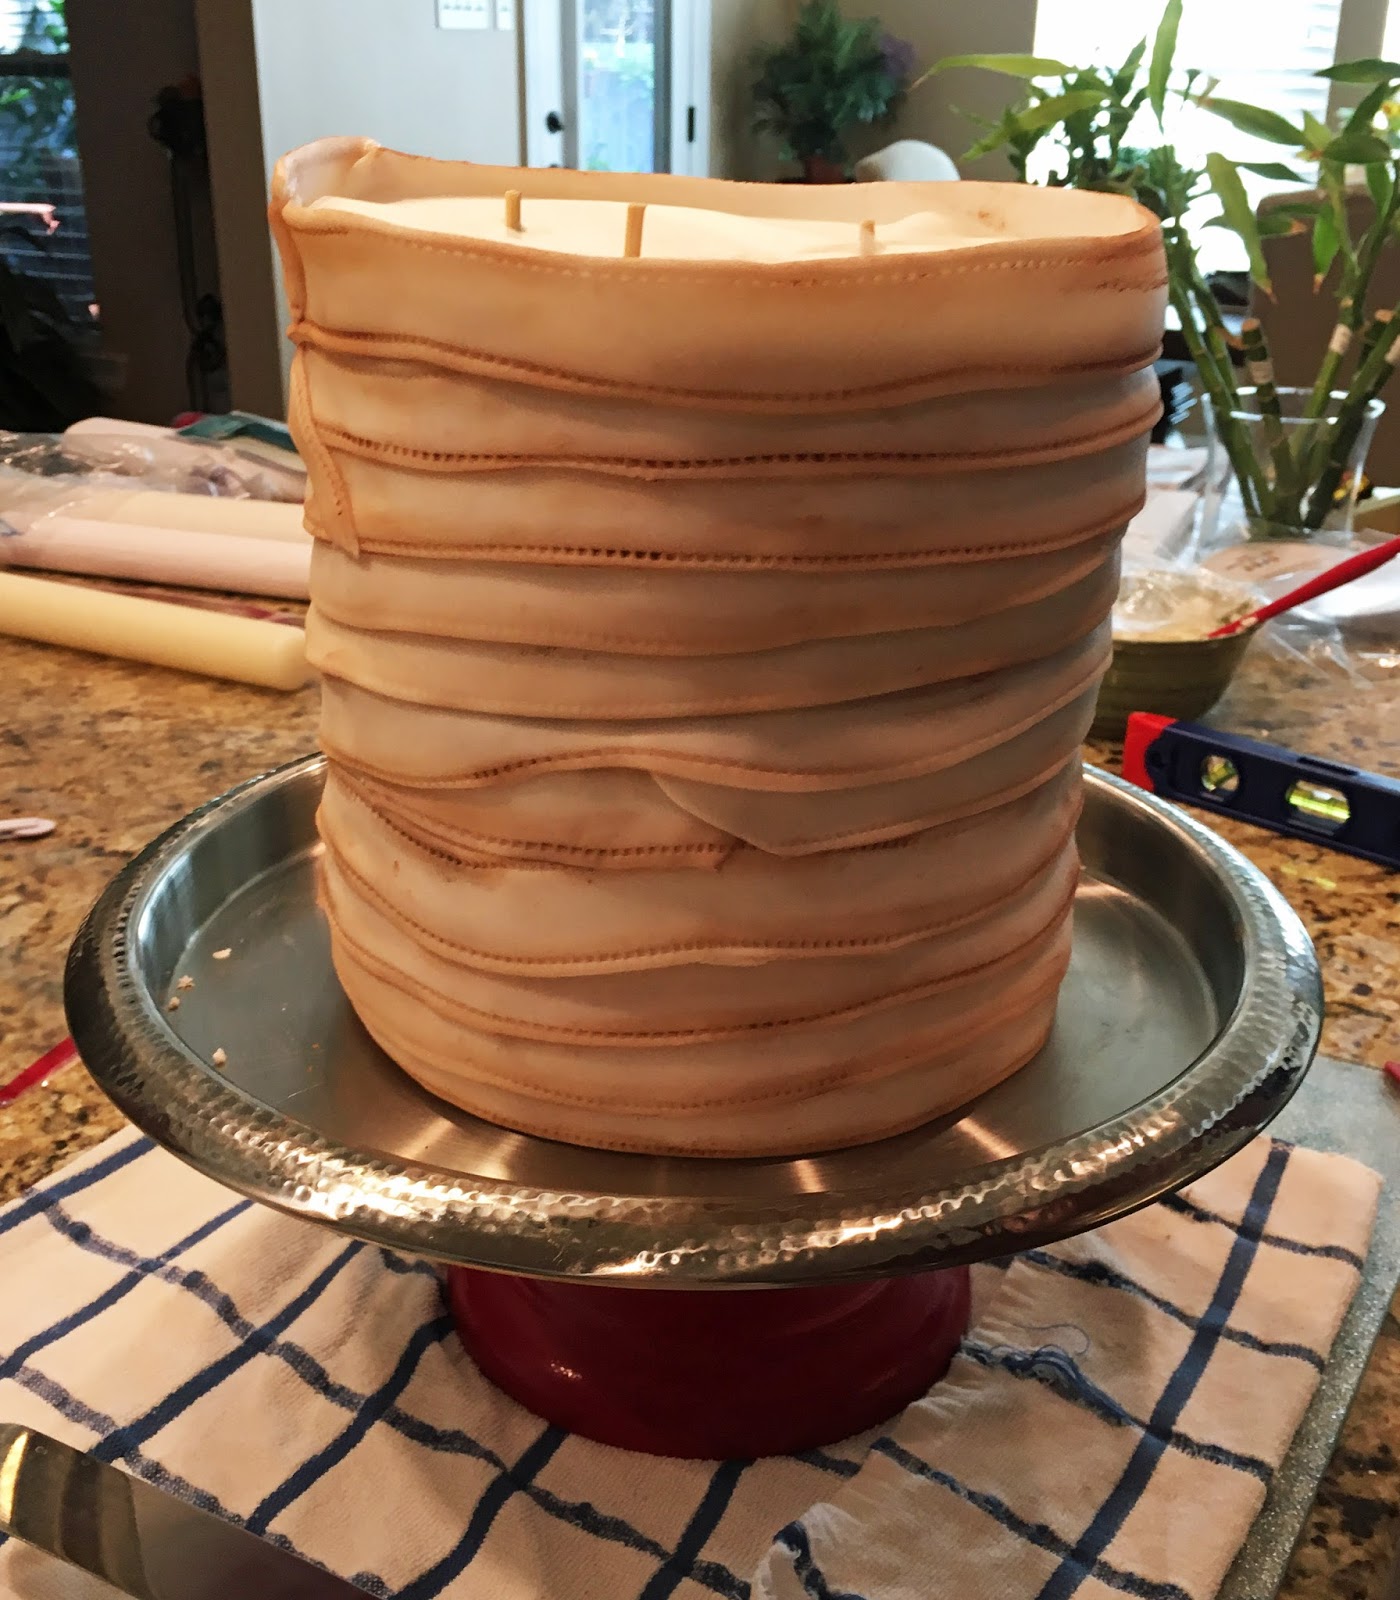
Yes! It was cute and decorating would be quick and easy. To make the bag I needed more height than my 3-layer Slutty Cake gave me, so I added a 4" cake dummy to the bottom of the stack. I rolled out 1 inch strips of fondant, scored the edge of the strips to give it a stitched look, dusted the edges with cocoa power to give it a dirty look, and finally started wrapping the cake. it was so easy. There were no worries about straight sides, flat tops, or bulging middles. Note: I tried dusting with different things (cinnamon, powdered ginger, etc) but the cocoa worked the best.


When I got to the top of the cake I extended the last strips about 1/2 inch above the cake. This accomplished two things 1) it kept the candy from sliding off the top of the cake, and 2) it made it look like the candy was sitting inside the bag.


Next I slapped on some eyes. I just cut out fondant circles and them stretched them into a more oval shape.


Then I added a few shorter strips of fondant to cover the tops of the eyes and make it look like they were peaking out from beneath the strips. I also added some strips to suggest a mouth, and I darkened the inside of the mouth with cocoa to make it stand out even more.  I should have added a nose too, but I didn't think of it till I was at the party.


Last step was the handle for the bag. I used some wire to give the fondant handle some support, and I just kept adding strips on top of the wire till the wire was deeply embedded inside the fondant. Dusted it with cocoa and stuck it through the cake and into the foam cake dummy at the bottom. I know you are not supposed to stick wire in cake (the wire is not food safe), but I figured the cake was not going to get eaten.


The final touch was adding the candy to the top of the Mummy Cake to make it actually look like a Trick-or-Treat Candy Bag, and Voila I had a decorated cake in less than two hours. Boom.


Best part is, a lot of people at the party didn't even realize it was a cake! They just thought it was a Trick-or-Treat bag full of candy. How cool it that!

Happy Decorating,

Carol


Saturday, October 22, 2016

Gold Engagement Cake with Peonies – Edible Gold Paint, Gunging and Easy Ruffled Cake Drum


Disclosure:We are a participant in the Amazon Services LLC Associates Program, an affiliate advertising program designed to provide a means for us to earn fees by linking to Amazon.com and affiliated sites.

I’m just a hobby baker, so this 3-tiered cake was one of my most adventurous so far. It doesn’t look very complicated, but I had a few miss-steps and learned some interesting new techniques along the way.


First off the painting of the tiers…

At first I was going to use gold leaf, but after being told that gold leaf wasn't edible I decided to paint on the gold color.  Next obstacle was deciding on what type of color to use. Who knew there were so many options: pearl, luster and disco dust, gels, and airbrush paint. Then the whole edible vs non-toxic issue came up yet again. I didn’t realize that a lot of the accent stuff that is sold for cake decorating is actually not edible. Some dusts are labeled as non-toxic which essentially means it won’t kill you if you eat it, but it is not designed to be consumed.

So after some searching I finally settled on Edible Hybrid Luster Dust by Chef Alan Tetreault. The Chef Tetreault line has lots of gold colors to choose from, and after much thought I finally settled on Soft Gold.  In the end it turned out a little lighter than I was wanted, but I think it still looked okay.

So  to paint on the gold color I mixed the luster dust with vodka to form a thick paste and just started brushing it on.


I wanted the cake to have broad, uneven brush-strokes (like the example the bride-to-be game me), but it didn’t quite come out that way. The paint ended up looking more uniform than I wanted, but it didn’t look too terrible. (Hey the “customer” was getting it for free so she couldn’t complain.) But it still vexes me why I couldn’t get the look I wanted…maybe my paint wasn’t thick enough??? I may try it again on a dummy cake just to see where I went wrong.  I also used this nifty little measuring tool by Wilton to make sure my painted area stayed the same thickness as I went around the cake.  And my Cake Boss Cake Stand/Turntable is so wide and spacious thanks to a gadget by Innovative Sugarworks that expands my turntable to 20".  Don't you just love cake decorating gadgets??!!


The next next new thing I tried was the gumpaste peonies. This was the first time I tried to make realistic looking gumpaste peonies, and they were actually pretty easy to construct. I used a center Styrofoam ball and just glued a bunch of individual peony petals to it. Not hard, but very time consuming. Sorry, I forgot to take pictures as I was making the flowers, but this is the end product.  I also dusted a little of the dry gold luster on the petals to give them some shine.


Next issue was this horrible, yawning gap that showed up after I stacked the cakes.  The example design the  didn’t have a border to hide this kind of flaw, so I was freaking out.  How was I going to hide the huge gap???!!!


But then I remembered a video I saw on the “gunging” technique. In this technique you beat your fondant with milk and vodka until it forms a paste that has the consistency of beaten egg whites. It takes a lot of beating (10-15 minutes), but in the end you get a soft, putty-like mixture that acts like that silicone filler the construction guys use.


You can pipe the gunge into to gaps and then scrape the access off with a straight edge tool. You can also use the gunge to fix nicks and gouges in your fondant. The gunge saved the cake!!


Before:
 And after:

My next dilemma was the unattractive drum at the base of the cake.  My bottom tier was 12 inches and I planned on using a 12 inch drum that would blend into the bottom tier and make it look taller.  Sadly it didn't turn out that way.  In hindsight I realize that I didn't take into account the added thickness from the ganache on the cake, so the cake drum ended up being a 1/2 inch smaller than the tier above it.  Stupid, stupid, me.

You can also see a bit of a bulge on the bottom tier,  Sigh... Nothing I could do about that at this point. The bulge showed up even before I stacked the cakes, so I guess the white cake recipe I used was too fluffy and delicate to handle the weight of three layers plus all the buttercream, ganache, and fondant.


But back to the ugly cake drum problem.  I couldn't fix the bulge, but I could try and fix the base.  I tried a few things: painting it gold, wrapping a gold ribbon around it, adding a ribbon of white fondant, but nothing looked good.  Then I cut out some 1x1 inch squares of fondant and started filling the gap.  I just keep overlapping the squares and working my way around the cake.  And surprise, surprise, it really looked good. They kind-of resembled fancy pleats!  In fact it looked like I had actually planed it!!  I guess necessity really is the mother of invention.


So in the end it, even with my missteps, the cake didn't turn out too bad.   But I really do apologize for the ugly wooden board under the cake.  It was all I had the the house that was large enough to hold the cake.  I was hoping they would have some decorations at the party that I could use to hide the board, but no such luck.  My cake decorating attempts are always filled with misadventures.


Happy Decorating,

Carol


Sunday, October 16, 2016

Freezing Cakes: Hot, Warm or Room Temperature ???

It seems like an accepted fact that freezing a cake will not harm it; both professional and home bakers agree. In fact some say that the act of freezing (if done properly) may actually improve the taste, texture, and moisture level of said cake.

But controversy swirls around WHEN to freeze the cakes. Should they be frozen when the cakes are piping hot straight out of the oven? Should they be frozen when they are warm to the touch? Or should you wait till they are completely cool before freezing?


There are three divided camps on this issue…


Some people (the NEVER HOT camp) say to NEVER put hot cakes in the freezer. Some of the reasons include:

1) Placing hot foods in the freeze will cause the temperature inside the freeze to rise and cause previously frozen foods to partially thaw. But other people counter and say that modern freezers with their sensors and more efficient motors can handle the temperature fluctuations and adjust the air temperature accordingly.

2) The Never Hot Camp says that freezing hot cakes will trap steam/water inside the cake.  The steam/water will turn into ice crystals which will accelerate freezer burn and cause the cake to have an "off" taste. But other people counter and say that freezer burn does not start to creep into food until they are frozen for 2-3 months.

3) Freezing hot cakes will trap steam in the cake which will change the texture of the cake; causing it to become dense, rubbery, and sometimes even soggy. Other people say that trapping the steam and moisture inside the cake will actually make it moister.

4) By wrapping the hot cakes prior to freezing you are trapping heat inside the cake and allowing the cooking process to continue. Even after it is placed in the freezer it will continue “cooking” until the freeze can lower the core temperature below 140 degrees.


Some people (the WARMER camp) say to let the cakes cool 10-15 minutes and then wrap and freeze.

The WARMER camp is a little wishy-washy and don't really have a list of reasons.


The third and largest camp (the ALWAYS COOL camp) says to freeze the cakes once they are completely cool. The biggest reason why is:

1) Steam should be allowed to escape the cake prior to wrapping and freezing. Cake recipes are tested and tweaked under the assumption that a cake will be cooled to room temperature. The amount of liquid/moisture that goes into the cake/recipe also depends on that assumption. If you wrap a hot cake and freeze it immediately you are therefore trapping moisture/steam into the cake that wasn’t designed to be there. This added moisture might make the cake too moist and in some cases downright soggy.


So who is right? When should cakes be frozen? Hot, Warm, or Room Temperature?

To answer the question for myself I did a little test...

I baked my standard 3-layer white cake (shortening based with no butter) and I wrapped and froze one layer immediately after it came out of the oven. The second layer I de-panned and allowed to cool for 15 minutes before I wrapped and placed it in the freezer. The third layer I allowed to cool for 1-1/2 hours before it was wrapped and placed in the freezer.

The cakes stayed frozen for a week, then I placed them on the counter, and stilled wrapped in plastic wrap and aluminum foil I allowed them to defrost.

First thing I noticed on unwrapping was that the surface of the HOT frozen and WARM frozen cakes were a little sticky. Nothing really bad, but noticeable.

Next I staked the cake, but I didn’t add frosting because I didn’t want the frosting to influence the texture or taste of the cake. I wanted to test them in their naked, unadorned state. The bottom layer is the HOT layer, the center is the WARM layer, and the top is the COOL/Room Temperature layer.


Next I sliced. ( Notice I stuck a toothpick in the bottom/HOT layer?  I had to do this so I could tell which was which! )


Then I tasted.

 Hummmmm...

Surprisingly they looked and tasted EXACTLY the same. The HOT cake might have been a smidgen denser, with a slightly tighter crumb, but nothing too noticeable. And again – they all tasted exactly the same. I had four people sample the individual cake layers and no one noticed a difference.

I was really surprised at the findings, I thought for sure that the HOT frozen cake would taste moister – but not so.

So I guess for this particular cake at least – the timing of when it is frozen does not matter. The bottom line is freeze the cake when it is most convenient to you.


Happy Baking,

Carol