Sunday, June 13, 2021

Toothy T-Rex Dinosaur Cake

Yes SneakyLilHobbit this is my cake!!!

Some dinosaur cakes look cute and cuddly, but some cakes have dinos like this.  Big, scary, with sharp claws and stomping feet.  And look at those teeth!  They are the stuff of nightmares.  Do you somehow get the feeling that glowing, yellow eyes are watching you????  


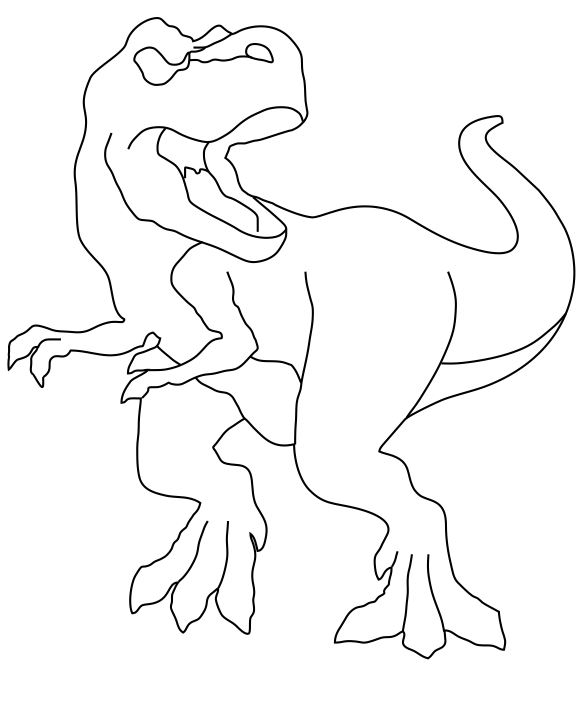
This caking adventure began like most of my recent cakes: with a 3D printer.  I used the printer to make the T-Rex fondant cutter shown below.


<< Disclosure: We are a participant in the Amazon Services LLC Associates Program, an affiliate advertising program designed to provide a means for us to ear fees by linking to Amazon.com and affiliated sites.>>

I have a Creality Ender 3 v2 3D printer and I love it.  Can I say that again - I LOVE IT.  If you want to read an intro into 3D printers for cookie cutters you can read my post HERE.

So the cake began with the large T-Rex that was going to be the focal point of the cake.  I made the cutter about 6-1/2" tall because I was making a two tiered cake, and I wanted the T-Rex to be really BIG.  To make the T-Rex I mixed some green tinted fondant with Tylose powder and rolled it out about 1/8"-1/4" thick. Note: The Tylose (also called Gum-Tex and CMC) makes the fondant harden like gum paste.

This is the line drawing I used to make my cutter.  I use the app Cookie Cad to generate the STL files that then gets sent to the 3D printer.  Again, you can get more info about the 3D printing process HERESorry, I don't sell cookie cutters.  I just make them for myself.


After rolling out the fondant, I used a small impression mat to give the fondant the look of reptilian skin.  I purchased this set of texture mats in the clay section of Michael's or maybe it was Hobby Lobby.  It doesn't look like this set is being sold anymore. This Goosebumps mat might give a similar texture, but not 100% sure.

I used the pebble texture mat to get the reptile skin texture.

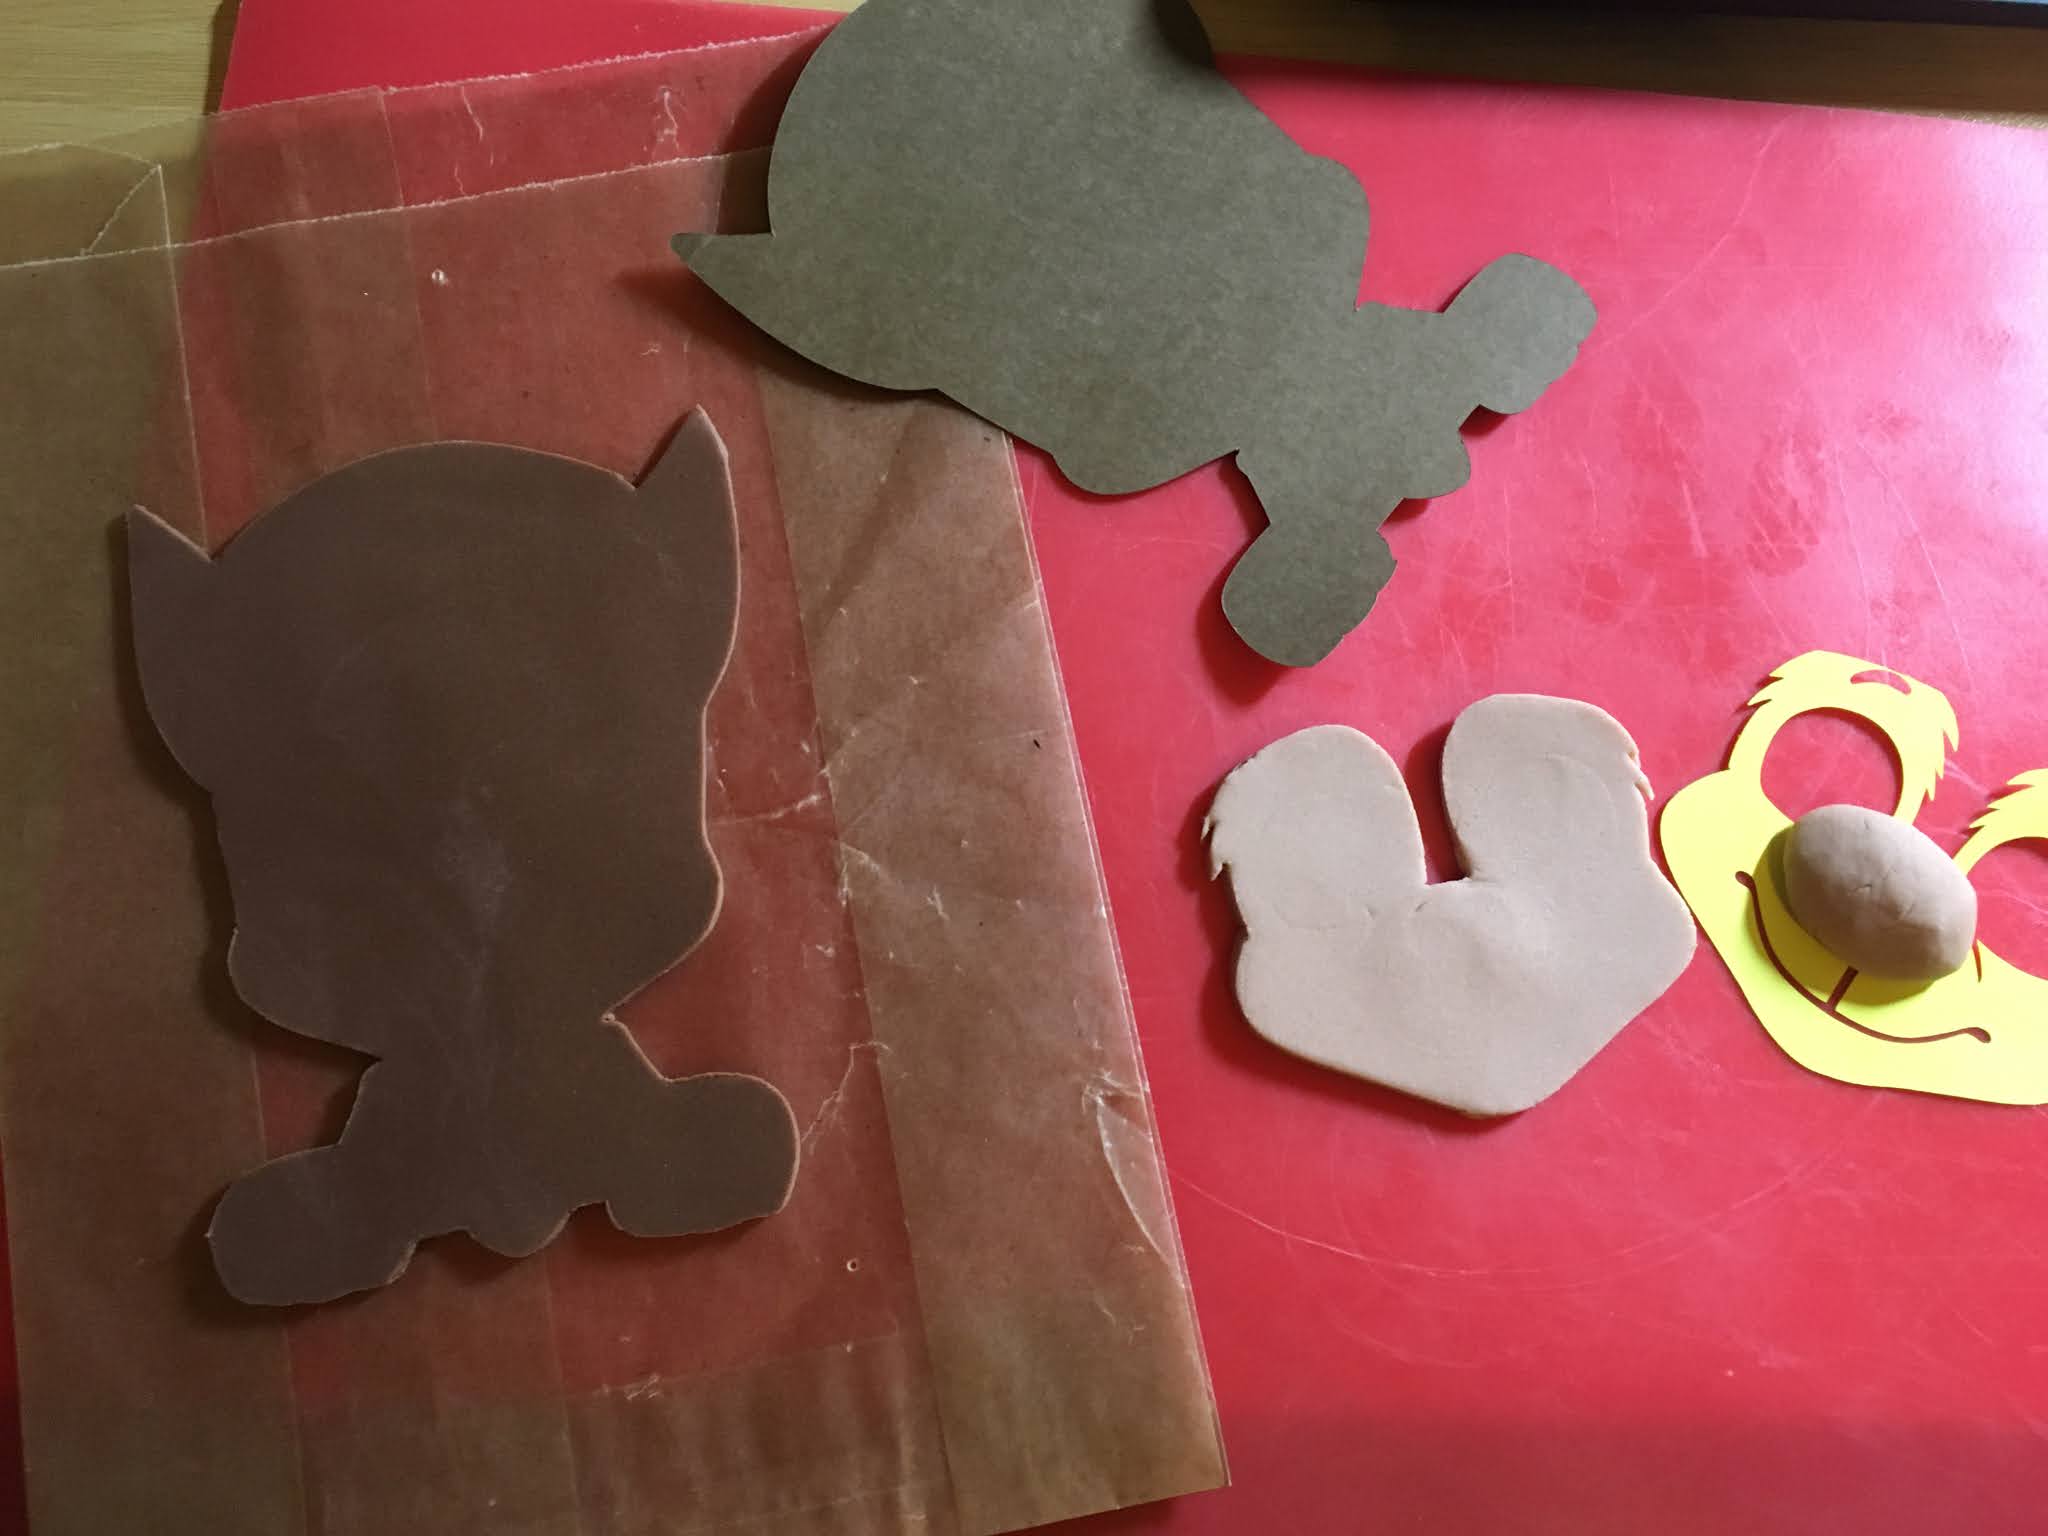
Next I used the cutter to cut out the full T-Rex form.  I dusted the cutter with corn starch to keep the fondant from sticking, and I used a soft paint brush to gently nudge out any sections that stuck. 


Then I used the same cutter to cut out additional body parts that I layered on top of the main body.  I cut the left legs, the arm that is in the foreground, and the head.  For the second head, I also cut out the eye socket, the mouth, and the nostril area before placing the new head on top of the main piece.   For the large left leg, I placed it on top of the main body and then smeared the hip area with the main body till the line separating the two disappeared.  I used the impression mat to touch up any areas where the texture was rubbed away.  I also used a craft knife to cut the line on the belly and chest.  


I decided that I wanted the head to stick out even more, so I cut a third head and put it behind the main body piece. This kind of pushed the head forward.   You can see all the layering here.  For the head area there are three "heads" sandwiched together.  I also put some extra fondant behind the thin right arm to keep it from breaking off the main body.  


Next I did more work on the head.  Inside the cavity I cut for the mouth I added a red piece of fondant for the tongue, some black behind the tongue, and some orange fondant for those flappy parts on the side of the mouth.  (Don't know what they are called.)  In the eye cavity I placed a yellow ball of fondant to form the eye ball.  And note that I pinned the T-Rex to side of a 9" foam cake dummy so it would dry with a curve to match the cake.  I put a piece of parchment paper under the fondant to keep it from sticking to the cake dummy.


Then came the time consuming part: rolling all the teeth and sticking them in place.  I also rolled tiny balls of green fondant and stuck them above the teeth.  I added some black fondant around the eye socket and inside the nose cavity.  I finished off the face with some thin rolls of fondant around the eye and cheek.   The final step was to add color to the T-Rex.  I drew the triangles along his spine with a black edible marker, and dusted the T-Rex with edible petal dust in shades of brown, yellow, orange, and dark green.  Dark green was used to create the shadows, and the yellow for highlights.  Orange and brown for the belly and inside the spine markings. 


In the photo below I tilted the T-Rex so you could see how adding the extra body parts added dimension to the dinosaur.  It is not completely flat like a 2D cookie, but it is not fully rounded like a 3D figure.  I like to call it 2-1/2 D.  It is flat with a a few highs and lows.
 

And here he is - first thing to go on the cake.  But I do wish I had made him a little bit taller.  When I make things ahead of time they are either too big or too small.   And the fondant border around the base of the upper tier was made using a FMM Straight Frill cutter - they come in all shapes and sizes.


Along with the T-Rex I also made some coconut trees.  I did all three ahead of time which gave them time to dry and stiffen.  I don't think coconut trees were around in the Jurassic Period, but I don't think anyone will care.  LOL.  I had planned on putting the name "DUKE" on the cake drum, but it wouldn't fit.  (I should have used a larger drum.)  "DUKE" didn't look good on the flat area between the tiers, so I put it on the top tier.  The letters/name made everything else look a little crowded, but at this point I didn't have any other option.  I also thought the sides of the top tier looked a little sparse.  I tried putting some silhouettes of birds, but it didn't look good.  In the end I just put more clouds.   PS: I made the DUKE letters, the flying dinosaurs, and number 5 topper using fondant cutters I made with the 3D Printer.  


So here is the finished cake.  I have to say it is one of my favorites.


I just love the toothy grin of that T-Rex.

Happy Decorating,

Carol


Wednesday, June 9, 2021

Paw Patrol Cake

Here is a Paw Patrol cake that I made for yet another cousin.  You don't realize how many cousins you have till you start making cakes for everyone!

The dogs are what I like to call 2-1/2 D.  They are not flat like regular 2D, but not fully round like 3D.  They are halfway in between.  

<< Disclosure: We are a participant in the Amazon Services LLC Associates Program, an affiliate advertising program designed to provide a means for us to ear fees by linking to Amazon.com and affiliated sites.>>

To make the dogs I purchased an SGV file from Etsy and cut the pieces using my Cricut Air Explorer 2.  I then used the paper templates to cut out matching fondant pieces.  If you don't have a Cricut you can just cut the pieces with a scissors.  It will take longer, but you can do it with a little time and patience.  


I cut a the base layer of "Chase" out of dark brown fondant.  For the light brown pieces  (paws, face, ears) I textured them with a ball of crumpled up aluminum foil.  Pressing the foil into the soft fondant gives the fondant a hair-like look.  Then once I cut all the fondant pieces I just start layering them on top of each other.  It is a pretty simple process with no artistic talent needed.  It is like putting together a puzzle.  I also kneaded a little Tylose powder to the fondant before rolling out the fondant and cutting it.  The Tylose powder (also called CMC and Gum-Tex) causes the fondant to harden and become stiff. 


Some of the pieces, like the nose and brim of the hat, I made extra thick just to give the dogs that 3D look.  I also set the dogs on the side of a foam cake dummy while they dried.  This gave them a curved shape that matched the cake.   And for a final touch of realism I dabbed a little edible brown petal dust on his face to enhance the shadowed areas.  The brands of petal dust that I use are ColorPop and Roxy & Rich.  Both brands are edible; don't accidently get a brand that is not food safe.  No one will probably eat the hardened fondant dogs, but you never know.  And for a final, final touch of realism I used an edible black marker to add the tiny black whisker marks between his nose and mouth. 


I made all the dogs ahead of time, so when I assembled the cake most of the decorating was already finished.  Here I am making Marshall.  His base is black fondant, with other pieces cut from white, red, and yellow fondant.  For making pieces like this I typically use Wilton or the Hobby Lobby or Michaels store brands.  They are cheap and no one is going to eat them so I don't have to worry about the taste.


For the spots on Marshall's ears I used tiny circle cutters to cut out areas that looked like spots.  I also used the circle cutter to cut the tiny paw prints for the shield. 


Rubble came next...


On assembly day I covered a cake drum with green fondant, and used an alligator impression mat to give it a cool design.  I didn't cover the center of the cake drum with fondant because the cake covered that area and I don't like to waste fondant.


Once the cake drum was ready, I stacked my two cakes onto the drum.  I use Cake Safe acrylic disks to get the sides of my cake straight and the tops flat.  I use Extra Wide Bubble Tea Straws in the bottom tier to support the weight of the top tier.  


Then I cut out the clouds and grass using some cloud shaped cutters.  The clouds on the top were made from Wilton gum paste so they would dry hard and stay in that upright position.  (Don't use Satin Ice gum paste because that stuff never really hardens.) The clouds and grass on the cake itself are fondant, and all where cut using the same cloud cutters.


For the letter/names, I went to the FontMeme.com and printed out the name Myles.  I used the paper template to cut out the individual letters in blue and yellow fondant.

So you see, easy peasy.  Just cut out paper templates, cut the fondant to match the paper templates, and stack the fondant cut outs to form the dogs.   Nothing to it!


Happy Decorating,

Carol


Saturday, June 5, 2021

Baby Jungle Animal Cake

 Here is a simple cake in which the baby jungle animals (lion and giraffe) are made using segmented cookie cutters.  The elephant topper is made front fondant using a YouTube tutorial posted by Cakes by Lynz.


I purchased a 3D printer a few months back, and it has become my favorite cake decorating tool.  You can read more about it HERE.

I made each part of the lion's body a separate cutter so it was just a matter of cutting shapes out in various colors and layering them together.


The giraffe was simpler with only the main cutter and one for the nose area.  The spots were made with tiny circle cutters.


A few leaves and bows, and the cake was complete.  There was also a smash cake in the same theme.  


Happy Decorating,

Carol


Batman and Spider-Man combo cake

 Batman and Spider-Man combo cake.


This week's cake was this relatively easy mashup of Batman and Spider-Man.  The hardest part was making the web which I made using thin strands of black fondant.  I could have piped it using buttercream, but I suck at piping.  The rest of the cake was easy because I went overboard (once again) making fondant/gum paste cutters using my 3D printer.  I made a cutter for everything that needed cutting.  Can you  tell I'm in love with my 3D printer?  You can read about the 3D printer HERE.


I did have one oops with the spider cutter - those spindly little legs of my gum paste spider kept breaking off !  In the end I gave up on the "edible" spider and cut one out of glitter paper using my Cricut.  Cricut, 3D Printer, Air Brush - cake decorators have so many toys.


Happy Decorating,

Carol

Monday, May 31, 2021

Dog Food Bowl Cake

I saw this cake popup on a YouTube channel I watch, and I decided to make one to celebrate my dog's 16th birthday.  Not that she gets to eat this cake.  It is marbled cake with chocolate frosting loaded on top with Whoppers, Milk Duds, and Junior Mints.  Although someone said the "dog food kibbles" looked like cat poop. :-(  What a way to kill my appetite. 


<< Disclosure: We are a participant in the Amazon Services LLC Associates Program, an affiliate advertising program designed to provide a means for us to ear fees by linking to Amazon.com and affiliated sites.>>

For the cake I baked two 8" rounds, and torted each layer so I had 4 layers.  On the top layer I cut out a 5" circle (I should have cut out 6") to form the depression in the dog food bowl.  I then trimmed the top outer edge of the layer to form a rounded curve.  And yes, I ate the scraps.


I applied a layer of chocolate frosting, and smoothed it with acrylic sugar smoother.  After smoothing, I placed the cake in the refrigerator to chill. 


After chilling, I covered the cake in fondant.  I've been using Carma Massa Ticcino fondant, which holds up really well in hot humid environments.  It tastes pretty good too.  But recently I found out the Satin Ice has a high humidity fondant too.  I will have to give it a try. 


I added a pink collar around the base of the cake.  I cut the long strip using a 5-wheel pastry cutter, and I made the buckle with two nested square cutters.  


I later painted the buckle and the tag with edible silver paint.  For the tag I used an octagon cutter.  I used a plaque cutter for the pink name plate, and FMM Tappit Art Deco cutters to the letters.


And the final step was piling the depression with mounds of candy that resembled dog food.  I used Whoppers, Milk Duds, and Junior Mints.  All favorites of mine.

Happy 16th Birthday, Peanut.


Happy Decorating,

Carol

Friday, May 28, 2021

Simple Game Controller Cake

This is a cake I made featuring a game controller on top.  It is a simple design, with the only involved part being the controller - but I cheated and used a mold.


<< Disclosure: We are a participant in the Amazon Services LLC Associates Program, an affiliate advertising program designed to provide a means for us to ear fees by linking to Amazon.com and affiliated sites.>>

I started with the controller.  I found a mold for a controller and used that as my starting point.  I dusted the mold with cornstarch and then pushed Rice Crispy Treats into the mold, making sure to fill all the tiny crevices. (The cornstarch keeps the gooey treats from sticking.)  Then I rolled out black fondant and draped it over the controller formed with the treats. It looked okay, but I didn't think there was enough height and definition in the button areas.  The mold is actually really shallow.

So I used my handy-dandy Creality 3D printer to help with the problem.  I printed some circles and plus symbols to match the size of the original mold, and placed my cutouts into position.  You can see my cutters in this picture - they are blue.  I also used some tiny circle cutters to cut the yellow, blue, green, and red buttons.  If you are intrigued by the use of a 3D printer in cake decorating, check out my post HERE.


I also used the 3D printer to cut the letters and numbers used on the cake.  I know I could just print a paper template and cut the objects from that, but I like the crisp lines that using a fondant cutter gives me.  And I also just love using my printer.  So like I said - a pretty easy cake to make.


Happy Decorating,

Carol

Thursday, May 6, 2021

Baby Brontosaurus Shower Cake

This is a dinosaur cake that I made for my 1st cousin's (once removed) baby shower.  I used her invitation as the inspiration for the cake.


<< Disclosure: We are a participant in the Amazon Services LLC Associates Program, an affiliate advertising program designed to provide a means for us to ear fees by linking to Amazon.com and affiliated sites.>>

The topper was made using my Cricut Air Explorer.  The font I used is called Amarillo which I downloaded from the site DAFont.com.  The letter "O" is a different font, but for the life of me I can't remember the name of the font. I used glitter card stock for the front and dark brown card stock for the back.  I stuck the two together using an adhesive dot runner (don't get the glue runner, get the dot runner), and to finish it off I hot glued an 8" long 3mm thick acrylic rod to the back.  Easy Peasy, and it only cost about $1.50 to make.

The cookies were made to match the cute little baby brontosaurus on the invitation my cousin sent me.  I made a cookie cutter using my Ender 3 Pro 3D printer.   I can't tell you how much I love this 3D printer.  I seem to use it with every cake I make.  I'm serious, really, every cake.  I have a blog post HERE if you want to read more about 3D printers.

For my cookies I use glaze instead of royal icing (I think it just tastes better). I used Wilton Leaf Green food gel with a little Ivory for the body, and ivory for the tummy and spots on the back.


I also used edible marker to make the eyes, mouth, and outline the spots and the body.


For the flowers I used a Peony petal and leaf cutter, and for the tiny roses and leaves I used a silicone mold that came with a unicorn set.   The drip was made using Merckens Super White coating wafers mixed with a 3:1 ratio of heavy whipping cream.  I used to use the Wilton brand, but no one seems to have them anymore.  I tinted the drip using the Wilton Leaf Green and Ivory to match the glaze on the dinosaurs.

So here is the finished cake.  It was actually pretty easy to make.


Happy Decorating,

Carol

Sunday, April 18, 2021

You Are My Sunshine - Sunflower Baby Shower Cake

What could be cuter than a sunflower themed baby shower???  And best of all it was EASY to make...


<< Disclosure: We are a participant in the Amazon Services LLC Associates Program, an affiliate advertising program designed to provide a means for us to ear fees by linking to Amazon.com and affiliated sites.>>

I made some sunflowers using a simple Daisy Cutter and gum paste tinted a pale Golden Yellow.  The center of the flower is just a blob of brown gum paste that I poked with a ball tool and a straight pin.  I dried the flower on crumpled parchment paper to give them motion and shape.  I also dusted the petals and center of flower with orange, brown, and black petal dust to make them look a little more life like.


I also made cupcakes and decorated them with a gum paste daisies I made from a silicone mold.   Here are the cupcakes and cake at the party.  It was a very nice day (except for the drenching rain).


Anyone for chocolate cake??


Happy Decorating,

Carol